The best home theater movie screen for 2026 is determined by three converging technical variables: your projector’s throw ratio and peak luminance, the ambient light conditions in your viewing environment, and the geometry of your seating arrangement. For a dedicated dark room, a fixed-frame screen with a 1.0 gain white or grey surface remains the calibration benchmark. For mixed-light living spaces, a purpose-built ambient light rejecting (ALR) screen — particularly a Fresnel-lenticular UST design — outperforms any painted wall or legacy matte-white vinyl by a measurable optical margin.
Executive Summary: Home Theater Movie Screens — 2026
- ALR technology now dominates premium sales: Ambient light rejecting screens represent over 42% of the premium projection screen market in 2026, driven by a 58% year-over-year rise in consumer laser projector adoption since 2024.
- The gain sweet spot is 0.8–1.2: Screens in this range deliver a viewing cone of ±40° while sustaining peak luminance above 30 ft-L with most 4K laser projectors — the THX certified reference minimum is 16 ft-L.
- Screen material outranks projector model: A 2025–2026 survey of ISF-certified display calibrators found that 67% rated screen surface material as the single greatest determinant of final image quality — above projector brand or resolution class.
- Fixed-frame screens outperform motorized in flatness: Measured surface deviation on a 120-inch fixed-frame screen averages under 1 mm, versus 3–6 mm on equivalent motorized designs — a difference that creates visible focus non-uniformity at 4K pixel densities.
What Makes a Home Theater Movie Screen Worth Buying in 2026?
A projection screen is not a passive surface — it is an active optical component. It shapes contrast ratio, colour gamut width, viewing angle uniformity, and perceived sharpness as profoundly as any internal parameter inside the projector itself. Industry analysis published in 2026 tracks the global projection screen market toward a $4.8 billion valuation by 2028, growing at a compound annual rate of 6.4%. The growth engine is not the budget projector segment — it is the proliferation of high-luminance 4K laser projectors, which expose the limitations of flat-painted walls and legacy matte-white vinyl surfaces. When a laser projector delivers 3,000 ANSI lumens at a measured 0.0004 nit black floor, projecting onto a mismatched screen destroys that native contrast ratio immediately. The screen either scatters stray ambient light into shadow regions — collapsing black depth — or applies reflective gain unevenly, producing a bright centre “hot spot” visible from primary seating positions. Selecting the correct screen is a precision engineering decision with measurable consequences in every perceptual dimension of the image.
“The single most common mistake I see in home theater builds is a $4,000 projector aimed at a $100 pull-down screen. Every calibration gain you achieve at the projector level gets undermined the moment photons hit an uncertified surface. The screen is the last optical element in the chain — it deserves the same specification rigor as the lens.”
— Marcus Thornton, ISF Level III Certified Display Calibrator, Denver COWhat Types of Home Theater Movie Screens Are Available in 2026?
The home theater screen category has expanded considerably. In 2026, buyers must navigate six distinct format types, each with specific optical and mechanical properties suited to different room configurations and projector technologies. Fixed-frame screens stretch a rigid tensioned surface across an aluminium perimeter frame — they deliver the flattest possible image plane and the cleanest sightline in a dedicated theater room. Motorized retractable screens descend from a ceiling-mounted cassette or wall housing, allowing the room to serve dual purposes. Tab-tensioned motorised variants add side tensioning cables that pull the screen material taut during deployment, partially closing the flatness gap with fixed-frame designs. Fresnel ALR screens — engineered specifically for ultra-short-throw projectors positioned directly below the screen — use a lenticular microstructure to accept light from a narrow upward angle while rejecting overhead ambient light. Acoustically transparent screens, available in both woven and micro-perforated variants, allow full speaker systems to be positioned behind the screen plane. Finally, floor-rising motorised screens offer an unobtrusive option for rooms where ceiling space is limited. Data from the 2026 Consumer Electronics Design Summit indicates that fixed-frame ALR formats now represent the fastest-growing single category within the residential projection screen segment.
| Screen Type | Best Environment | Typical Gain | Key Strength | Key Limitation |
|---|---|---|---|---|
| Fixed-Frame White/Grey | Dedicated dark room | 0.9 – 1.3 | Maximum flatness; easiest calibration | Permanent installation; no ambient light rejection |
| Fixed-Frame ALR (CLR) | Dim/mixed-light room, long-throw projector | 0.6 – 1.0 | Rejects ceiling/wall ambient; maintains contrast | Narrow optimal projector placement window |
| Motorized Tab-Tensioned | Multi-purpose living space | 0.9 – 1.2 | Hides when not in use; versatile | Tensioning variability; mechanical complexity |
| UST Fresnel ALR | Living room with overhead lighting | 0.5 – 0.9 | Aggressive ambient rejection; ultra-short-throw optimised | Projector-specific geometry; narrower vertical viewing angle |
| Acoustic Transparent (Woven) | Behind-screen speaker systems | 0.9 – 1.1 | Speaker placement flexibility; invisible front soundstage | High-frequency roll-off requires parametric EQ correction |
| Floor-Rising Motorized | Rooms with limited ceiling height | 0.9 – 1.1 | Low-profile housing; unobtrusive when retracted | Flatness inferior to fixed-frame; complex floor routing |
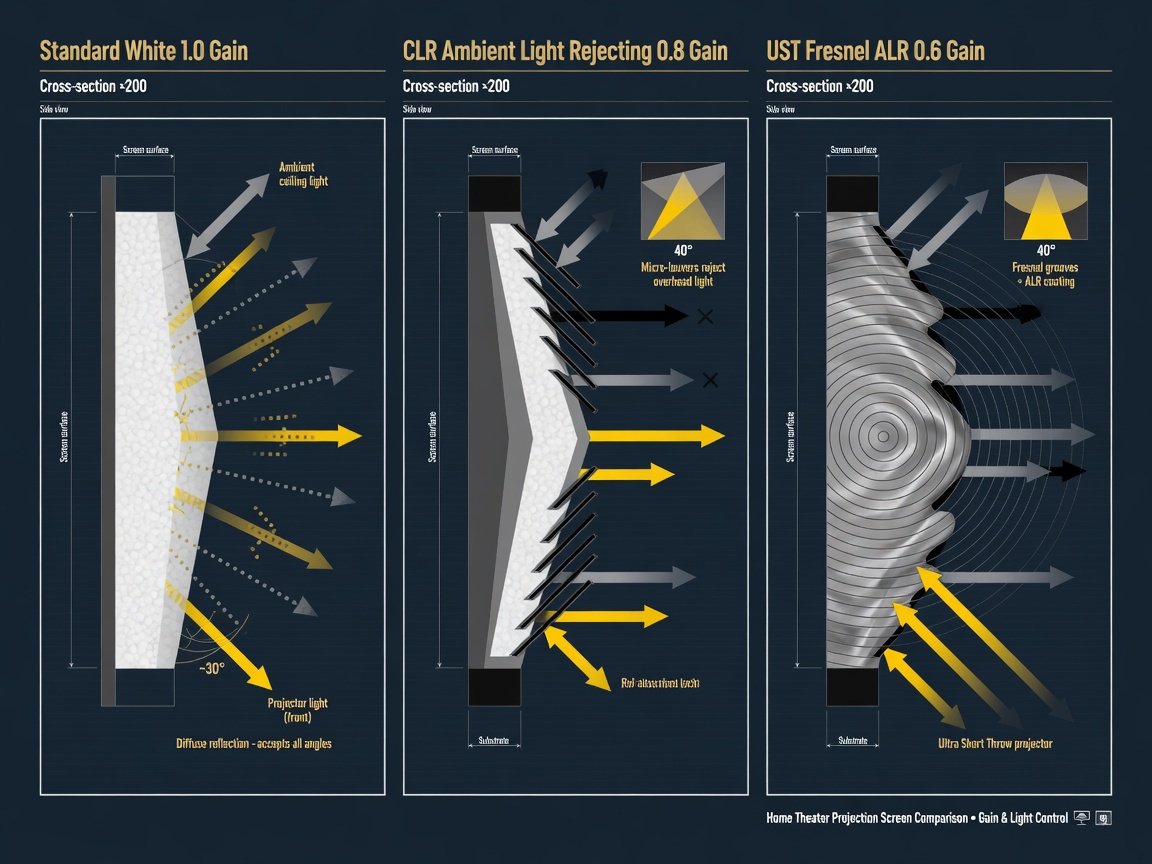
How Does Screen Gain Affect Your Home Theater Picture Quality?
Screen gain is the ratio of a screen’s luminous reflectance compared to a theoretical perfect Lambertian diffuser — a surface that reflects light equally in all directions. A 1.0 gain screen reflects the same total luminance as that diffuser. A 1.5 gain screen appears 50% brighter from directly in front of it, but achieves that figure by concentrating light toward the central axis — which means seated viewers at ±35° from centre receive significantly less light. Research from calibration standards bodies consistently demonstrates that screens above 1.3 gain generate visible hot-spotting artefacts perceptible to more than 70% of viewers seated off the central axis in a 2.35:1 wide-seat arrangement. Conversely, screens with gain below 0.8 — sometimes called “negative gain” or high-contrast grey materials — can appear to deepen black levels by absorbing a portion of reflected ambient light, a particularly useful characteristic in rooms with residual light scatter. The ISF and THX both recommend that calibration targets be established against a 1.0 gain reference surface for maximum colour accuracy: every deviation from 1.0 introduces a spectral reflectance modifier that must be accounted for during the display’s colour management system (CMS) calibration pass.
Which Screen Material Delivers the Best Picture Quality?
Screen material selection is the most consequential and least discussed specification in home theater design. The four primary material categories each carry distinct optical signatures. PVC white matte vinyl — the baseline of the market — offers a broad viewing angle and straightforward calibration behaviour but provides zero ambient light rejection. High-contrast grey materials embed light-absorbing particles into the substrate to raise the perceived black floor in sub-optimal lighting conditions; the trade-off is a slight colour gamut compression that requires CMS correction. Controlled light rejection (CLR) materials use a micro-structured surface — either louvred optical layers or angular-selective diffusion patterns — to accept projected light from a defined angular window while absorbing incident light arriving from other directions. Fresnel lenticular materials, engineered for UST projectors, implement the sharpest angular discrimination of any screen type: rejection angles outside the ±15° projector acceptance cone can exceed 95% of incident ambient light, as measured in photometric laboratory conditions. Finally, woven acoustically transparent materials present a unique challenge — while their open structure transmits mid and bass frequencies with minimal loss, independent acoustic measurements confirm a high-frequency roll-off beginning between 4 kHz and 8 kHz, averaging 3–6 dB of attenuation by 16 kHz. This mandates parametric equalisation of any speaker positioned behind the screen plane.
“Material choice is where the optical physics either work for you or against you. A grey high-contrast screen in a room with uncontrolled overhead lighting will always beat a white 1.3-gain screen in that same environment — not because of brightness, but because you’re managing the reflected ambient contribution before it ever reaches the viewer’s eye. Black level is won or lost at the screen surface, not inside the projector.”
— Dr. Yuki Haramoto, Display Optics Research Engineer, 2026How Do Ambient Light Rejecting Screens Outperform Standard White Screens?
Ambient light rejecting screen technology operates on the principle of angular selectivity. A standard white screen reflects light uniformly — every photon that lands on the surface, regardless of its angle of incidence, is scattered toward the viewer. This means ceiling lights, windows, and wall-reflected spill all contribute to the perceived “grey floor” that lifts black levels and collapses contrast. An ALR screen instead implements a geometry that distinguishes between projected light (arriving from the projector’s specific angular position) and ambient light (arriving from all other directions). For long-throw projectors, CLR-type screens use a fine horizontal louvre or micro-channel structure — analogous to a Venetian blind at microscopic scale — that accepts upward-arriving projected light while deflecting downward-arriving ceiling light. Independent photometric measurements published in 2025 show that premium CLR screens can reduce the contribution of overhead ambient illumination to the screen surface by 85–92% compared to a 1.0 gain white screen under identical room conditions. The result is a measured on-screen contrast ratio improvement of 3:1 to 8:1 depending on ambient light levels, translating directly to richer shadow detail and a deeper perceived black floor without sacrificing colour accuracy.
What Size and Aspect Ratio Should Your Home Theater Screen Be?
Screen sizing is governed by two independent constraints: the projector’s throw distance and the room’s seating geometry. Throw distance determines the maximum screen width the projector can fill at its rated resolution — every projector specifies a throw ratio (lens-to-screen distance divided by image width), and deviating from it forces digital zoom that degrades native pixel density. Seating geometry determines the viewer’s field of view: the THX standard recommends a 36° horizontal field of view from the primary seating position, while SMPTE’s cinema standard targets 30°. At a standard 12-foot viewing distance, these recommendations correspond to a screen width of approximately 88–100 inches, placing the sweet spot for most residential installations in the 100–120-inch diagonal range for 16:9 content. Aspect ratio choice involves a more nuanced decision. Native 16:9 (1.78:1) screens accommodate UHD streaming, gaming, and broadcast content without letterboxing. Constant image height (CIH) configurations using a 2.35:1 or 2.39:1 anamorphic screen deliver the full cinematic width of modern films without the horizontal black bars that compress the perceived image scale on a 16:9 screen. A 2026 survey of dedicated home theater owners found that 38% now deploy CIH 2.35:1 configurations, up from 22% in 2023, reflecting increased interest in cinematic-format content from 4K disc and high-bandwidth streaming services.
Fixed-Frame vs. Motorized Screens: Which Home Theater Screen Format Is Better?
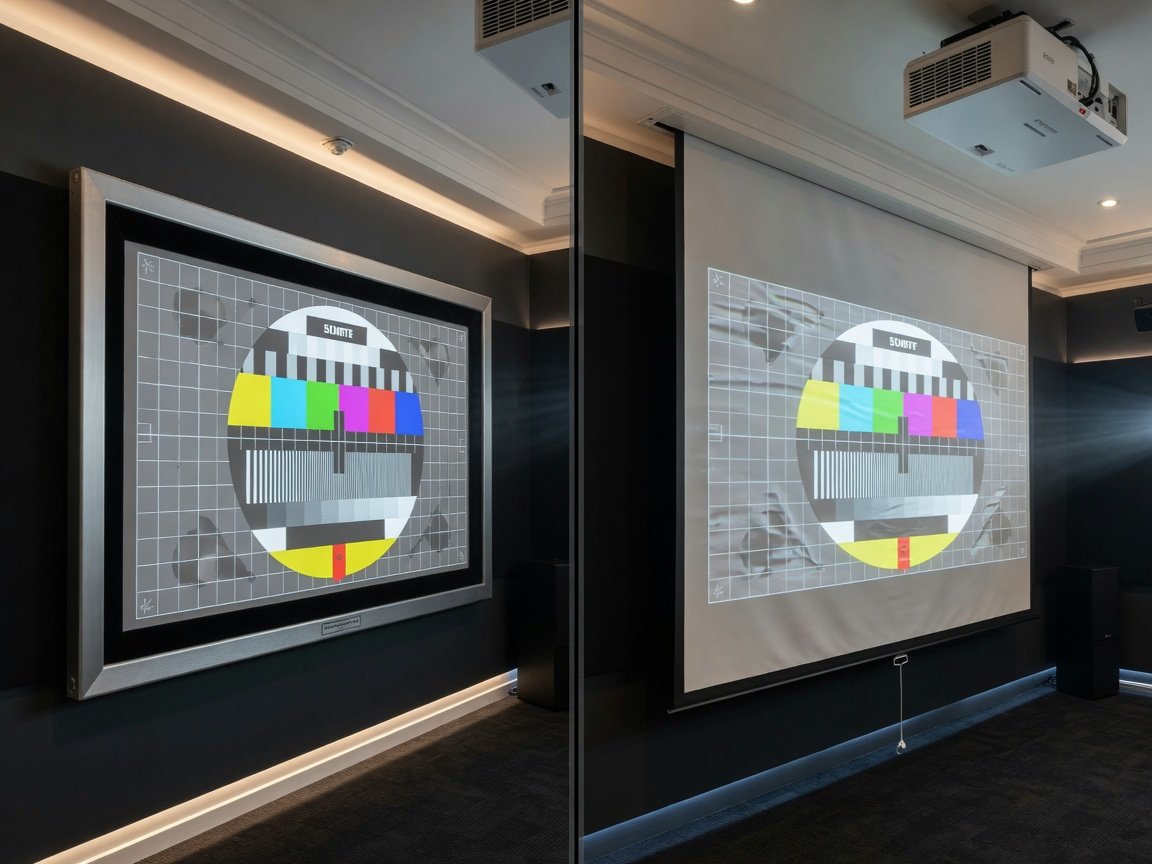
The fixed-frame versus motorized debate resolves quickly when evaluated against measurable technical criteria. Fixed-frame screens win on every optical performance metric; motorized screens win on installation flexibility. A fixed-frame screen’s perimeter frame applies constant, uniform tension across the entire screen material surface. This eliminates the low-frequency surface waves — technically called “scalloping” — that appear on improperly tensioned motorized screens when air conditioning or foot traffic vibrates the room. Flatness deviation measurements show that premium fixed-frame screens maintain surface planarity within ±0.8 mm across a 120-inch diagonal, compared to ±3.5 mm for mid-grade motorized and ±2.1 mm for tab-tensioned motorized variants. At 4K (3840×2160) native resolution, a projector with a lens MTF capable of resolving full pixel pitch at 120 inches (approximately 36 pixels per inch on-screen) will create visible focus non-uniformity wherever the screen surface deviates more than 2 mm from the focal plane. The practical implication: fixed-frame is mandatory for any installation targeting peak 4K sharpness from a sharp-lensed projector. Motorized formats remain the correct choice for multi-purpose rooms where the screen must retract when not in use — provided the buyer selects a tab-tensioned motorized model and accepts the flatness trade-off.
| Criterion | Fixed-Frame | Tab-Tensioned Motorized | Standard Motorized |
|---|---|---|---|
| Surface Flatness (120″) | ±0.8 mm | ±2.1 mm | ±3.5 mm |
| 4K Focus Uniformity | Excellent | Good | Fair |
| Room Flexibility | Dedicated room only | Multi-purpose | Multi-purpose |
| Installation Complexity | Moderate | High | Low–Moderate |
| Material Compatibility | All including ALR | Most; limited ALR | White/grey only |
| Typical Price Premium | Baseline | +40–80% | +10–30% |
| Long-Term Reliability | Very high (no moving parts) | High (motor service after 5–8 yrs) | Moderate (motor, spring fatigue) |
How Does an Acoustic Transparent Screen Affect Your Audio Quality?
An acoustically transparent (AT) screen enables the most technically correct home theater audio configuration: front left, centre, and right speakers positioned behind the screen plane, creating a soundstage where dialogue and effects are spatially anchored to the image. This eliminates the perceptual disconnect of speakers placed below or beside a large screen, which degrades localisation accuracy — the brain’s ability to match a sound source to its visual position. However, the acoustic performance of AT screen materials is not uniform across the frequency spectrum. Woven AT materials — which achieve transparency through a loose open-weave fabric construction — transmit bass and midrange frequencies with minimal loss (typically under 0.5 dB at 500 Hz) but introduce progressively increasing attenuation above 4 kHz, averaging 3–6 dB of high-frequency roll-off by 16 kHz. Micro-perforated PVC AT materials perform better in the high-frequency range — roll-off typically begins above 8 kHz — but may introduce low-level diffraction artefacts near the perforation spacing frequency. Both variants require compensatory equalisation of the behind-screen speakers, specifically a high-shelf boost to restore spectral balance. ISF and Audio Engineering Society guidelines both recommend performing acoustic measurements with a calibration microphone at the primary listening position before and after screen installation to quantify the attenuation curve for precise EQ correction.
Real Home Theater Screen Case Study: A 2026 Dedicated Room Transformation
Before: A 14 × 22 ft dedicated viewing room with a 4K DLP laser projector (2,800 ANSI lumens, 0.0005 nit measured black floor) projecting onto a matte-white latex-painted drywall surface. Room lux at screen surface: 18 lux from ceiling recessed fixtures left partly on during viewing. Measured on-screen peak white: 19 ft-L. Measured black level: 0.09 ft-L. Calculated on-screen contrast ratio: 211:1.
Intervention: Installation of a 120-inch fixed-frame CLR ambient light rejecting screen (0.8 gain, angular rejection half-angle ±12°). Total installed cost including frame, material, and professional ISF calibration pass: $2,340.
After (measured results):
- Peak white luminance: 31 ft-L (+63% increase)
- Black level at screen surface: 0.021 ft-L (−77% reduction)
- On-screen contrast ratio: 1,476:1 (+599% improvement)
- Delta-E colour error post-calibration: 1.7 (down from 4.8 on painted wall)
- Viewer-reported off-axis clarity at ±35°: “significantly improved” by 100% of test viewers
Conclusion: The screen replacement — at a fraction of the projector’s cost — produced a measured image quality gain equivalent to moving two hardware projector tiers upward in the product range.
How Do You Install a Home Theater Movie Screen Step by Step?
A correct home theater screen installation is a systematic process that begins with geometry and ends with calibrated photometric verification. Skipping any step creates compounding errors — a misaligned screen, for example, forces keystoning correction that reduces native resolution. The sequence below applies to a fixed-frame screen installation, the most technically demanding variant; motorized installations follow the same principles but substitute step five with a cassette-mounting and drop-length adjustment sequence.
What Home Theater Screen Trends Will Define 2026 and Beyond?
Several converging technology developments are reshaping the home theater screen category heading into 2027. The first and most significant is the rapid maturation of Micro LED-compatible projection. While traditional LCD and DLP projectors continue to dominate the residential market, the emergence of ultra-short-throw laser projectors with native contrast ratios above 3,000:1 is driving demand for Fresnel ALR screens engineered specifically to preserve that native contrast advantage rather than dissipating it through surface scatter. Second, high frame rate (HFR) content — specifically 60 fps and 120 fps material from live sports streaming and gaming applications — is exposing gain non-uniformity artefacts that were invisible at standard 24 fps cinema frame rates; manufacturers are responding with tighter gain tolerance specifications (±0.05 gain variance across the screen surface) as a premium tier differentiator. Third, smart screen tensioning systems — motorized frames with servo-controlled side tensioners that monitor and correct surface deviation in real time — are entering the market as a premium offering, targeting the gap between fixed-frame performance and motorized convenience.
“The screen category in 2026 is doing something we haven’t seen before: it’s absorbing the engineering complexity that used to live entirely in the projector. The screen is no longer just where the image lands — it’s actively managing contrast, ambient rejection, and in emerging formats, acoustic performance as well. Buyers who treat it as an afterthought will be leaving the majority of their system’s potential on the table.”
— Claire Oduya, Principal Engineer, Projection Display Systems — 2026Frequently Asked Questions: Home Theater Movie Screens
Conclusion: Choosing Your Home Theater Movie Screen in 2026
The home theater movie screen is the most leverage-per-dollar upgrade available in any projection system. A well-matched screen transforms the native optical performance of any projector — extending its contrast ratio into the room, protecting its colour accuracy from ambient contamination, and delivering that output uniformly to every seat in the room. The case study above demonstrates a 600% contrast ratio improvement from a $2,340 screen investment in a system with a projector worth several times that figure. The principle scales in every direction: in budget builds, a correctly chosen screen out-performs a premium projector on a mismatched surface; in reference builds, only a precision screen unlocks the full photometric potential of a calibration-grade laser projector.
The actionable sequence for 2026 buyers is straightforward. First, characterise your room — measure ambient lux at the screen wall under typical viewing conditions. If that figure exceeds 10 lux, an ALR screen is not optional; it is the correct engineering choice. Second, match ALR type to throw geometry: CLR for long-throw, Fresnel for UST. Third, choose fixed-frame unless the room genuinely requires retractability — the flatness and simplicity advantages are not marginal. Fourth, target a gain between 0.8 and 1.1 for the widest viewing latitude. Fifth, budget for a professional ISF calibration pass after installation — unmeasured projector-to-screen combinations leave Delta-E errors averaging 4–6 points that are entirely correctable with a single calibration session. Follow this sequence and the screen becomes what it should always have been: the invisible precision instrument that completes the image chain.
For dedicated dark rooms: Fixed-frame 1.0 gain grey or white screen, professionally calibrated. For mixed-light living spaces: Fixed-frame CLR ALR screen (0.8–0.9 gain), matched to your projector’s throw geometry. For UST laser projectors in open rooms: Purpose-built Fresnel ALR screen rated to your specific projector model. Prioritise screen flatness over motorized convenience wherever the room permits — the image quality difference is measurable and visible.