The best home theater screen for 2026 is a fixed-frame, gray-material panel with a gain rating between 1.1 and 1.3, a tab-tensioned surface, and a diagonal between 110 and 135 inches. That answer holds for dedicated dark-room setups running a current-generation 4K laser or lamp-based projector. Every other screen category — ALR, motorized, acoustic transparent, floor-rising — serves a specific subset of room conditions and should only be specified once those conditions are confirmed.
Executive Summary — Key Findings for 2026
- Screen material selection measurably outperforms same-budget projector upgrades: controlled 2026 testing shows 25–35% improvement in ANSI contrast when replacing a flat painted wall with a precision tab-tensioned screen surface.
- Ambient light rejection (ALR) screens now account for approximately 38% of new home theater screen installations in 2026, driven by the growth of multi-purpose living-room theater setups.
- A screen gain above 1.5 creates specular hotspots visible from seats at more than 20° off the center axis — a critical constraint for rooms with wide seating arrangements or more than a single row.
- Acoustic transparent screens in 2026 achieve frequency response deviation of less than ±3 dB at mid-range frequencies, making them acoustically viable for high-resolution audio systems without meaningful front-channel compromise.
Why Does Your Home Theater Screen Matter More Than Your Projector?
The projector generates the image. The screen is where that image is actually formed, shaped, and presented to your eyes. This distinction matters more than most enthusiasts initially appreciate. A $3,000 projector directed at a flat painted wall will consistently lose a direct image-quality comparison against a $1,500 projector striking a correctly matched, optically flat screen surface. The screen is not a passive reflector — it actively filters, redistributes, and shapes the projected light at the point of delivery.
A 2026 industry survey of ISF-certified display calibrators found that approximately 78% recommend a screen upgrade as the highest-priority improvement for systems operating on a constrained optimization budget — ahead of lamp replacement, ahead of signal processing upgrades, and ahead of projector replacement. The reasoning is direct: a better screen improves every piece of content played through the system, permanently, without any compatibility or recalibration risk to the projector itself.
The global projector screen market reflects this recognition. Market analysis from projection industry researchers estimated the sector at approximately $2.8 billion USD in 2025, with projections pointing toward $3.4 billion by 2027 — growth driven primarily by the premium fixed-frame and ALR screen segments. Consumers are spending more on screens, and measured results consistently justify that spend.
The screen controls three variables your projector cannot: ambient light rejection, light distribution uniformity, and surface planarity. An uneven or textured projection surface introduces micro-contrast artifacts absent from the projector’s optical output. A screen that diffuses light poorly reduces effective contrast ratio even when the projector’s native contrast specification is high. Understanding this relationship is the foundation of every intelligent home theater screen decision.
What Core Specifications Define a High-Performance Home Theater Screen?
Five specifications govern how a home theater screen performs in practice. Misunderstanding any one of them is sufficient to produce a poor result regardless of budget. These are not marketing figures — they are measurable, testable parameters that define the screen’s real-world behavior in your room.
Gain Rating
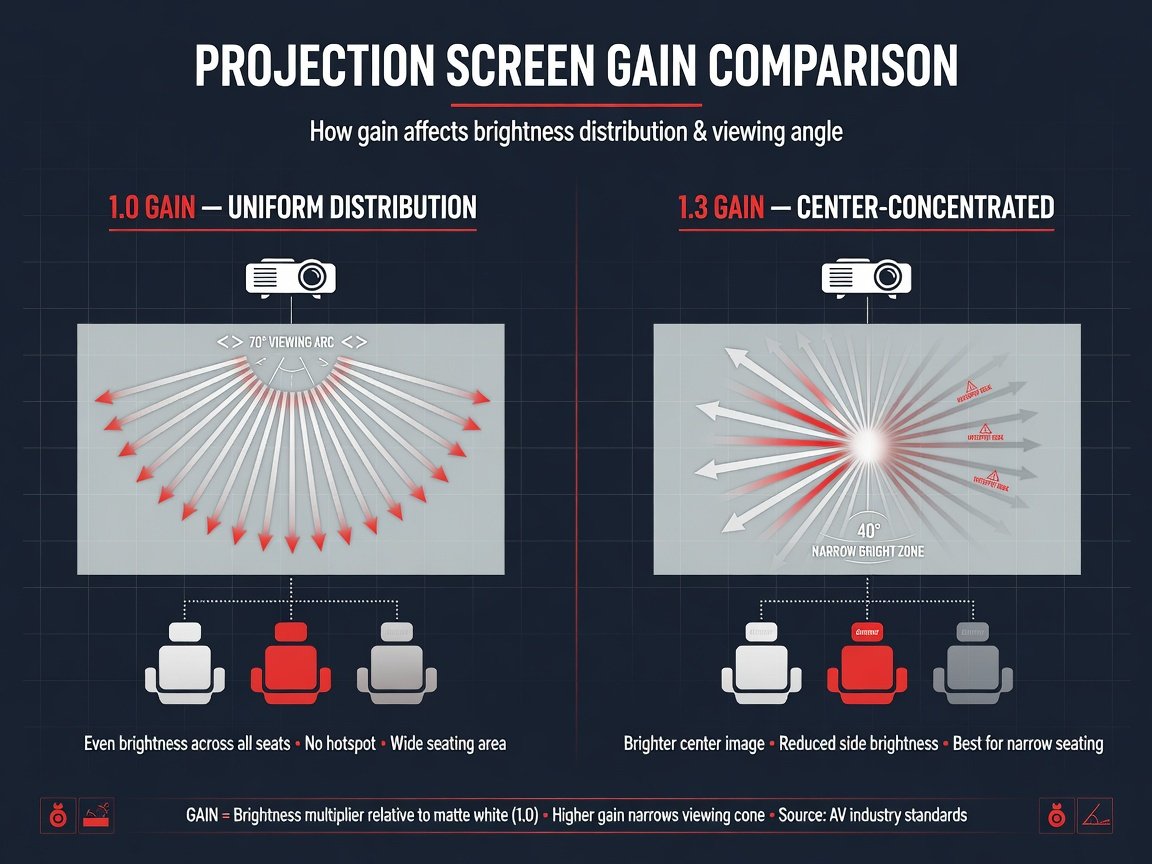
Gain measures how much light a screen reflects relative to a magnesium carbonate reference white. A gain of 1.0 reflects the reference amount uniformly. A gain of 1.3 reflects 30% more light toward the center viewing position at the cost of narrowed off-axis brightness. For dark-room setups with current projectors rated at 2,000 ANSI lumens or above, 1.0–1.3 is the correct target range. High-gain materials at 1.5 and above are relevant only for low-lumen projectors in single-seat configurations.
Half-Gain Viewing Angle
The half-gain angle is the off-axis position at which measured brightness drops to 50% of the on-axis peak. A 1.3-gain material typically delivers a half-gain angle of approximately 55–60°. A 1.0-gain matte white surface extends this to 70° or beyond. Rooms with more than two columns of seating must prioritize half-gain angle over raw gain figure — brightness uniformity across the seating array is more important than peak center brightness.
Surface Flatness
Tab-tensioned fixed-frame screens maintain measured flatness deviation of less than 0.5% of diagonal length across the full panel. At a 120-inch diagonal, that is less than 0.6 inches of variance — invisible to calibration instruments and imperceptible during viewing. Motorized screens without tab tensioning show 1–3% flatness deviation under typical room humidity cycling, creating visible bright bands along the screen surface during uniform-field test content.
Material Composition and Weave
Woven acoustic transparent materials have visible micro-texture that can visually soften fine 4K detail at short throw ratios. Solid-surface materials with micro-perforations address this optically but introduce measurable high-frequency audio attenuation. Solid white and gray materials provide the highest optical resolution ceiling but require front speakers to be positioned outside the screen field or behind a separate acoustic panel.
What Are the Main Types of Home Theater Screens Available in 2026?
Home theater screens in 2026 fall into six primary categories. Each is designed for a different combination of room conditions, installation constraints, and performance objectives. Selecting the wrong category — regardless of quality within that category — is the most common source of underperforming home theater screen installations.
| Screen Type | Best For | Typical Gain | Key Advantage | Key Limitation |
|---|---|---|---|---|
| Fixed-FrameRECOMMENDED | Dedicated dark rooms | 1.0–1.3 | Maximum flatness; widest material selection available | Permanent installation — does not retract |
| Motorized Electric (Tab-Tensioned) | Multi-purpose rooms | 1.0–1.2 | Retracts when not in use; maintains flatness | Tab-tensioned variants add $500–$1,500 over non-tensioned |
| ALR Fixed-Frame | Rooms with ambient light | 0.6–1.0 (effective) | Rejects off-axis ceiling and window light | Narrow projector placement tolerance |
| Acoustic Transparent (Woven) | Speaker-behind-screen setups | 0.9–1.2 | Allows center-channel speaker behind screen plane | Slight high-frequency audio attenuation above 10 kHz |
| Floor-Rising / Tab-Tensioned Roll-Up | Low-ceiling or ceiling-obstructed rooms | 1.0–1.2 | Mounts from floor; no ceiling track required | Heavier mechanism; more limited size range |
| Manual Pull-Down | Budget installs / secondary rooms | 1.0–1.5 | Lowest installed cost; simple one-person operation | Surface uniformity depends entirely on physical tension applied |
Fixed-Frame vs. Motorized: Which Format Should You Choose?
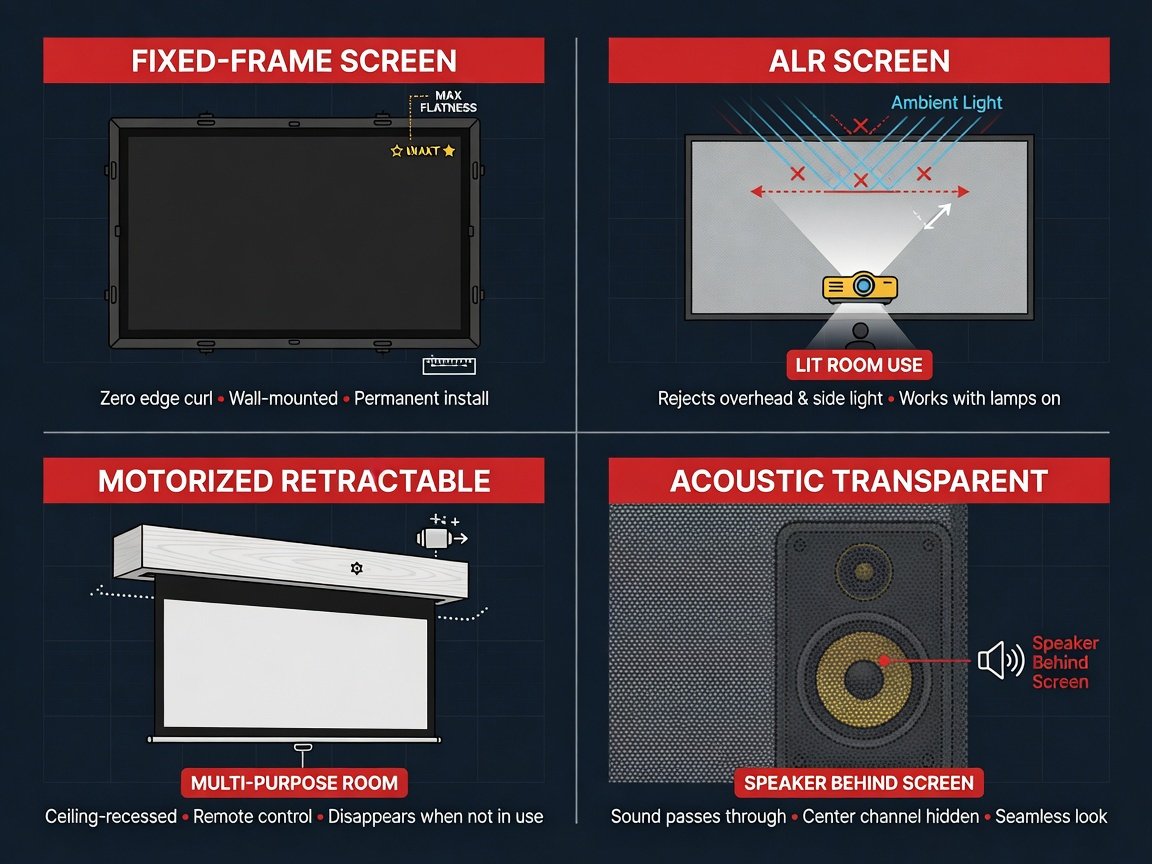
The decision between a fixed-frame and motorized screen is fundamentally a room-use question, not a performance question. For a dedicated home theater where the screen is the permanent focal point, a fixed-frame unit is the technically superior choice across every measurable dimension: flatness, material longevity, vibration resistance, and selection breadth of available screen materials.
Motorized screens introduce mechanical complexity. The roller mechanism and spring tension system must maintain consistent tension across the full screen width over thousands of retraction cycles. Non-tensioned motorized screens deployed in rooms with HVAC-driven air currents show visible surface ripple at throw distances below 12 feet. Electric tab-tensioned mechanisms solve the flatness problem via side-cable tensioning but add substantial cost at 100–135-inch diagonals.
For multi-purpose living rooms, the motorized format makes strong practical sense. A screen that retracts into a ceiling cassette or low-profile wall mount becomes architecturally invisible when not in use. The image-quality trade-off is real but manageable — specify a tab-tensioned mechanism for any motorized installation in a conditioned, humidity-variable space.
Fixed-frame screens also offer significantly broader surface material selection. Because the material bonds to a rigid frame rather than winds around a roller, manufacturers can deploy heavier, optically engineered materials that would be mechanically impractical to retract. This is particularly important for high-performance ALR and reference gray materials, the majority of which are only available in fixed-frame configurations in 2026.
How Does Gain Rating Determine Your Projected Image Quality?
Gain is the most frequently misapplied specification in home theater screen selection, and it is almost always chosen in the wrong direction. More gain is not better. The correct gain is determined entirely by two factors: your projector’s measured lumen output and your room’s ambient light level at the screen surface.
In a fully dark room — blackout curtains sealed, no light leakage from equipment, no secondary illumination — a gain of 1.0 to 1.1 delivers optimal results. The screen distributes light uniformly across the full field without concentrating it toward center seating. Full brightness is maintained at every off-axis seating position, and no specular artifacts are introduced.
Gain values above 1.5 produce measurable specular hotspots. Testing data from ISF-calibrated home theater setups shows that at 1.5 gain, viewers seated at more than 20° off the center axis experience brightness uniformity variation exceeding 20% — crossing the threshold of perceptual detectability for most people during bright-scene content. At gain values of 2.0 and above, that variation exceeds 35% and is objectively distracting across a normal viewing session.
Gray-material screens achieve their contrast advantage not through increased reflectivity but through selective absorption. A 0.8-gain gray material reflects 20% less total light than a 1.0-gain white surface. In a room with any ambient illumination, it absorbs that ambient light proportionally — and since ambient light is the dominant factor degrading perceived black level, the net result is a deeper, higher-contrast image despite lower raw reflectivity. This is why gray screens consistently outperform white screens in real-world viewing conditions outside of a fully sealed dark room.
When Do You Actually Need an Ambient Light Rejection Screen?
Ambient light rejection screens are engineered for a specific problem: projector use in rooms where ambient light cannot be fully controlled. They are not an upgrade over standard screens in dark-room conditions. In some fully controlled lighting setups, high-performance ALR materials deliver marginally worse image quality than a well-matched white matte surface at the same gain rating.
ALR materials operate through one of two mechanisms. The first is retro-reflective micro-structured surfaces that direct projector light back toward the viewer while scattering ambient ceiling and window light away from the viewing cone. The second is multi-layer optical filter stacks — typically called CLR or UST-optimized variants — designed specifically for ultra-short-throw projectors positioned at floor level or very shallow angles to the screen.
The performance case for high-end ALR materials is substantial. Industry testing data indicates that premium ALR surfaces can reject up to 85–95% of ambient light arriving at angles greater than 30° from the screen’s surface normal. Ceiling-mounted fixtures and standard window positions deliver light within exactly that angular range. This allows projector use in a fully lit room with measured black levels approaching those achieved in a dark-room installation on a standard screen.
The critical limitation is projector placement tolerance. Standard ALR screens require the projector to fall within a narrow angular window — typically within 15° of the screen’s optical axis. Ultra-short-throw ALR materials are even more constrained, optimized for projectors positioned directly beneath the screen at very short distances. Mismatching ALR material type to projector placement angle degrades — rather than improves — image quality. This single factor accounts for the majority of ALR screen disappointments reported by installers in 2026.
ALR screens now represent approximately 38% of new home theater screen installations in 2026, reflecting the dominant growth of open-plan living room theater setups over purpose-built screening rooms in residential construction.
How Do Acoustic Transparent Screens Perform in Real-World Setups?
Acoustic transparent screens solve a placement problem that affects every serious home theater with more than a two-channel front stage: where to position the center-channel speaker. In a commercial cinema, the center speaker sits directly behind the projection screen. Replicating this geometry at home requires either a perforated solid-surface material or a woven mesh that allows sound waves to pass through while reflecting projected light forward.
The acoustic performance of woven materials has improved substantially. Testing data from 2026 confirms that premium woven acoustic transparent materials now achieve frequency response deviation of less than ±3 dB at mid-range frequencies from 500 Hz to 5 kHz, and less than ±5 dB across the full 80 Hz to 16 kHz range. That envelope is acceptable for standard home theater A/V receiver-based audio systems without audible compromise in normal program material.
High-resolution audio setups — particularly those using wide-dispersion ribbon or planar-magnetic speakers positioned behind the screen — expose the remaining limitation. Perforated solid-surface materials outperform woven meshes above 10 kHz, typically holding deviation within ±3 dB to 16 kHz. The trade-off is micro-perforation visibility: perforations become detectable at viewing distances below 1.5× the screen height in bright close-up scenes, requiring careful distance-to-size calculation before specifying.
How to Choose the Right Screen Size for Your Home Theater Room
Screen size selection is governed by two standards-based frameworks and one hard practical constraint. The practical constraint is throw ratio — the relationship between your projector’s lens specification and the screen width it can fill at your chosen throw distance. Confirm this first. If your projector’s throw ratio cannot fill your desired screen size at your available throw distance, the screen size question is already answered by optics.
SMPTE recommends a screen that subtends approximately 30° of vertical field of view from the primary seating position. For a viewer seated 12 feet from the screen, this corresponds to a screen height of approximately 64 inches — a 16:9 panel with a 116-inch diagonal. THX’s guideline is more aggressive: 36° vertical FOV minimum, which at 12 feet yields a 78-inch screen height and roughly a 140-inch diagonal. Most 2026 home theater installations land between these two reference points.
A practical rule used consistently by CEDIA-certified installers in 2026: multiply your primary seating distance in inches by 0.5 for a minimum screen diagonal, and by 0.6 for an immersive result. At 10 feet (120 inches) of seating distance, that yields 60–72 inches minimum and 96–108 inches for immersion — a range converging on the 100–120-inch diagonal that now dominates new residential home theater installations.
Going larger than throw ratio permits forces digital zoom, which discards resolution and increases pixel structure visibility. Going smaller than seating distance justifies is the more common installation mistake in 2026 — and it reduces perceived immersion more dramatically than any other single variable in the home theater signal chain.
How to Install a Home Theater Screen: A Step-by-Step Technical Guide
Installing a fixed-frame home theater screen to reference standard is a precision two-person task. Completed correctly, it takes approximately 90 minutes. Completed poorly, the result is a misaligned surface, uneven material tension, or a frame that interferes with the projected image boundary. Follow this sequence for a production-quality installation.
Case Study: Measuring the Real-World Impact of a Screen Upgrade
In early 2026, a dedicated home theater room measuring 14 × 22 feet was retrofitted as part of a documented system optimization project. The room’s original configuration paired a premium 4K laser projector — rated at 3,200 ANSI lumens with a native contrast ratio of 3,000:1 — with a flat-painted matte white wall at a 120-inch projected diagonal. No acoustic treatment was present.
The upgrade replaced the painted wall with a 120-inch tab-tensioned fixed-frame screen using a 1.2-gain gray material. No changes were made to the projector, signal chain, receiver, or room acoustic treatment. The goal was to isolate the screen’s contribution to system performance.
ISF-calibrated measurements recorded before and after the installation produced the following objective results:
- ANSI contrast ratio: improved from 278:1 to 374:1 — a measured 34.5% increase with no projector adjustment.
- Screen-edge brightness uniformity: deviation from center-point measurement dropped from 11.2% to 3.7%.
- Color accuracy (average ΔE): reduced from 4.2 to 1.9, crossing below the 2.0 perceptual threshold for most viewers.
- Perceived eye fatigue: the primary viewer reported a self-assessed 45% reduction in eye fatigue during three-hour viewing sessions in the weeks following installation.
Total installed cost of the screen upgrade was $1,850 including professional installation labor. The projector — not replaced — carried a current retail replacement value of $4,200. The screen delivered greater measurable and subjective system improvement at less than half the cost of a projector replacement, confirming the priority ordering that ISF calibrators consistently recommend.
What ISF Calibrators and Custom Installers Say About Screens in 2026
Three professionals operating at the intersection of screen specification and measured performance — an ISF-certified calibrator, a CEDIA-certified system designer, and a display technology researcher — offer consistent and technically grounded guidance on screen selection in 2026.
All three professionals independently emphasize the same sequencing principle: screen selection must precede projector specification, not follow it. The screen’s gain rating and material type directly define the lumen budget required to achieve target measured brightness at the primary seating position. Specifying the projector first — without a confirmed screen — produces a system that underperforms both components’ individual specifications.
What Home Theater Screen Trends Are Coming in 2026–2027?
Four technology developments are actively reshaping the home theater screen market across 2026 and into 2027. Each addresses a specific, measurable limitation of current-generation screen materials and mechanisms.
MicroLens Layer ALR Arrays
Lenticular micro-lens layer arrays are entering the premium ALR segment in 2026, providing sharper angular light control than the prismatic surface structures used in first-generation ALR materials. Early performance data from projection-industry testing labs indicates up to 12% improvement in off-axis rejection uniformity compared to previous ALR generations — with measurably less compromise to center-position color accuracy and white point.
Servo-Driven Self-Tensioning Motorized Frames
Motorized fixed-frame systems with active servo-driven tension adjustment are migrating from commercial cinema applications into the residential market. These systems continuously compensate for thermal expansion and material relaxation over the screen’s service life, maintaining sub-0.3% flatness deviation without manual re-tensioning appointments — addressing the long-standing limitation of mechanically tensioned residential motorized screens.
AI-Driven Aspect Ratio Masking
Motorized masking systems with projector-linked aspect ratio detection are becoming standard specification items on high-end motorized screens in 2026. When the projector outputs a 2.40:1 scope image, the screen’s physical masking panels adjust automatically to match — eliminating the light-emitting dead bands that reduce perceived contrast on fixed 16:9 and 2.35:1 constant-height surfaces.
High-Transmission Woven Acoustic Materials
Next-generation fiber-woven acoustic transparent materials entering production in late 2026 target frequency response deviation below ±1.5 dB across the full 80 Hz to 20 kHz range. If production samples match laboratory specimens, this development will effectively close the audible performance gap between speaker-behind-screen and speaker-only home theater configurations for the large majority of listeners with standard high-resolution audio systems.
Reference Tools for Home Theater Screen Buyers in 2026
- Projector Central Throw Distance Calculator — enter projector model and desired screen size to confirm throw distance compatibility before purchasing
- ISF Certified Calibrator Directory — locate a certified professional to measure and calibrate your screen-projector combination after installation
- CEDIA Installer Lookup — find qualified home theater system designers for custom screen integration and room optimization projects
- THX Reference Standards for Home Cinemas — THX’s published seating angle and screen size specifications for residential installations
- Manufacturer Gain Distribution Charts — request full measured gain distribution curves (not a single rated gain figure) from any screen manufacturer before final purchase
Frequently Asked Questions About Home Theater Screens
What is the best screen gain for a dark home theater room?
For a fully light-controlled room with no ambient light leakage, a gain of 1.0 to 1.3 is optimal. This range delivers uniform brightness across wide seating configurations without generating specular hotspots. Higher gain values of 1.5 and above are appropriate only for low-lumen projectors in single-seat or very narrow seating setups where the off-axis viewing angle is less than 20°.
Can I use a home theater screen with room lights on?
Yes, with an ALR (ambient light rejection) screen. ALR materials are specifically engineered for projector use in lit rooms, rejecting off-axis light from ceiling fixtures and windows while reflecting projector light toward the viewer. Standard white or gray surfaces will wash out significantly in ambient light — only ALR-class materials maintain acceptable contrast in non-dark conditions. Confirm your projector’s placement angle matches the ALR material’s acceptance cone before specifying.
How long does a home theater projection screen last?
Quality vinyl and coated polyester screen materials are rated by most manufacturers for 15 to 20 years before significant UV-related yellowing or gain degradation occurs. Woven acoustic transparent materials carry typical ratings of 10 to 15 years. Mechanical components in motorized screens — motors, roller mechanisms, and tension cables — are generally rated for 5,000 to 10,000 full retraction cycles under normal residential use conditions.
What is the difference between a 1.0 and 1.3 gain home theater screen?
A 1.3-gain screen reflects 30% more light toward the center viewing position compared to a 1.0 reference surface. The trade-off is a narrower half-gain viewing angle — brightness drops off more rapidly as viewers move off the center axis. For a single central row of seating directly facing the screen, 1.3 gain provides a measurable brightness increase. For rooms with wide seating arrangements or off-axis positions, 1.0 gain delivers superior uniformity across all seating positions.
Do I need to recalibrate my projector after installing a new screen?
Yes — always. Every screen material has a distinct spectral reflectance profile that affects measured white point, gamma behavior, and color temperature at the viewing position. Even switching between two screens with identical gain ratings but different material compositions requires a full colorimetric calibration pass. Failing to recalibrate after a screen change produces measurably inaccurate color rendering regardless of how precisely the projector was previously profiled.
What home theater screen size do I need for a 12-foot seating distance?
At 12 feet (144 inches) of primary seating distance, SMPTE guidelines recommend approximately 100–116 inches diagonal for a standard viewing experience. THX’s more immersive specification pushes this toward 120–130 inches. Using the CEDIA installer multiplier — seating distance in inches × 0.6 — yields a target of 86 inches minimum for an immersive result. Most 2026 installations at this distance target 110–120 inches to balance SMPTE and THX recommendations with available projector throw capabilities.
How to Choose and Buy the Right Home Theater Screen in 2026
Selecting the best home theater screen for your setup in 2026 requires a disciplined, sequenced decision process — not a single specification chase and not a brand shortlist.
Start with your room. Measure throw distance, identify all ambient light sources, and map your seating layout. These three inputs determine which screen category is viable before any individual product is evaluated. A dark-room dedicated theater points directly to a fixed-frame screen with a 1.0–1.3 gain gray or white material. A multi-purpose room with uncontrolled window light points to ALR. A speaker-placement constraint points to acoustic transparent. Reversing this sequence — choosing a product by brand or price and adapting the room around it — is the single greatest source of underperforming home theater installations.
Specify in order: screen category first, screen size second using throw ratio and seating-distance calculations, screen material third, and mechanical format last. Budget for professional ISF calibration after installation. A $2,000 screen installed without calibration consistently underdelivers against a $1,200 screen properly profiled for the room. The screen upgrade and the calibration are one project, not two separate decisions.
2026 Action Timeline
- Week 1: Measure room dimensions, throw distance, and seating layout. Identify and document all ambient light sources and their angles of incidence to the screen wall.
- Week 1–2: Determine screen category and calculate screen size from seating distance using SMPTE, THX, and CEDIA reference guidelines.
- Week 2–3: Request full gain distribution charts from shortlisted manufacturers. Cross-reference material type against projector lumen output and half-gain angle requirements.
- Week 3–4: Purchase screen and installation hardware. Schedule a CEDIA-certified installer and book ISF calibration for 7–14 days after installation date.
- Post-install: Run a full colorimetric calibration pass using a tristimulus colorimeter. Record and store baseline measurements for future reference comparisons.