A home theater system set up follows a defined sequence: room selection, display installation, speaker placement, wiring, calibration, and acoustic treatment. This practical guide covers every technical stage of a thorough home theater setup, with exact measurements and configuration targets, so your system delivers cinema-grade performance from day one.
Executive Summary
- A correctly configured 7.2.4 Dolby Atmos system running through a calibrated AV receiver produces measurably flatter frequency response than any premium soundbar — typically within ±3 dB from 40 Hz to 16 kHz after automated room correction.
What Equipment Do You Actually Need for a Home Theater System Set Up?
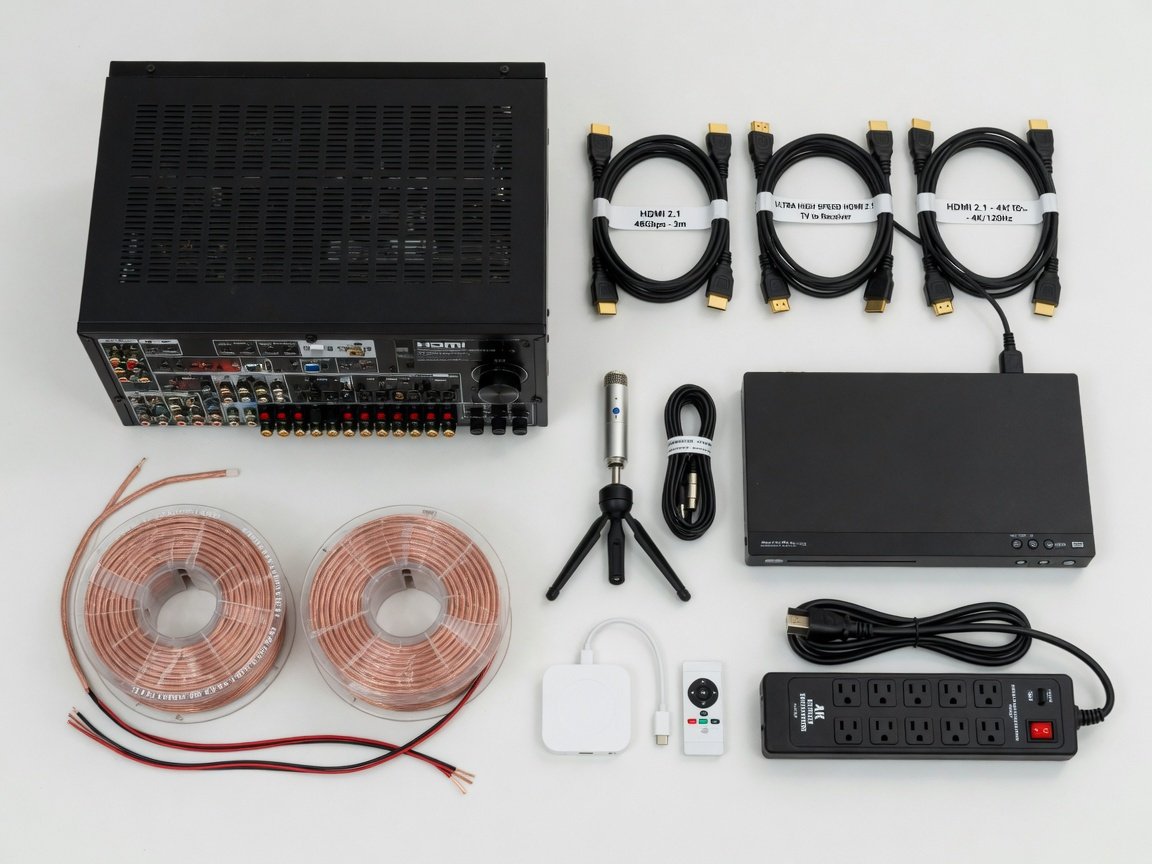
Building a functional home theater requires five core component categories: a display (television or projector with screen), an AV receiver or pre-amplifier/processor, a speaker system, source devices, and cabling. Each category has a minimum performance threshold below which the overall system underperforms regardless of what else you buy. Identifying those thresholds before purchase prevents the most common mistake in home theater planning — spending heavily in one area while leaving critical gaps in another.
For the display, a 4K panel with HDR10 support is the 2026 baseline. OLED and QD-OLED panels deliver the best native contrast for dark-room viewing. High-brightness Mini-LED LCD panels suit rooms with ambient light, particularly those rated above 1,500 nits peak HDR output. Laser projectors using solid-state light engines have crossed the $2,500 threshold for native 4K resolution, making large-screen projection increasingly practical for dedicated rooms. The recommended minimum screen size for genuine cinematic immersion is 100 inches diagonal from a projector or 75 inches diagonal from a flat panel at standard home theater viewing distances.
The AV receiver anchors the entire system. In 2026, any receiver you purchase should support HDMI 2.1 (48 Gbps bandwidth), Dolby Atmos, DTS:X, and eARC. A minimum of seven amplification channels handles a 5.1.2 Atmos layout. Nine channels unlocks a full 7.1.2 or 5.1.4 configuration. Subwoofer output should include two independent LFE ports to support a dual-subwoofer configuration, which significantly reduces bass nulls across multiple seating positions. A calibration microphone — either bundled with the receiver or purchased separately — is not optional. It is the instrument that makes the rest of the equipment perform correctly in your specific room.
Speaker selection should prioritize tonal consistency across the entire array. Matching front left, center, and right speakers from the same manufacturer family ensures coherent timbre as audio pans across the front soundstage. For height channels in an Atmos configuration, dedicated ceiling drivers or up-firing Atmos-enabled modules placed on top of the main speakers are both valid options — though properly angled in-ceiling drivers at the manufacturer-specified elevation produce superior height imaging. The center channel speaker requires the most power handling of any speaker in a film-based system, as it carries the majority of dialogue and anchor effects in a standard theatrical mix.
How Do You Choose and Prepare the Right Room for Home Theater?
Room geometry is the single largest determinant of acoustic performance before any equipment is installed. A rectangular room is always preferable to a square one. Square rooms create severe bass standing waves at the same low frequencies that produce the most visceral impact in film soundtracks — the 40–80 Hz range where explosions, low synths, and deep orchestral passages live. The ideal home theater room has a length-to-width-to-height ratio that avoids simple integer multiples. A 14 ft × 23 ft × 8.5 ft room (approximately a 1.6 × 2.7 × 1 ratio) is a common professional recommendation that distributes modal resonances more evenly across the frequency spectrum.
Light control is equally important for display performance. A room achieving 0–2 lux of ambient light during viewing allows OLED and projector systems to operate at their full contrast potential. Blackout curtains or motorized roller shades on all windows, combined with dark wall and ceiling finishes, minimize screen wash-out from stray light sources. If complete darkness is not achievable, an ultra-short-throw (UST) projector or a high-brightness Mini-LED panel becomes the better display choice over a conventional long-throw projector, whose contrast ratio collapses rapidly as ambient light rises above 5 lux.
Flooring material significantly affects early reflection energy. Carpet or thick area rugs reduce floor reflections — one of the most acoustically damaging surfaces in a home theater room — without requiring any dedicated acoustic panel installation. Hard flooring demands additional panel coverage on sidewalls to compensate. Concrete and CMU walls contain bass energy well due to their mass. Standard drywall stud construction allows more low-frequency energy to transmit into adjacent rooms. Sealing door gaps and applying door sweeps reduces sound transmission in both directions and also prevents the pressure-relief effect that occurs when a door does not seal — a common cause of bass loss at the listening position in otherwise well-built rooms.
How Should You Position Your Display Screen or Projector?
Display height and distance are governed by two independent but interrelated variables: viewer eye level and visual acuity threshold. For a flat panel display, the center of the screen should sit at or within 15 degrees of the seated viewer’s eye level. Mounting a large panel too high — a common error in rooms where the display competes with a fireplace for wall space — forces sustained neck extension and causes measurable viewer fatigue within 30–60 minutes. The center channel speaker should maintain the same horizontal relationship to the screen regardless of mounting height, keeping the sonic center of the audio image aligned with the visual center of the picture.
Viewing distance for 4K content follows the THX reference guideline, which targets an approximately 40-degree field of view for the primary seating position. In practical terms, this produces an optimal viewing distance of 1.0–1.5 times the screen width for 4K resolution. For an 85-inch display (approximately 74 inches wide), the optimal seating range is 74–111 inches from the screen surface. Sitting within this range maximizes visual immersion while remaining within the pixel resolving power of 4K density — at distances greater than 1.5× screen width, the perceptual benefit of 4K over 1080p diminishes significantly at normal visual acuity.
For projector installations, throw distance is calculated from the projector’s stated throw ratio multiplied by the desired screen width. A 1.5:1 throw ratio lens at 10 feet of throw produces a 6.67-foot-wide image. Ultra-short-throw (UST) projectors operate at ratios of 0.25:1 or lower and sit 6–18 inches from the screen, eliminating shadow-casting entirely and allowing the projection wall to function as a normal wall surface when not in use. Screen gain selection should match ambient light conditions. A gain of 1.0–1.3 is optimal for dedicated dark rooms. Ambient-light-rejecting (ALR) screens with a gain of 0.6–0.8 reject ceiling and sidewall reflections while retaining projector brightness in rooms that cannot achieve full light control.
What Speaker Configuration Should You Use for Maximum Immersion?
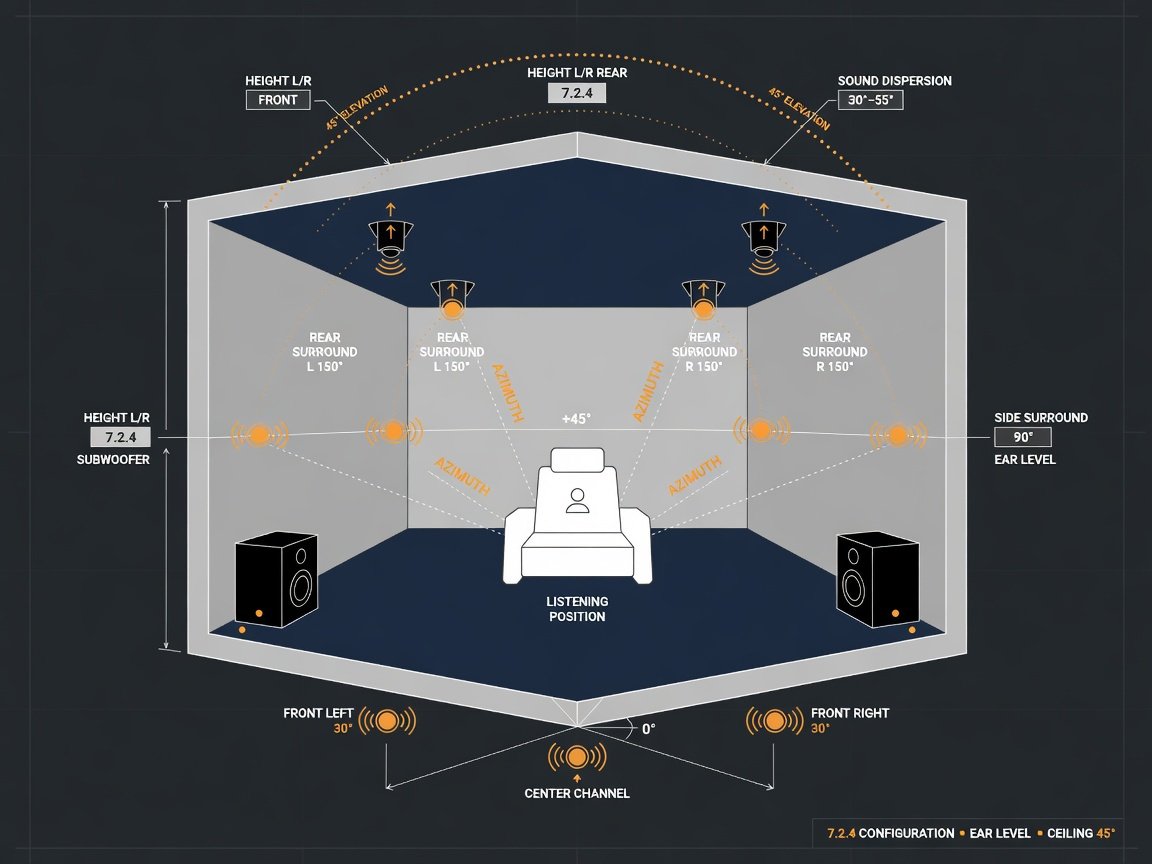
The Dolby Atmos specification defines speaker placement as precise elevation and azimuth angles rather than approximate descriptions. Front left and right main speakers position at ±22–30 degrees horizontal from the center channel at ear level. The center channel sits on the acoustic centerline directly above or below the display. In a 7-channel horizontal layout, side surrounds place at exactly 90 degrees and rear surrounds at 135–150 degrees, both at ear height or slightly above. Height channel speakers in a 7.2.4 configuration should fire from 30–55 degrees above the listener’s ear level — either via in-ceiling drivers or up-firing Atmos modules placed on the main speaker cabinets. Deviating below 30 degrees of elevation produces height channels that behave like widened surrounds rather than genuine overhead effects.
| Configuration | Channels | Best Application | Min Room Width | Atmos-Ready |
|---|---|---|---|---|
| 5.1 | 6 | Small–medium rooms, casual viewing | 11 ft | No |
| 7.1 | 8 | Medium rooms, wider rear surround stage | 13 ft | No |
| 5.1.2 | 8 | Entry-level Atmos immersion | 11 ft | Yes |
| 7.1.2 | 10 | Full Atmos with extended rear stage | 13 ft | Yes |
| 7.2.4 | 13 | Reference-level cinema immersion | 14 ft | Yes (full overhead) |
| 9.2.6 | 17 | Large dedicated screening rooms | 18 ft | Yes (maximum overhead) |
Subwoofer placement receives far less attention than it deserves. A single subwoofer placed in the front corner of the room creates uneven bass distribution — listeners seated toward the rear typically hear significantly more or less bass than those in the front row, with seat-to-seat variation often exceeding 10 dB at certain frequencies. A dual-subwoofer configuration, with units placed at opposing corners of the front wall or at the front corner and front-wall midpoint, reduces seat-to-seat bass variation by up to 12 dB compared to a single-subwoofer setup. This improvement is measurable with any handheld SPL meter and audible even to untrained listeners on bass-heavy content.
How Do You Wire and Connect All Your Home Theater Components?
Cable management and signal chain integrity are not cosmetic concerns. They directly affect performance and long-term reliability. Planning the wiring approach before any equipment is mounted saves significant time and prevents the most common frustration in home theater installation: tracing intermittent signal dropouts after everything is already on the wall. The signal chain flows in one direction — source devices into the AV receiver, receiver output to the display — and understanding that architecture before running a single cable prevents most wiring errors.
- Run all in-wall speaker cables before closing drywall. Use 12 AWG oxygen-free copper (OFC) cable for main, center, and surround speakers on runs up to 50 feet. 16 AWG is acceptable for height channel runs, which are typically shorter. Label each end at the wall plate and at the equipment rack with heat-shrink or vinyl labels before fishing through walls — mislabeled cables are the most time-consuming mistake to diagnose after installation.
- Install a single HDMI 2.1 cable from AV receiver output to display. For runs longer than 20 feet, use active HDMI cables or fiber-optic HDMI to avoid signal degradation at 48 Gbps. Confirm the cable is rated for 48 Gbps — not all cables marketed as “HDMI 2.1” meet this bandwidth specification. An undersized cable passes video but silently drops audio return channel data.
- Connect all source devices to AV receiver HDMI inputs, not directly to the display. The receiver handles video switching and audio format decoding. A single HDMI cable from receiver output to display carries both 4K HDR video and eARC audio return for the TV’s built-in streaming apps simultaneously — no additional cables required.
- Power all components through a surge protector rated above 2,000 joules. Dedicated 20-amp circuits for the AV equipment rack are ideal. Never share AV power circuits with high-draw appliances — refrigerator motors and HVAC compressors introduce noise into the AC line that manifests as hum in amplifier stages.
- Connect the calibration microphone to the AV receiver’s front panel port before running room correction. Place the microphone at the primary listening position at seated ear height. Receivers from Denon, Marantz, Yamaha, and Anthem include multi-point measurement routines — use all available measurement positions to give the room correction algorithm the most complete acoustic picture of your room.
- Test every HDMI input and speaker output before concealing cables. Play the receiver’s internal pink noise test tone through each speaker channel individually. Verify polarity on every speaker — a reversed positive/negative connection on any single speaker causes phase cancellation that collapses center image and reduces bass impact across the system.
How Do You Calibrate Your AV Receiver for Optimal Sound?
Automated room correction (ARC) software is integrated into virtually every AV receiver manufactured in the last six years. Audyssey MultEQ XT32 (Denon and Marantz), Yamaha YPAO-R.S.C., Pioneer MCACC Pro, and Anthem Room Correction (ARC Genesis) all perform the same fundamental task: they send test tones through each speaker, measure arrival times and frequency responses at the microphone, and then apply digital FIR and IIR filters to compensate for room-induced anomalies. In properly treated rooms, automated room correction can improve the measured frequency response at the listening position from a typical raw deviation of ±12–15 dB down to within ±3 dB across the 40 Hz–16 kHz range.
Manual post-calibration adjustments are essential regardless of which ARC platform your receiver uses. The three most impactful adjustments are: setting all speakers to “small” (which activates the crossover and redirects bass below the crossover frequency to the subwoofer rather than demanding it from a speaker that cannot reproduce it), setting the subwoofer crossover point to 80 Hz (the default THX benchmark for satellite speakers with limited low-frequency extension), and confirming that the measured subwoofer level sits between +3 dB and +6 dB relative to the main channels. ARC systems consistently set subwoofer levels conservatively. Real film soundtracks build in 3–6 dB of additional LFE headroom for impact peaks that automated tools do not account for.
Reference level calibration anchors the system’s master volume to a measurable standard. The THX reference is 85 dB SPL per channel, measured with a sound level meter set to C-weighting and slow averaging, driven by pink noise at −30 dBFS test tones from the receiver. Calibrating individual channel trim levels to this standard gain-stages your system identically to the theatrical mixing environment — which means the dynamic range, dialogue level, and bass impact you hear matches the director’s intent, with no subjective volume guessing required.
What Acoustic Treatments Make the Biggest Difference in a Home Theater?
Acoustic treatment targets two distinct problems: early reflections and low-frequency modal resonances. Early reflections arrive at the listening position within 20–30 milliseconds of the direct speaker sound. Above approximately 300 Hz, they smear transient detail, reduce stereo imaging precision, and reduce dialogue intelligibility. Below 300 Hz, room modes create severe peaks and nulls that digital equalization cannot fully correct. An ARC system can reduce a measured peak with EQ, but it cannot boost a null caused by destructive interference without overdriving the amplifier into clipping. Physical treatment remains the only reliable solution at these frequencies.
Broadband acoustic panels constructed from 2–4 inch thick fabric-wrapped rigid fiberglass or rockwool absorb mid- and high-frequency energy effectively when placed at first-reflection points on the side walls, rear wall, and ceiling. The mirror technique identifies first-reflection points precisely: sit at the listening position and have a helper slide a mirror along the sidewall — wherever you see a speaker in the mirror, that location requires treatment. Target reverberation time (RT60) for a dedicated home theater room is 0.2–0.4 seconds. Most untreated domestic rooms measure 0.5–0.8 seconds RT60, producing an audible reverberant tail that reduces speech intelligibility and masks low-level spatial detail in surround fields.
How Do You Optimize Your Display Picture Settings for Home Theater?
Display calibration is as consequential to visual performance as acoustic calibration is to audio performance. Every consumer display ships from the factory with settings optimized for brightly lit retail showroom floors, not dark home theater rooms. “Vivid” and “Dynamic” picture modes boost backlight aggressively, sharpen edges with artificial processing, add motion interpolation that creates the soap-opera effect, and shift color temperature toward a cold, blue-biased white point. These settings reduce measured color accuracy and increase perceived fatigue on extended viewing sessions.
For home theater use, start from the display’s “Cinema,” “Movie,” or “Filmmaker Mode” preset. Filmmaker Mode — developed by the UHD Alliance and supported by the majority of major display manufacturers in 2026 — disables all post-processing automatically and targets the D65 white point with Rec.709 or Rec.2020 color gamut, appropriate to the content signal. For SDR content, a display gamma of 2.2 is the correct target for a moderately lit room; a gamma of 2.4 is preferred for rooms achieving near-complete darkness. For HDR10 content, test the display’s tone mapping algorithm with reference clips that contain both dark shadow detail and bright specular highlights — shadow crushing and highlight clipping are the two most common HDR tone mapping failures.
Professional display calibration using a colorimeter or spectrophotometer and software such as Calman can reduce measured color errors (dE2000) to below 3.0 — the perceptual threshold below which color inaccuracies are invisible to the human eye at normal viewing distances. For users unwilling to invest in professional calibration, Filmmaker Mode combined with a manual backlight reduction matched to ambient room light represents a practical improvement over factory default settings with no additional cost.
How Do You Set Up Streaming and Source Devices in a Home Theater?
Source device selection and configuration directly determines the audio and video quality ceiling your receiver and display have to work with. The 4K Ultra HD Blu-ray physical format remains the highest-quality film source available in 2026 — a pressed disc delivers uncompressed HDR video and lossless Dolby TrueHD or DTS-HD Master Audio at bit rates between 50–100 Mbps that no current streaming service matches. A dedicated 4K Blu-ray player connected via HDMI to the AV receiver’s input should serve as the reference source for critical listening sessions and as the anchor for display calibration verification.
For streaming sources, connect devices directly to the AV receiver rather than to the display wherever possible. This routes audio through the receiver’s decoding and processing chain, enabling full Dolby Atmos and DTS:X object-based rendering from compatible streaming titles. Capable streaming platforms in 2026 for home theater applications support Dolby Vision, HDR10+, Dolby Atmos, and lossless audio passthrough. Configure all streaming devices to output a full audio bitstream — not decoded PCM — so the AV receiver applies its own room correction filters and bass management to the decoded signal rather than receiving a pre-processed output it cannot further optimize.
Network infrastructure affects 4K streaming reliability more directly than most owners anticipate. Premium streaming services deliver 4K HDR at 20–80 Mbps sustained bit rates. A wired Ethernet connection to the streaming device eliminates buffering events and the dynamic bit-rate reductions that services deploy automatically under congested wireless conditions — which introduce compression artifacts most visibly in fast-motion scenes with fine detail in bright highlight areas. Where wired Ethernet is impractical, a Wi-Fi 6E (802.11ax, 6 GHz band) access point located in or immediately adjacent to the home theater room provides sufficient, consistent bandwidth with lower interference than shared 2.4 GHz or 5 GHz bands in multi-device households.
What Are the Most Common Home Theater System Set Up Mistakes to Avoid?
The most prevalent error in home theater system set up is concentrating display spend at the direct expense of acoustics and speaker placement. The room shapes every sound the speakers produce. A modestly priced speaker system in a treated room will outperform an expensive one in a reverberant, untreated space.
The second most common error is setting channel levels by ear rather than by measurement. Owners frequently adjust the center channel upward because dialogue appears to lack clarity — which usually indicates an acoustic or EQ problem rather than a gain deficiency. Raising center channel level above reference creates a front-heavy mix that sounds unnatural on everything except the specific content used for the adjustment. The reference-level calibration protocol using a sound level meter and pink noise test signals eliminates this issue entirely by grounding every gain decision in measured SPL at the listening position.
Running all speakers configured as “large” in the AV receiver setup menu is a third widespread mistake. “Large” instructs the receiver to send the full audio frequency range to that speaker — including low-frequency content below its physical capability. Small bookshelf speakers, center channel speakers, and height modules driven with full-range signal produce driver distortion, port chuffing, and thermal stress on voice coils. Setting all satellites to “small” with an 80 Hz crossover protects every speaker in the system and routes bass content to the subwoofer, where it belongs. This single configuration change measurably reduces distortion across the midrange of every speaker in the array.
What Home Theater Trends Are Defining the Category in 2026 and Beyond?
The most significant display technology development in 2026 is the continued maturation of micro-LED panels for consumer-accessible price points. Micro-LED delivers per-pixel luminance control without the organic degradation concern inherent to OLED, with measured peak brightness exceeding 3,000 nits and a theoretical operating life above 100,000 hours. While still priced above $20,000 for screen sizes relevant to home theater, micro-LED manufacturing costs are forecast to approach OLED price parity within the 2027–2028 window based on current production scale trajectories — making it a technology to watch for next-build planning.
4K laser projectors have transitioned from enthusiast-tier to mainstream in 2026. Laser light engines deliver 20,000+ hour rated lifespans, eliminating the lamp replacement cycle entirely, while offering improved color volume and higher sustained brightness than equivalent lamp-based models. Consumer-grade 4K laser projectors are now widely available below $3,000 — a price point that makes a 120-inch high-gain projection screen a practical centerpiece for mid-budget dedicated theater rooms. Short-throw laser projectors continue to compress in size and price, with the most capable 2026 UST models achieving 2,000+ ANSI lumens with native 4K resolution for under $4,000.
On the audio side, AV receivers shipping in 2026 increasingly support four simultaneous object-based audio format decoders — Dolby Atmos, DTS:X, Auro-3D, and IMAX Enhanced — within a single decoding architecture. The convergence of spatial audio standards between gaming and home theater is accelerating: 2026 gaming consoles and GPUs operate natively within the same HDMI 2.1 ecosystem, meaning a properly configured home theater set up today functions as a reference gaming station with zero reconfiguration. Voice control integration through home automation platforms has reached sub-400 ms latency for scene-triggered commands, making automated lighting, screen deployment, and receiver power-up a practical single-step operation in both professional and enthusiast-grade installations.
Frequently Asked Questions About Home Theater System Set Up
What is the best speaker layout for a 5.1 home theater?
For a 5.1 system, position the center channel on the acoustic centerline of the display, front left and right at ±22–30 degrees horizontal from center at ear level, and surround speakers at ±90–110 degrees to the side, also at ear level or slightly above. The subwoofer performs best placed at the front wall near one of the main speakers — not in a rear corner, where bass accumulation produces uneven bass distribution and audible time delay relative to the front channels on transient content.
How far should I sit from my TV or projector screen?
For 4K content, the optimal viewing distance is 1.0–1.5 times the screen width. For a 75-inch panel (approximately 65 inches wide), that means sitting 65–98 inches — roughly 5.5 to 8 feet — from the screen surface. For projector screens, apply the same formula to the projected image width. Sitting beyond 1.5× screen width reduces the sense of visual immersion; sitting inside 1.0× screen width can cause eyestrain at the wide field of view angle, though no pixel structure becomes visible at 4K resolution at any practical sitting distance.
Do I need a dedicated room for a good home theater?
No. A dedicated room produces the best results, but high-performance home theater is achievable in living rooms and multipurpose spaces. In shared spaces, prioritize displays that perform under ambient light (high-brightness Mini-LED panels or ALR projector screens), position speakers symmetrically relative to the primary seating position, and select acoustic panels that also function as wall art. The performance gap between dedicated and multipurpose rooms narrows substantially when proper symmetric speaker placement and some degree of acoustic treatment are applied.
What is the difference between Dolby Atmos and DTS:X?
Both are object-based audio formats that position individual sound elements in three-dimensional space rather than assigning them to fixed speaker channels. The primary technical distinction is that Dolby Atmos specifies exact speaker placement angles and uses proprietary spatial rendering algorithms, while DTS:X adapts to any speaker layout and allows mixing engineers to define a custom speaker map per title. Both formats deliver comparable immersive audio on a correctly configured AV receiver. Streaming platform content availability slightly favors Dolby Atmos; DTS:X maintains a strong presence on premium physical media releases from certain major studios.
How long does a full home theater system set up take?
A professional installation of a 7.2.4 Dolby Atmos system — including in-wall cabling, equipment rack assembly, speaker mounting, display installation, and calibration — typically takes 3–5 days for a CEDIA-certified installer. A competent DIY builder working solo can expect 2–3 weekends for the same scope. Calibration alone — running automated room correction, verifying output with a sound level meter, and applying manual post-calibration trims — takes 3–6 hours when executed correctly. Rushing calibration is the step most likely to produce a system that underperforms its hardware potential.
Do I need professional calibration or can I do it myself?
Automated calibration built into your AV receiver — Audyssey MultEQ XT32, Yamaha YPAO-R.S.C., or Anthem ARC Genesis — handles the most technically demanding aspects of room correction and is fully accessible to any user. Running the automated routine correctly using all available microphone positions provides a strong starting point that closely approaches professional audio calibration quality in most rooms. Professional calibration adds the most value for display accuracy verification and in acoustically complex rooms where automated algorithms make suboptimal EQ decisions. Budget $300–$600 for a combined audio-visual professional calibration if you want to close the final gap between good and reference-quality performance.
What is the correct subwoofer crossover frequency for home theater?
80 Hz is the THX standard crossover frequency and the correct starting point for virtually all home theater satellite speaker configurations. At 80 Hz, bass signals become directionally ambiguous — the human auditory system cannot localize sound sources below this frequency reliably, which means bass reproduced by the subwoofer at any position in the room integrates seamlessly with the directional audio from the satellites. If your main speakers have particularly large woofers (8 inches or larger) with a measured −3 dB point below 50 Hz, lowering the crossover to 60 Hz can preserve more of the speaker’s natural bass character while still protecting it from LFE peaks.
Conclusion: Your Home Theater System Set Up Action Plan
A successful home theater system set up is the product of systematic decisions executed in the right sequence. Equipment budget matters far less than placement precision, acoustic treatment discipline, and calibration rigor. The technology available in 2026 — 48 Gbps HDMI infrastructure, AI-assisted room correction algorithms, laser projection, and object-based audio rendering — means the technical ceiling for home theater performance has never been higher. Your task is to apply it methodically rather than opportunistically.
Follow this six-week implementation sequence:
- Week 1 — Room Preparation: Select and measure the room, assess light control, plan acoustic treatment locations, and run all in-wall speaker cable and HDMI conduit before any equipment is installed. Label every cable run at both ends.
- Week 2 — Display and Speaker Installation: Mount the display at the correct eye-level height, confirm all speaker positions against Dolby Atmos placement specifications before permanently mounting any bracket or driver.
- Week 3 — Connection and Initial Calibration: Connect all components, verify speaker polarity on every channel, confirm eARC HDMI port selection on the display, and run the automated room correction routine using all available microphone positions.
- Week 4 — Acoustic Treatment: Install corner bass traps first, then broadband panels at side-wall and ceiling first-reflection points. Measure RT60 if possible and adjust panel placement to approach the 0.2–0.4 second target range.
- Week 5 — Display Calibration: Enable Filmmaker Mode, reduce backlight to match room ambient light level, and consider professional ISF or HAA calibration to close the final accuracy gap on the display.
- Ongoing — Re-calibrate After Room Changes: Re-run room correction any time you add or move furniture, change acoustic panels, or reposition speakers. The acoustic signature of the room changes with its contents — calibration is a living process, not a one-time event.