You can watch a movie in theater quality at home by combining a large-format 4K display, a calibrated surround-sound audio system, and controlled ambient lighting. A properly built home cinema can achieve close to a THX-certified commercial theater’s measurable performance — yet many existing home systems fall short of that standard because they are installed and never calibrated.
Executive Summary
- Market scale: The global home theater equipment segment continues to expand as consumers invest in premium living-room infrastructure alongside or instead of multiplex visits.
- The calibration gap: Most installed home theater systems are never measured after initial setup, leaving substantial acoustic and visual performance unrealised regardless of hardware quality.
- Audio is the harder problem: A correctly calibrated 7.1.4 Dolby Atmos system can replicate the 85 dB SPL reference level and 105 dB peak headroom of a THX-certified commercial auditorium. Most soundbars cannot reach this standard.
- Format parity has arrived: Streaming services in 2026 deliver Dolby Vision HDR and lossless Dolby Atmos object-based audio at bitrates that close the last measurable gap with physical UHD Blu-ray sources on certified playback hardware.
What Does “Theater Quality” Actually Mean for a Home Setup?
“Theater quality” is not a marketing phrase. It is a set of measurable technical standards defined by SMPTE, THX, and Dolby for commercial cinema certification. A licensed multiplex must meet specific thresholds for peak screen luminance, color gamut, contrast ratio, frequency response, and sound pressure level before it is approved to screen premium formats.
For a home cinema, replicating those standards means hitting four core benchmarks. First, peak screen luminance of at least 100 nits for SDR material or 1,000 nits for HDR content measured at the viewer’s eye position. Second, a color gamut covering at least 90% of the DCI-P3 color space. Third, a combined speaker frequency response of 20 Hz to 20 kHz within ±3 dB at the primary listening position. Fourth, a background noise floor below 30 dB(A) in the room — the threshold at which ambient noise becomes perceptible during quiet dialogue passages in a well-mixed film.
Most domestic living rooms fail the fourth criterion before a single component is powered on. Road traffic, HVAC systems, and building noise push ambient levels into the 40–50 dB(A) range, masking low-level audio detail that a properly treated dedicated space preserves. This explains why dedicated home cinema rooms consistently outperform casual living-room installs even when the hardware specifications are identical. Identifying which benchmarks your current room fails is the mandatory first step before any purchasing decision.
What Display Technology Comes Closest to Cinema Quality in 2026?
Three display technologies compete for the home cinema reference position in 2026: OLED, MicroLED, and 4K laser projectors. Each has measurable advantages and trade-offs when assessed against SMPTE and DCI-P3 cinema standards.
OLED panels at 77 inches and above deliver pixel-level contrast with a true black floor, matching the perceived depth of a commercial Dolby Cinema screen in a controlled-light environment. Their limitation is peak luminance: consumer OLED panels typically sustain 150–300 nits in full-screen scenes, with specular highlights reaching 800–1,200 nits. That falls short of the 10,000-nit ceiling targeted by current Dolby Vision specification, though the gap is rarely perceptible on well-mastered content at the display’s rated brightness.
4K laser projectors have become the preferred choice for immersive large-screen rooms. Entry-level 4K laser projector prices have fallen substantially since 2024, making 120-inch screen setups accessible at price points previously occupied by 85-inch flat panels. A reference-tier laser projector delivers 2,500–4,000 ANSI lumens, native contrast above 3,000:1, and 90–98% DCI-P3 coverage — provided the room can achieve near-total light control.
MicroLED remains the engineering benchmark. Available units achieve peak luminance above 4,000 nits, native contrast exceeding 1,000,000:1, and DCI-P3 coverage above 99% — figures that exceed what most commercial multiplex screens deliver. Price compression is underway, but MicroLED currently commands a substantial premium over both OLED and laser projection at comparable screen sizes.
How Do You Build Theater-Grade Audio at Home?
Audio is where the majority of home cinema setups lose the most ground relative to a commercial theater. A well-engineered multiplex operates a multi-amplified speaker array with dedicated subwoofer stacks capable of sustaining 105 dB SPL at the primary listening position — the level at which a film’s full dynamic range is reproduced as the mixing engineers intended it.
The minimum viable home cinema audio chain is a 5.1-channel configuration: front left, center, front right, two surround speakers, and a dedicated subwoofer. The center channel handles approximately 60% of a film’s dialogue and on-screen action audio. It must be timbre-matched to the front left and right speakers so that sounds panning across the front soundstage remain tonally consistent. A mismatched center channel is one of the most common and most audible deficiencies in residential home theater audio.
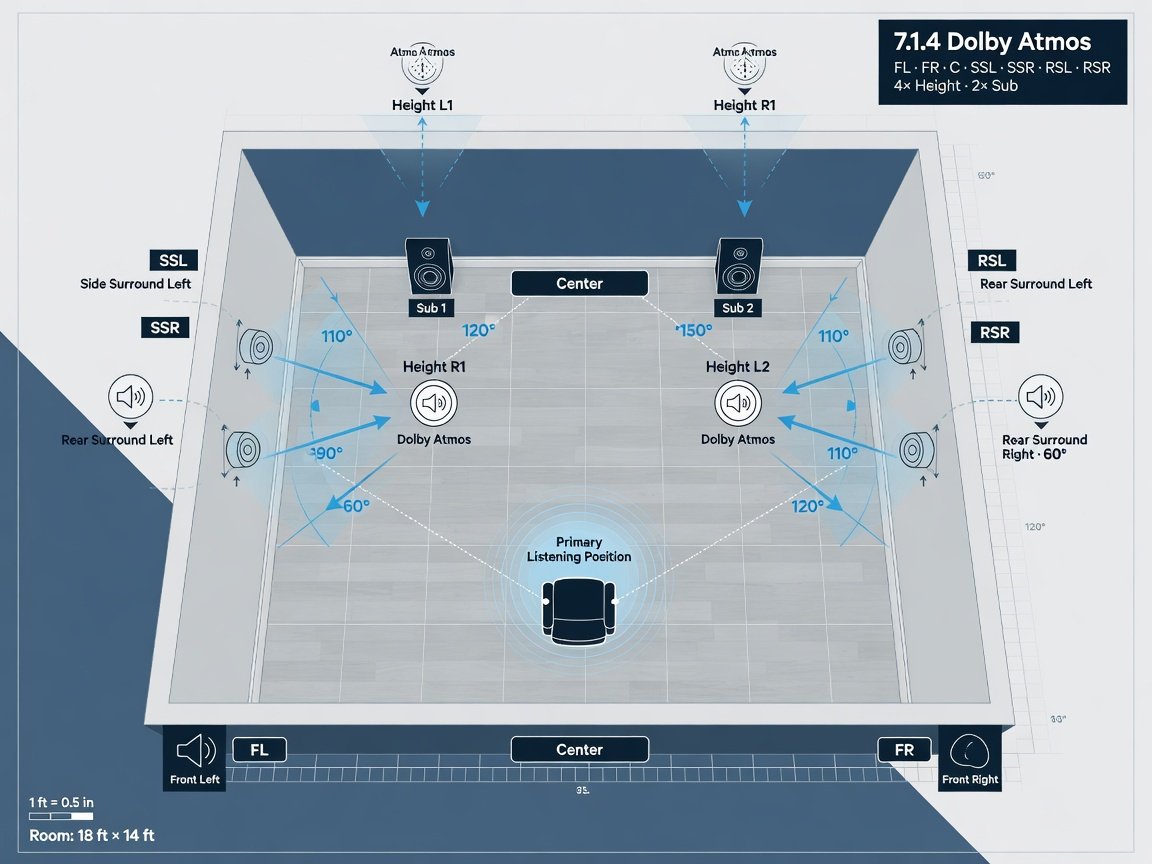
For full three-dimensional immersion, a dolby atmos layout adds overhead channels — typically a 7.1.4 or 5.1.4 configuration with four ceiling-mounted or upward-firing height speakers. Object-based audio processing allows the AV receiver to position individual sound objects in three-dimensional space, replicating the overhead effects layers that Atmos-mixed theatrical releases embed in their soundtracks. The majority of major theatrical releases in 2026 are delivered in native Dolby Atmos.
Subwoofer placement requires careful engineering. A single subwoofer in a room corner maximises low-frequency output but creates highly uneven bass pressure distribution across the listening area. Deploying two or four subwoofers in a distributed arrangement — then applying AV receiver or outboard processor bass equalisation across their combined measured output — produces far more consistent low-frequency performance at every seat position in the room.
Most audible improvement in a home cinema system comes from correct speaker placement, room correction, and subwoofer integration — not from the receiver’s DAC architecture or amplifier topology alone.
How Do Room Acoustics Shape the Home Cinema Experience?
Room acoustics account for a substantial share of perceived audio quality in a home cinema environment, as established by the acoustic engineering principles used in professional studio and theater design. A bare rectangular room with parallel walls, a hard floor, and a reflective ceiling creates standing waves, early reflections, and flutter echo that degrade dialogue clarity, stereo imaging, and low-frequency extension — regardless of the speaker specification.
The three principal acoustic treatment categories are absorption, diffusion, and bass trapping. Absorption panels — typically 2–4 inch thick rockwool or compressed fiberglass — reduce mid- and high-frequency reflection energy from side walls and the rear wall. First reflection points, where direct sound from the front speakers bounces toward the listening position from the side walls, are the highest-priority treatment locations in any room.
Bass trapping targets low-frequency buildup in room corners. Room mode resonances in the 40–120 Hz octave cause bass frequencies to peak and sag dramatically at different positions across the listening area. Corner-placed bass traps of 4–8 inches nominal depth reduce the severity of these modes by absorbing incident bass energy before it builds into a standing wave. The result is more consistent subwoofer and lower-midrange output across all seating positions.
Diffusion panels scatter mid- and high-frequency energy rather than absorbing it, preserving acoustic liveliness while breaking up coherent reflections that cause comb filtering and image smear. Placed on the rear wall behind the primary listening position, diffusers prevent an acoustically “dead” character while still improving front-stage clarity. Even soft furnishings — a dense pile rug, heavyweight curtains, and upholstered seating — reduce room reverberation time measurably before any purpose-built treatment is installed.
Projector vs. Large-Screen TV: Which Is Right for Your Home Cinema?
The projector-versus-television decision has no single correct answer. It depends on your room’s ambient light control capability, available wall space, viewing distance, budget, and whether you prioritise maximum screen size, contrast depth, or peak HDR brightness. Both technology categories have advanced substantially since 2024.
| Criterion | 4K Laser Projector | OLED TV (77–97 in) | MicroLED (110–136 in) |
|---|---|---|---|
| Max practical screen size | 100–150+ inches | Up to 97 inches | Up to 136 inches |
| Peak luminance | 2,500–4,000 ANSI lm | 800–1,200 nits | 3,000–4,000+ nits |
| Native contrast ratio | 3,000:1–5,000:1 | Infinite (pixel off) | 1,000,000:1+ |
| Ambient light tolerance | Low — requires dark room | High | Very high |
| DCI-P3 colour coverage | 90–98% | 98–99% | 99%+ |
| Entry price (2026) | $1,500–$4,000 | $2,200–$6,000 | $15,000–$40,000+ |
| Setup complexity | High (throw, alignment, screen) | Low | Medium |
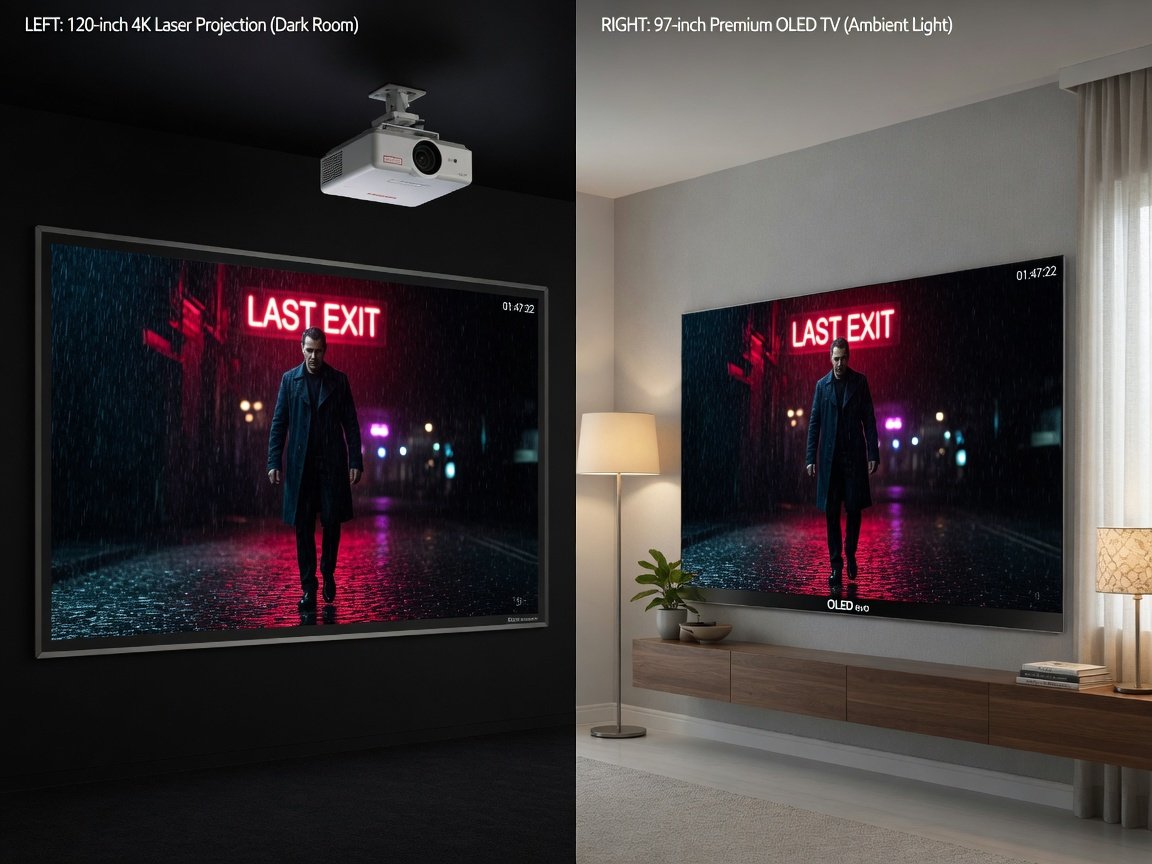
For rooms without full blackout capability, a large OLED or premium LCD panel is the practical choice — ambient light degrades projected images far more severely than emissive displays. For rooms where total darkness is achievable, a 4K laser projector on a 120-inch acoustically transparent screen produces the closest available consumer match to a commercial auditorium experience. The angular size of the image at a 3-metre viewing distance triggers genuine peripheral immersion that a 97-inch television at the same distance cannot replicate.
The shift to laser light sources has been transformative for home projection. Unlike lamp-based projectors, which lose a significant share of their output over their rated lifespan, laser light sources are designed to maintain close to their original brightness across tens of thousands of hours of use — changing the total cost of ownership calculation entirely.
How Do You Find and Stream Movies in the Highest Available Quality?
Source quality is the absolute ceiling of your home cinema experience. The best display and audio hardware in the world cannot recover detail that was never delivered by the incoming signal. In 2026, three source tiers exist for home cinema: 4K Ultra HD Blu-ray disc, premium streaming with high-bitrate Dolby Vision, and standard compressed 4K streaming.
4K Ultra HD Blu-ray remains the reference format by measurable metrics. A typical UHD disc encodes video at 50–100 Mbps using HEVC, compared to 15–25 Mbps for most 4K streaming services. The disc also carries lossless Dolby TrueHD Atmos or DTS:X Master Audio tracks at up to 18 Mbps — significantly above the compressed Atmos core stream delivered over IP. For critical first-viewing on a calibrated large-screen system, the disc still wins on objective fidelity.
Premium streaming has narrowed this gap considerably. Apple TV+ and select Amazon Prime Video titles deliver HDR10+ or Dolby Vision graded content at peak bitrates above 40 Mbps for certain releases. On a properly calibrated display at standard viewing distances, these streams are often perceptually indistinguishable from disc. The practical rule: for casual viewing on a well-calibrated system, high-bitrate streaming is adequate. For a reference screening on a screen above 100 inches, physical media still holds the measurable advantage.
Connection stability is a non-negotiable prerequisite. Dolby Vision 4K streaming requires a sustained 25 Mbps minimum; premium-bitrate streams consume 50–80 Mbps at peak. A wired Ethernet connection from your router to the streaming device eliminates the packet loss and retransmission events that cause buffering artefacts during complex HDR scenes — artefacts that are significantly more visible on a 120-inch screen than a 65-inch television.
How Do You Calibrate Your Display for Theater-Accurate Color and Contrast?
Factory display presets are tuned for brightly lit retail showrooms, not for cinema viewing in a darkened room. A freshly unboxed television in its default “Vivid” or “Dynamic” mode is typically over-bright, over-saturated, and calibrated to a colour temperature of approximately 9,300 K — well above the D65 (6,500 K) white point mandated by Rec.709, Rec.2020, and DCI-P3 colour standards used in professional mastering.
Basic self-calibration begins with selecting “Movie,” “Cinema,” or “Filmmaker Mode” on your display. Filmmaker Mode, supported across major television platforms since 2024, automatically sets the colour space to Rec.709 or DCI-P3, disables motion-smoothing interpolation, and locks the gamma curve to the BT.1886 reference characteristic. This single setting change is the highest-impact action most users can take without specialist equipment.
Professional calibration using a spectroradiometer and calibration software such as CalMAN or LightSpace CMS goes substantially further. Measurement and correction of the display’s actual output against the DCI-P3 or Rec.2020 target colour volume at multiple brightness levels typically achieves a Delta-E (colour accuracy deviation) below 1.5 — compared to a Delta-E of 5–15 in a typical uncalibrated consumer television. Delta-E errors above 3.0 are perceptible on skin tones and saturated primary colours; errors above 6.0 are immediately noticeable to untrained observers.
How Does Lighting Control Make or Break the Home Cinema Experience?
Ambient light is the single largest environmental threat to perceived display contrast. An OLED panel with a native contrast ratio approaching the infinite loses that advantage entirely when ambient illumination falls on the screen surface. Even 1 foot-candle of ambient light raises the black floor from near-zero to a measurable grey level, compressing the entire image’s dynamic range against that ambient baseline.
Blackout curtains are the non-negotiable minimum for any room intended for serious cinema viewing. Purpose-designed home cinema curtains with foam-backed light-blocking lining reduce room illuminance to near zero during daytime screening, preserving the display’s full native contrast ratio. Commercial cinemas typically operate at below 0.01 foot-candles of ambient light during projection — a standard achievable at home with proper window treatment and door seals.
Bias lighting — a low-luminance light source positioned behind the display, typically specified at D65 colour temperature — reduces eye strain during extended viewing by elevating the average surround luminance slightly above absolute zero. This prevents the perceptual fatigue caused by repeated adaptation between the bright screen and a pitch-black surround. The SMPTE recommendation for reference bias lighting is a surround luminance of approximately 10% of peak screen white. LED strip systems matched to 6,500 K provide this effect without introducing forward-facing screen contamination.
Smart lighting integration — motorised blackout shades, programmable dimmers, and AV control system triggers — enables a single-command cinema mode: shades descend, ambient lights extinguish, bias lighting activates, and the display powers to the correct input. This removes ritual friction from every screening and guarantees consistent photometric conditions across every session, which matters for calibration accuracy and perceptual consistency.
How Does Seating Placement Affect What You See and Hear?
Seat position determines both the acoustic response you receive and the image geometry your visual system processes. SMPTE and THX guidelines for commercial cinema specify that the primary viewing zone should occupy a horizontal angle no wider than ±36° from screen centre, and a vertical angle no greater than 15° below eye level to screen centre. These constraints exist because the human visual cortex processes wide-field peripheral imagery differently from the foveal centre — overly wide viewing angles reduce perceived image sharpness and accelerate visual fatigue during long viewing sessions.
For a 16:9 home cinema screen, the equivalent THX viewing distance recommendation for a fully immersive field of view is 0.84× the screen diagonal. For a more relaxed, cinema-style experience, 1.5–2.0× the diagonal is appropriate. A 120-inch screen therefore ideally accommodates a primary seat between 100 and 240 inches (2.5–6.0 metres) from the screen surface, depending on the experience target.
Acoustically, the primary listening position should not be placed against the rear wall. The rear wall boundary reinforces bass frequencies through pressure doubling, and rear-wall reflections arrive at the listening position as a time-delayed echo of the direct sound from front speakers. Position the primary seat approximately one-third of the room’s total length from the rear wall. This position statistically avoids the most severe room mode pressure maxima, producing more balanced low-frequency response without additional parametric equalisation.
Purpose-designed home theater seating — including stadium-raked platform risers, acoustic-friendly upholstered frames, and recliner geometry that positions the listener’s ear at correct tweeter height — contributes directly to both acoustic performance and perceived comfort. A seat that places the listener’s ear 4–6 inches below tweeter axis causes the speaker’s high-frequency dispersion window to partially miss the listening position, audibly dulling presence and air in the upper frequency range.
What Does a Complete Home Cinema Setup Cost in 2026?
Home cinema costs in 2026 span four practical tiers defined by technical performance ceiling and installation complexity. Significant hardware price compression at the entry and mid-range levels has expanded access to reference-quality performance compared to three years ago.
| Tier | Display | Audio | Total Estimated Cost | Performance vs. Commercial Theater |
|---|---|---|---|---|
| Entry | 65–75″ OLED or QLED | 5.1 speakers + AV receiver | $2,500–$5,000 | Good baseline performance |
| Mid-range | 85–97″ OLED or 100″ laser projector | 7.1.4 Atmos + dual subwoofers | $8,000–$20,000 | Very good, approaching commercial reference |
| Reference | 120″ laser projector + AT screen | 11.2.4 Atmos, calibrated | $25,000–$60,000 | Excellent, at or near THX reference level |
| Flagship | MicroLED or dual-laser 4K | Custom multi-amp + room treatment | $80,000+ | Exceeds many commercial multiplexes |
The reference tier is where dedicated enthusiasts who have iterated through entry-level and mid-range systems typically settle. The highest-impact single investment at any tier is professional calibration and acoustic treatment: an $8,000 system that is correctly calibrated and acoustically treated measurably outperforms a $35,000 system in an untreated, uncalibrated room on the majority of perceptual quality metrics.
Step-by-Step: How Do You Build a Home Cinema Setup from Scratch?
A properly sequenced home theater setup follows a fixed order of operations. Skipping or reordering steps — purchasing a screen before measuring room throw distance, for example — is the primary cause of expensive retrofit work and compromised final performance.
- Measure and model the room. Record all room dimensions and ceiling height. Calculate primary room mode resonances using a free online resonance calculator. Identify the primary listening position geometry relative to the intended screen wall, and confirm the room has adequate throw distance for your target screen size.
- Specify and fix your display. Choose display technology — projector or flat panel — based on measured room light control capability and screen size target. Confirm projector throw distance against lens specification. Install the display mount or screen structure before any cabling or speaker mounting is done, since display position governs all downstream speaker geometry.
- Design the speaker layout on paper. Follow Dolby Atmos or DTS:X speaker placement guidelines for your target channel count. Mark speaker positions, subwoofer locations, and cable run paths on a dimensioned room plan before cutting, drilling, or mounting anything.
- Install acoustic treatment. Place bass traps floor-to-ceiling in all four room corners. Install absorption panels at all six identified first reflection points (two side-wall, one ceiling, optionally one rear-wall). Add rear-wall diffusers. Measure the treated room’s reverberation time with a free RTA application and measurement microphone before proceeding.
- Run cabling and install hardware. Use minimum 14 AWG oxygen-free speaker cable for front LCR channels and 16 AWG for surround and height channels. Run HDMI 2.1-rated cable from all source devices to the AV receiver, and from receiver to display. Install the AV receiver, disc player, streaming device, and speakers. Terminate and label every cable.
- Run AV receiver auto-calibration (Audyssey MultEQ XT32, Dirac Live, YPAO-RSC, or MCACC Pro). Position the supplied measurement microphone at the primary listening position and at five to eight additional positions around the seat. Run the complete calibration routine. This step alone typically reduces measured frequency response deviation from ±12–15 dB to ±3–4 dB across the full audible range.
- Calibrate the display. Enable Filmmaker Mode if available. Use an HDR test pattern disc (Spears & Munsil UHD HDR Benchmark or equivalent) to verify HDR tone mapping and confirm reference white tracking. Book an ISF or THX-certified professional calibration for final accuracy measurements and 3D LUT correction.
- Set reference listening level. Using a calibrated SPL meter at the primary seat and pink noise test tones, trim each speaker channel so that each measures 75 dB SPL (C-weighted, slow response). This establishes the 0 dBFS reference position on the AV receiver volume control for your specific room and speaker combination.
- Reference-screen and iterate. Screen a known reference film — ideally one you know well in both a commercial theater and your previous home system — and compare against your calibration targets. Adjust subwoofer crossover frequency and boundary equalisation as needed. Document all settings before making any further changes.
What Home Cinema Trends Are Shaping 2026 and 2027?
The home cinema industry is at a technical inflection point in 2026. Several converging developments are expected to redefine what “theater quality at home” means by the end of 2027.
AI-driven display processing is the most immediate trend. Neural processing units integrated into premium televisions and external streaming hardware now perform real-time upscaling of 1080p and SDR content toward 4K HDR quality, using models trained against reference master footage. AI-upscaled 1080p material on premium displays can approach the perceived resolution of native 4K at standard viewing distances — a development with significant implications for the deep back-catalogue of pre-4K content.
Acoustic transparency improvements in screen materials are removing one of the most persistent compromises in projector-based home cinemas. New micro-perforated ambient light-rejecting screen fabrics allow speakers to be placed directly behind the screen in acoustically neutral positions while simultaneously rejecting ambient overhead light. This eliminates the historical requirement to mount the center channel above or below the screen rather than on-axis, a placement that introduces measurable high-frequency beaming errors.
Streaming audio bitrate parity with physical media is expected to complete by late 2027. Several major platforms have publicly committed to lossless audio delivery for flagship titles — a shift that will close the last remaining measurable fidelity gap between streaming and UHD Blu-ray disc for most home cinema systems.
By late 2027, the remaining gap between a well-equipped home cinema and a premium commercial theater is expected to be perceptual rather than technical. The hardware to exceed most commercial multiplexes on measurable parameters already exists. What remains is installation discipline and calibration quality — an education and implementation challenge, not a technology one.
Frequently Asked Questions
Can you watch a movie in theater quality at home without a dedicated room?
Yes, but with specific constraints. A living-room setup can approach theater quality if ambient light is controlled with blackout curtains, the display is calibrated to Filmmaker Mode or equivalent, and the audio system includes a correctly placed subwoofer and at least five speakers. The primary compromises are acoustic treatment — difficult in a multipurpose room — and the ambient noise floor, which is typically harder to reduce below 35 dB(A) in a living room than in a purpose-built space.
What is the minimum speaker configuration to replicate a commercial cinema at home?
A 5.1 configuration — front left, center, front right, two surround speakers, and a dedicated subwoofer — is the functional minimum. The center channel is non-negotiable: it carries approximately 60% of dialogue and on-screen action audio. For Dolby Atmos object-based content, adding two upward-firing or ceiling-mounted height speakers (creating a 5.1.2 layout) delivers a meaningful overhead dimension upgrade without requiring a full structural ceiling installation.
Is a 4K projector better than a large-screen TV for home cinema in 2026?
It depends on your room’s light control capability. A 4K laser projector on a 120-inch screen produces an angular image size and peripheral field immersion that no flat-panel television currently sold can replicate at the same viewing distance. However, it requires near-total darkness to maintain contrast integrity. An OLED television in a room with ambient light will outperform a projector suffering screen wash. If full blackout is achievable, the projector wins on immersion and angular size. If not, a large OLED is the more consistent choice.
Do I need wired speakers, or have wireless Atmos systems improved enough?
Wireless surround and height speaker systems have improved substantially in 2026. Systems using proprietary 5 GHz RF transmission and lossless compressed audio codecs now achieve latency below 5 milliseconds — below the threshold of audible perception for lip-sync errors. For a new dedicated cinema build, wired remains the reference standard for calibration precision and long-term reliability. For retrofit installations where routing cable through walls is impractical, current wireless Atmos speaker systems are a technically viable alternative rather than a significant compromise.
How much does professional display calibration cost and is it worth the investment?
Professional display calibration by an ISF- or THX-certified technician typically costs $250–$600 depending on your region and display complexity. It is almost always cost-effective on screens above 65 inches and on any projector installation. The measurable improvement — reducing Delta-E colour accuracy deviation from 5–15 to below 1.5 — produces visible improvements in skin tone accuracy, shadow detail gradation, and colour saturation without modifying any hardware. Factory calibration on premium displays does not achieve this level of accuracy under normal operating conditions.
What streaming bitrate is sufficient for a large-format home cinema screen?
For screens up to 85 inches at standard viewing distances, premium 4K HDR streaming at 25–40 Mbps is perceptually very close to UHD Blu-ray quality. For screens above 100 inches, or viewing distances below 1.5× the screen diagonal, UHD Blu-ray’s higher video bitrate becomes more discernible — particularly in high-motion, high-texture scenes. A wired Ethernet connection to your streaming device and a platform that supports Dolby Vision are the baseline requirements for quality-critical large-screen streaming.
Conclusion: Your Path to Theater-Quality Viewing at Home in 2026
Watching a movie in theater quality at home is technically achievable in 2026 at every budget tier from $2,500 upward. The gap between what most home systems deliver and what they are capable of delivering is almost always a matter of calibration, acoustic treatment, and correctly sequenced installation — not component quality or purchase price.
Follow this implementation sequence to close that gap systematically:
- Weeks 1–2: Measure your room’s ambient noise floor and light levels. Enable Filmmaker Mode on your display. Run your AV receiver’s auto-calibration routine using the supplied measurement microphone. These three steps cost nothing and measurably improve every system.
- Weeks 3–4: Install blackout curtains and D65 bias lighting. Add a corner bass trap at the most acoustically problematic room position — typically the corner nearest the subwoofer. Measure with a free RTA application to verify the improvement.
- Month 2: Book a professional ISF or THX display calibration. Have a calibration specialist verify your speaker system’s channel trim levels and subwoofer integration against THX reference. Document all settings.
- Month 3 and beyond: Upgrade components in order of measurable impact — center speaker first, subwoofer second, display third. Evaluate each upgrade against your calibration benchmarks, not against your uncalibrated starting point.
The most capable home cinema system is not the most expensive one. It is the one that is correctly calibrated, acoustically managed, and operated in a room where photometric and acoustic conditions are controlled. Start with the measurements. Follow the standards. The cinema experience follows from that discipline, not from hardware spending alone.