A well-executed home theater set up delivers a cinematic experience that rivals commercial venues — all within your own home. The fundamentals of a successful home theater setup are consistent regardless of budget: select acoustically and electrically compatible components, prepare the room to minimise acoustic interference, calibrate every system using measurement data, and route signals without introducing noise or degradation. This guide covers every stage of the process in technical depth, from initial room measurement through to final system verification.
Executive Summary
- Display geometry is the foundation. Screen size, throw distance, and viewing distance must be calculated together before any component is purchased
- Audio placement outweighs audio spend. Correct loudspeaker placement and basic room treatment deliver greater perceived improvements than equivalent spending on upgraded speakers alone.
- Calibration is mandatory, not optional. Uncalibrated displays exhibit colour accuracy errors averaging 25–30 Delta-E units; uncalibrated rooms show bass non-uniformity of 15–20 dB seat-to-seat — both far beyond the threshold of human perceptibility.
- Infrastructure decisions are irreversible without demolition. Conduit routing, acoustic isolation, and circuit sizing must be resolved before walls are closed; retrofitting these elements costs three to five times the original installation price.
What Components Do You Need for a Home Theater Set Up?
The core components of a home theater set up fall into four functional categories: display, audio, source, and control infrastructure. Each category contains distinct technical specifications that must align for the system to perform coherently across all content types and signal formats.
Display hardware includes either a flat-panel television — OLED, QLED, or Mini-LED — or a projector paired with a projection screen. Panel sizes for dedicated home theater use currently range from 77 to 110 inches; laser projectors fill screens from 100 to 200 inches depending on throw configuration. 4K-capable displays are now common across home theater installations, with HDR10+ and Dolby Vision compatibility standard across mid-tier and above panels.
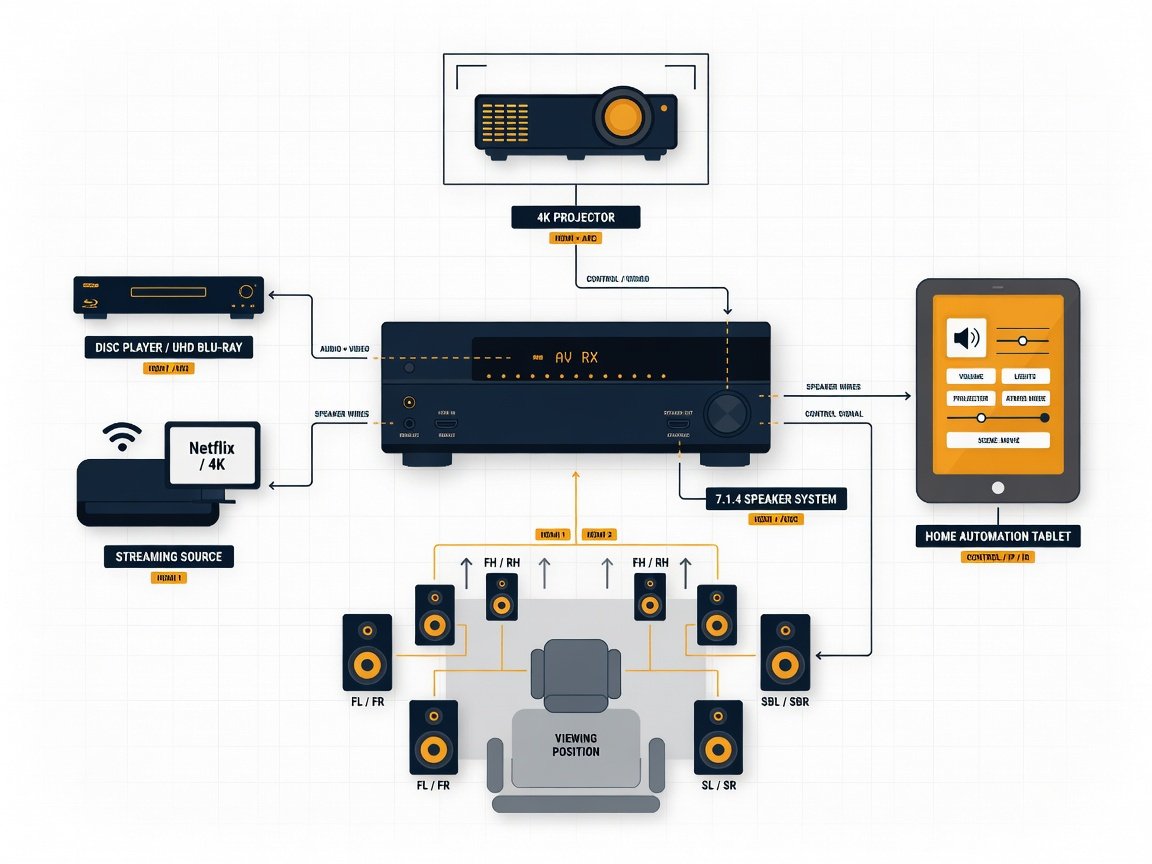
Audio hardware comprises an AV receiver or separate processor and power amplification, a minimum speaker array of 5.1 channels, and at least one powered subwoofer. Scaling to 7.1.4 adds two rear surround channels and four height channels, enabling full object-based Dolby Atmos and DTS:X decoding. Control infrastructure encompasses HDMI 2.1 switching, signal distribution hardware, and optional home automation integration via IP, RS-232, or IR interfaces. Each component category must be specified in relation to the others — an Atmos-capable AV receiver is wasted investment without the speaker array and room geometry to deploy height channels correctly.
Cable infrastructure underpins the entire system. HDMI 2.1 cables rated for 48 Gbps bandwidth are required to carry uncompressed 4K/120Hz signals with HDR metadata intact. Using HDMI cables that fail this specification introduces signal degradation that manifests as image dropouts, HDR handshake failures, and reduced frame rate ceilings. Specifying correct cable types before installation is far less expensive than replacing cables incorrectly routed behind sealed walls.
How Do You Choose the Right Display Technology in 2026?
The display choice is the single most consequential decision in a home theater set up. Three primary technologies compete in 2026: OLED panels, Mini-LED panels, and laser projectors. Each presents distinct advantages depending on room dimensions, ambient light levels, and budget constraints that must be evaluated before committing to a configuration.
OLED panels deliver perfect black levels through per-pixel illumination control, achieving theoretical infinite contrast ratios. Peak brightness typically ranges from 800 to 1,500 nits depending on window size and panel generation — sufficient for rooms with controlled ambient light. The primary limitation is screen size: flagship OLED televisions currently max out at 97 inches. At that size, 4K pixel pitch places the minimum full-resolution viewing distance at approximately 1.5 metres, well within most dedicated room configurations. OLED panels carry a risk of permanent image retention under prolonged static content, a factor relevant to gaming and live sports applications.
Mini-LED panels deploy thousands of local dimming zones — premium models use between 2,304 and 5,000 zones — to approximate OLED’s per-pixel contrast performance while achieving peak brightness levels of 2,000 to 4,000 nits. This brightness ceiling handles ambient light significantly better than OLED, making Mini-LED the stronger choice for rooms without full blackout light control. Current Mini-LED flagship panels extend to 110 inches, closing the gap with projection at the upper end of the flat-panel market.
Laser projectors represent the highest ceiling for image size. Short-throw and ultra-short-throw laser projectors deliver 100-to-150-inch images from projection distances of 30 centimetres to 4 metres. Long-throw laser projectors fill 200-inch screens from 6 to 8 metre throw distances. Laser light sources are rated at approximately 20,000 hours of operational lifespan — roughly ten times the lifespan of traditional lamp-based projectors — eliminating lamp replacement as a recurring maintenance cost.
Viewing distance calculation follows SMPTE and THX guidelines. For a 16:9 display, the optimal viewing distance spans 1.5 to 2.5 times the screen’s diagonal measurement. A 120-inch screen therefore places the primary seat between 180 and 300 centimetres from the display surface. THX’s reference standard specifies a 36-degree horizontal field of view at the primary seat — a requirement that fixes screen width as a precise function of viewing distance. Projection screen gain requires equally deliberate selection: a unity-gain (1.0) screen reflects light uniformly across all angles, suiting multi-seat configurations, while high-gain screens (1.3 to 2.5) concentrate brightness toward the central axis at the cost of reduced off-axis luminance.
What Audio Configuration Delivers True Surround Sound?
The baseline for genuine home theater audio is a 5.1 configuration: three front channels (left, centre, right), two surround channels at ±110 degrees, and a subwoofer. This topology decodes Dolby Digital and DTS 5.1 content accurately and delivers front-channel dialogue anchoring alongside basic surround immersion that is sufficient for most theatrical content.
Scaling to 7.1 adds two rear surround channels positioned at approximately 135 to 150 degrees from the primary listening position. This enables DTS-HD Master Audio and Dolby TrueHD 7.1 discrete decoding, producing a measurably wider and more enveloping surround soundfield. The step change in immersion between 5.1 and 7.1 is perceptible on well-mixed theatrical releases and represents one of the highest-value upgrades available at modest incremental cost — two additional speakers and their associated amplifier channels.
Dolby Atmos and DTS:X object-based audio require height channels in addition to the horizontal plane array. A 7.1.4 configuration — seven horizontal channels, one subwoofer, four ceiling or height-effect speakers — matches the object-channel budget of most commercially mixed Atmos releases and represents the current practical ceiling for home installations. Dolby’s technical documentation indicates that Atmos-enabled systems with correctly positioned ceiling channels deliver measurable improvements in perceived immersion over 5.1 configurations in controlled listener evaluations, with the rear overhead quadrant contributing the largest individual gain.
A 7.1.4 Dolby Atmos configuration captures the full object-channel budget of the majority of commercially mixed theatrical releases.Dolby Atmos Home Theater Installation Guidelines, 2026 Edition
Speaker placement geometry follows the ITU-R BS.775 international standard. Front channels should be positioned at 0 degrees (centre) and ±30 degrees (left and right) measured from the primary listening axis. Surround speakers sit at ±110 degrees for 5.1 and at ±110/±135 degrees for 7.1. Height channels should be positioned at 30 to 55 degrees of elevation as specified in the Dolby Atmos Home Theater Installation Guide — in-ceiling mounting at 45 degrees elevation is the practical standard solution where ceiling construction permits.
Subwoofer placement is less directionally prescriptive but critically important to bass frequency uniformity. Frequencies below 80 Hz are largely omnidirectional, making subwoofer position a function of room modal behaviour rather than directional imaging. A Distributed Bass Array (DBA) — four subwoofers placed at prescribed symmetrical positions within the room — is the most technically rigorous solution for rooms wider than 4 metres, reducing seat-to-seat bass variation to within ±3 dB compared to ±15–20 dB typical of single-subwoofer placements in untreated rooms.
Subwoofer placement and measurement should always precede output specification — a correctly positioned and equalised unit will consistently outperform a higher-powered subwoofer that has not been correctly placed.
How Do Room Acoustics Affect Home Theater Performance?
Room acoustics govern the perceived quality of every audio component in the system. Untreated rectangular rooms generate parallel-wall reflections that cause comb filtering, flutter echo, and low-frequency standing waves — all of which degrade stereo imaging and dialogue intelligibility regardless of loudspeaker quality or purchase cost.
Low-frequency room modes (eigenmodes) occur at frequencies where the room’s physical dimensions are whole-number multiples of the sound wavelength. A 5-metre room length produces a first axial mode at approximately 34 Hz. These modes cause significant bass non-uniformity — peaks and nulls of 10 to 20 dB are common at affected frequencies in untreated rooms — making subwoofer calibration without physical treatment largely ineffective at resolving the underlying acoustic problem.
Room treatment addresses problems that no amount of electronic correction can fully resolve, making it one of the highest-value investments in any home theater build.
Broadband absorption panels using 100mm mineral wool or rigid fiberglass fill address mid and high-frequency reflections at first and second reflection points — the wall and ceiling positions where sound from the main speakers reaches the listening position after a single bounce. Correct panel placement reduces early reflections, improving stereo imaging width, depth, and phantom centre stability. Bass trapping — the most technically demanding aspect of treatment — requires floor-to-ceiling treatment in room corners where bass energy concentrates due to modal pressure buildup. Effective corner traps combine porous absorption with resonant panel construction to achieve attenuation beginning at 60–80 Hz and extending through the midrange.
Diffusion preserves room liveliness while eliminating discrete reflections. Quadratic residue diffusers and skyline diffusers placed on the rear wall scatter acoustic energy across multiple directions, preventing the listening position from sitting in a specular reflection node. The target reverberation time (RT60) for a home cinema, per CEDIA design guidelines, is 0.2 to 0.4 seconds at 1 kHz — a range that provides sufficient acoustic energy for a natural listening environment without the reverberant tail that degrades speech intelligibility.
What Is the Optimal Seating Layout for a Home Theater?
Seating layout directly determines display size requirements, speaker placement geometry, and acoustic treatment priorities. Errors made at the layout planning stage force compromises across every other system, and many of those compromises are permanent once construction is complete.
The primary viewing distance must be established first. THX certification standards specify a 36-degree horizontal field of view at the primary seat as the reference viewing geometry for home theater — a specification that fixes screen width as a direct function of viewing distance. A 120-inch (diagonal) 16:9 screen delivers this field of view at approximately 2.4 metres from the screen surface. THX also specifies a minimum 85 dB SPL at the primary listening position with no more than 3 dB of variation across seating rows — a constraint that directly determines acceptable row-to-row distance relative to the speaker array and sets a technical floor for amplifier output specification.
Multi-row configurations require riser height calculations. Each row behind the primary row needs a raised platform to achieve unobstructed sightlines to the bottom of the screen. A standard calculation uses the seated eye height (approximately 1.05 metres above the riser surface) and the required sightline clearance over the head of the row ahead. With a screen bottom edge at 0.45 metres above the primary floor level, each riser step typically measures 18 to 22 centimetres. Riser construction must account for acoustic decoupling — solid-surface risers transmit subwoofer vibration directly to rear-row seats without adequate isolation material between the riser platform and the structural floor beneath it.
Seat-to-seat spacing for commercial-style power recliners runs 1.0 to 1.2 metres centre-to-centre with 0.9 to 1.0 metre depth clearance for full reclination. A 4-metre-wide room comfortably accommodates three seats per row at this spacing while retaining adequate side-wall clearance for first-reflection absorption panels. Heavily upholstered recliners also function as distributed broadband absorbers, raising the room’s overall absorption coefficient and reducing the treatment surface area required on walls and ceiling to achieve the target RT60.
How Do You Run Cables and Manage Signal Routing?
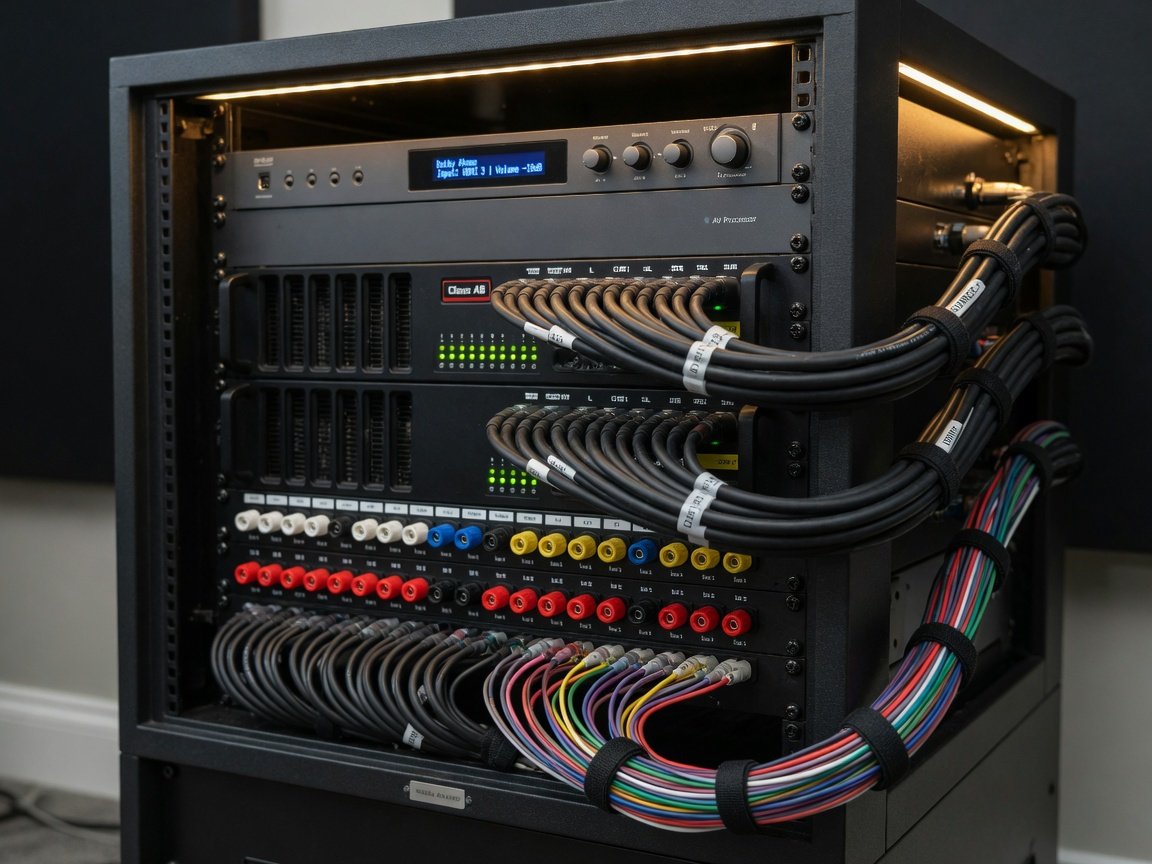
Cable infrastructure is the least visible and most permanent element of a home theater set up. Planning conduit routes and pulling cables before walls close is the single most cost-effective infrastructure decision a home theater builder can make — retroactive cable installation behind finished walls costs three to five times the equivalent work done during construction.
All HDMI runs should use 48 Gbps-rated cables for distances up to 5 metres. Beyond 5 metres, passive copper HDMI cables become unreliable at 4K/120Hz data rates regardless of manufacturer claims. Active optical HDMI cables (AOC) carry HDMI signals over optical fibre with electrical endpoints at each termination and support lengths of 30, 50, or 100 metres without signal degradation. AOC cables are directional — source and display ends are marked — and cannot carry ARC or eARC signals; a separate short copper HDMI cable is required for any audio return path.
Speaker cable gauge follows a resistance-based calculation. For 8-ohm nominal speaker loads, cable resistance should remain below 5% of the speaker impedance. This places 16 AWG cable at a practical limit of 5 metres, 14 AWG at 10 metres, and 12 AWG at 15 metres. Shielded speaker cable adds cost without measurable benefit in typical home environments where significant magnetic interference sources are absent.
Power infrastructure requires dedicated circuits for the equipment rack. AV receivers and power amplifiers draw significant transient current during dynamic audio peaks — a minimum 20-ampere dedicated circuit per amplifier rack position is standard practice. A passive or active power conditioner between the mains supply and equipment reduces the noise floor at analogue audio output stages, which is measurable with a distortion analyser in environments with high mains-borne noise. Conduit planning should incorporate at minimum: one 32mm conduit per HDMI run, one 25mm conduit per speaker zone, and one 40mm conduit for mains power to the rack position.
| Cable Type | Signal | Max Recommended Distance | Key Constraint |
|---|---|---|---|
| Passive Copper HDMI 2.1 | 4K/120Hz HDR | 5 metres | Quality varies significantly between products |
| Active HDMI (in-cable chip) | 4K/60Hz HDR | 10 metres | Directional — observe source/display labelling |
| Active Optical HDMI (AOC) | 4K/120Hz HDR | 100 metres | Cannot carry ARC/eARC; directional |
| HDMI over CAT6 (HDBaseT) | 4K/60Hz HDR | 70–100 metres | Requires matched transmitter/receiver pair |
| 16 AWG Speaker Cable | Analogue audio | 5 metres (8Ω load) | Resistance limit: <5% of speaker impedance |
| 12 AWG Speaker Cable | Analogue audio | 15 metres (8Ω load) | Preferred for LCR, subwoofer, and long runs |
How Do You Calibrate a Home Theater System for Best Performance?
Calibration transforms a correctly installed system into a correctly performing one. Both display and audio systems require measurement-based calibration using appropriate instruments — visual estimation and factory presets are insufficient for reference-grade performance and in most cases actively degrade output accuracy relative to the reference standard.
Display Calibration — Step by Step
Uncalibrated consumer displays typically exhibit colour accuracy errors of 25 to 30 Delta-E units — far beyond the 3 Delta-E human visual perception threshold. Most manufacturers ship displays in a “vivid” or “dynamic” preset mode optimised for showroom ambient light, which overdrives blue primary saturation, applies aggressive sharpening, and enables motion interpolation that introduces visible artefacts on cinematic frame rates.
- Select the baseline picture mode — “Cinema”, “Movie”, or “Filmmaker Mode” applies the closest factory approximation to reference colour science and is the correct starting point for calibration.
- Disable all post-processing features — motion smoothing (TruMotion, MotionFlow, or equivalent), noise reduction, edge enhancement, and adaptive local dimming must all be switched off.
- Set peak brightness using a calibrated 10% white window test pattern to the target luminance for your room’s ambient light — 48 nits for a fully light-controlled dark cinema environment, 100–120 nits for dim-light rooms.
- Measure greyscale tracking using a spectrophotometer and a luminance ramp from 10% to 100% IRE. Note correlated colour temperature (CCT) and gamma deviations across the full luminance range.
- Adjust two-point white balance (gain and offset controls) to achieve D65 colour temperature (6,500K) across the full luminance range, targeting Delta-E below 3 at every greyscale step.
- Correct colour gamut using the CMS (Colour Management System) controls to adjust primary and secondary hue, saturation, and luminance values to the target colour space — Rec.709 for SDR content, P3-D65 for HDR.
- Validate the EOTF curve — Gamma 2.2–2.4 for SDR material, ST.2084 PQ for HDR10 and Dolby Vision content.
Audio Calibration — Step by Step
Audio calibration begins with room measurement using a calibrated omnidirectional measurement microphone and REW (Room EQ Wizard), the industry-standard free acoustic measurement tool. A logarithmic frequency sweep at the primary listening position captures the room’s impulse response, from which the software derives frequency response, RT60 decay time, and group delay — the three primary diagnostics for identifying both treatment requirements and EQ correction targets.
- Set all speaker distances from the primary listening position in the AV receiver or processor — a laser distance measure provides accuracy to within 1 centimetre, translating to approximately 0.03 ms of time alignment precision per channel.
- Run the automatic calibration routine (Audyssey MultEQ XT32, Dirac Live, or YPAO-R.S.C. depending on receiver platform) with the microphone at the primary position and at least four satellite positions covering the seating area.
- Review and override bass management crossover — if the auto-calibration result deviates from best practice, manually set the crossover frequency to 80 Hz, the THX-recommended standard for most home theater speaker configurations.
- Re-measure with REW post-correction and compare the result to the preferred target curve — typically a gently sloping response beginning a −3 dB/octave roll-off above 2 kHz.
- Apply targeted manual EQ corrections for residual peaks exceeding 3 dB in the 63 Hz to 2 kHz region. Peaks can be corrected with narrow parametric cuts; nulls caused by destructive interference require physical treatment adjustment rather than EQ.
- Verify channel levels using a calibrated SPL meter at the primary listening position — THX reference level is 85 dB SPL per channel with a pink noise test signal, measured C-weighted.
Automatic room correction systems have improved significantly but remain a starting point rather than an end point. A post-calibration REW measurement session is recommended to verify filter results and apply manual refinements where the algorithm has over-corrected or failed to address a modal peak.
What Source Devices and Streaming Hardware Should You Use?
The source layer of a home theater set up determines which content formats the system can decode and at what signal quality that content reaches the display and audio processor. Matching source device output capabilities to the AV receiver’s decoding capabilities and the display’s HDR processing pipeline is a prerequisite for extracting full system performance.
An Ultra HD Blu-ray player remains the highest-quality source for home theater content in 2026. Physical media delivers lightly compressed video at up to 100 Mbps (HEVC encoding) and fully lossless audio (Dolby TrueHD Atmos, DTS-HD Master Audio) without the bitrate constraints imposed by streaming services.
Streaming media players provide access to Dolby Vision, HDR10+, and Dolby Atmos content via subscription services at compressed bitrates typically ranging from 15 to 40 Mbps for 4K content. For Dolby Atmos audio passthrough from streaming services, the streaming device should connect directly to the AV receiver’s HDMI input rather than routing through the display’s eARC output, which can introduce processing latency and format conversion errors depending on display firmware revision.
Ultra HD Blu-ray physical media delivers video bitrates up to 100 Mbps — more than twice the peak bitrate of the highest-tier 4K streaming services available in 2026.
Gaming consoles configured for home theater use require a separate HDMI input profile on the display set to “gaming mode” — disabling all image processing to achieve input latency below 10 ms. This profile must be kept separate from the cinema mode profile used for film content, as gaming mode disables colour management processes essential for accurate HDR rendering on film material. Both current-generation gaming consoles support 4K/120Hz with Variable Refresh Rate (VRR) via HDMI 2.1, enabling fluid variable frame rate output for compatible game titles.
Media servers running locally stored content libraries should use a wired Gigabit Ethernet connection rather than Wi-Fi, ensuring sufficient bandwidth for uncompressed 4K HEVC streams that can peak above 80 Mbps. A network switch co-located with the equipment rack reduces cable run lengths and eliminates Wi-Fi congestion as a variable in streaming reliability.
How Much Does a Home Theater Set Up Cost in 2026?
Home theater budgets span a wide range, but the cost distribution across system categories is consistent regardless of tier. Display hardware and audio components typically represent the largest portions of the budget, with acoustic treatment, cable infrastructure, control systems, and seating making up the remainder.
Entry-level system (£3,000–£8,000 / $3,500–$9,500): A 77-to-85-inch OLED or QLED display, a mid-tier nine-channel AV receiver with Dolby Atmos and DTS:X decoding, a 5.1.2 speaker package from a mainstream manufacturer, a single powered subwoofer, and partial acoustic treatment at first reflection points. This configuration delivers genuine Atmos performance and excellent picture quality in a room with even basic light control.
Mid-tier system (£8,000–£25,000 / $9,500–$30,000): A 100-to-120-inch laser projector paired with an acoustically transparent screen, a high-performance AV processor with separate multi-channel amplification, a 7.1.4 speaker configuration with dual subwoofers, comprehensive first-reflection and corner bass trap treatment, and basic IP-based control system integration. At this level, both display and audio performance approach measurable reference standards.
Reference system (£25,000–£100,000+ / $30,000–$120,000+): A 4K laser projector with professional ISF calibration, a cinema-grade AV processor with dedicated multi-channel power amplification, a complete 11.1.4 or larger speaker array with THX Ultra certification, full room construction with acoustic isolation and professional treatment, and a whole-room automation platform.
What Are the Key Home Theater Trends Shaping 2026 and 2027?
The home theater sector is undergoing rapid technological change across display, audio processing, and control integration categories. Several trends will define high-performance installations through the remainder of 2026 and into 2027.
Micro-LED display technology is entering the premium home theater segment in earnest in 2026. Unlike OLED, Micro-LED maintains per-pixel emissive performance without organic degradation risk at high sustained brightness levels. Early residential installations report peak brightness above 4,000 nits with contrast ratios matching OLED at panel sizes from 110 to 165 inches. Module-based assembly systems are beginning to reduce the installation cost trajectory, though current pricing for complete panels remains in the £80,000–£200,000 range — a figure expected to decline substantially through 2027 and 2028.
AI-driven adaptive calibration is accelerating across mid-tier and reference processor platforms. Leading calibration software developers are integrating machine-learning algorithms that continuously adapt room correction filters based on ongoing measurement data, reducing the requirement for periodic manual recalibration sessions. AI-adaptive systems are designed to reduce calibration drift compared to static correction filter sets, lowering the ongoing maintenance burden for professional installations.
Smart room protocol consolidation is progressing around the Matter and Thread IoT standards. Major AV control platforms are releasing native Matter bridges in 2026, enabling lighting, motorised shading, HVAC, and AV systems to operate within a unified control layer without separate proprietary protocol bridges for each subsystem. Integrated smart home and AV control systems are rapidly becoming the default expectation in new construction rather than a premium option.
Example Scenario: What Does a Home Theater Installation Look Like in Practice?
This illustrative scenario involves converting an unfinished 6-metre by 8-metre basement room into a reference-grade dedicated home theater. The room presented three significant challenges: a 2.4-metre ceiling height (below the CEDIA-recommended 2.6 metres for four-channel height speaker configurations), parallel concrete walls generating severe flutter echo above 800 Hz, and a 15-metre cable run from the equipment rack to the projector position.
Phase 1 — Construction and acoustic isolation (6 weeks): A floated timber frame was installed on the concrete walls and ceiling to reduce structural vibration transmission and provide a fixing surface for acoustic treatment. An independent floating floor — 25mm MDF over acoustic isolation compound over a mineral wool mat — reduced impact noise transmission. All conduit for HDMI, speaker, control, and power cable routes was installed during this phase before wall boarding.
Phase 2 — Acoustic treatment installation (2 weeks): 48 panels of 100mm mineral wool broadband absorption were installed at first and second reflection points on walls and ceiling. Twelve 300mm deep corner bass traps were installed across all four vertical room corners from floor to ceiling. A custom-built skyline diffuser array was installed across the full rear wall.
Phase 3 — System installation and calibration (3 weeks): A 4K laser projector delivering 3,200 ANSI lumens was installed at a 3.6-metre throw distance onto a 140-inch acoustically transparent screen. The audio system comprised a 13.2.4-channel configuration with three-way LCR speakers, bipole surround speakers, direct-radiating in-ceiling height speakers, and four independently powered subwoofers in a Distributed Bass Array configuration.
Frequently Asked Questions
What is the minimum room size for a dedicated home theater?
CEDIA design guidelines recommend a minimum of 4.2 metres wide by 5.5 metres long for a baseline 5.1 speaker configuration with a 100-inch screen. Smaller rooms can function as home theaters but impose meaningful constraints on viewing distance geometry, speaker placement angles, and the depth of acoustic treatment that can be installed without further reducing usable floor area.
Do I need an AV receiver or a separate processor and amplifier?
For systems budgeted up to approximately £5,000, an integrated AV receiver is the most practical choice — it combines decoding, room correction, and amplification in a single chassis at a competitive price point. Above this budget, separating the AV processor from dedicated power amplifiers delivers measurably lower noise floors, higher sustained output for large speaker arrays, and greater upgrade flexibility, as each component can be replaced independently as the system evolves.
Is acoustic treatment necessary if I use automatic room correction?
Room correction systems address frequency response deviations effectively but cannot correct excessive reverberation time (RT60 above 0.5 seconds), flutter echo between parallel surfaces, or severe bass mode non-uniformity at affected frequencies. Physical treatment and electronic correction are complementary rather than interchangeable: treatment resolves problems that EQ cannot, and EQ addresses residual deviations that treatment alone cannot fully eliminate.
What is the correct crossover frequency between main speakers and the subwoofer?
80 Hz is the THX-recommended crossover frequency and the correct standard starting point for most home theater speaker configurations. Smaller bookshelf or satellite speakers may benefit from a 100 or 120 Hz crossover. Large floor-standing speakers with measured in-room response below 40 Hz may operate with a 60 Hz crossover. Always verify the setting by measuring the combined speaker-plus-subwoofer in-room response rather than relying on manufacturer specifications alone.
How do I prevent HDMI signal failures on long cable runs?
Use active optical HDMI cables (AOC) for any run exceeding 5 metres. Install cables through dedicated conduit before walls are closed, and avoid in-line adapters, gender changers, and extension cables wherever possible — each additional connection introduces a potential failure point at 48 Gbps data rates. For multi-room distribution, an HDBaseT matrix switcher over CAT6 infrastructure is the most reliable and scalable long-run signal distribution solution.
Does the position of the display affect audio performance?
Yes, directly. Placing a large display in front of the front speaker array forces the LCR speakers outside the reference ±30-degree angular geometry, degrading dialogue localisation accuracy and front soundstage coherence. An acoustically transparent screen resolves this constraint by allowing the LCR array to be positioned directly behind the screen surface — maintaining exact angular relationships without raising the screen above or offsetting it from the speaker positions.
What is the practical difference between Dolby Atmos and DTS:X?
Both are object-based surround formats that encode audio as a combination of channel-based elements and spatially positioned audio objects rendered to whatever speaker configuration is available at playback. Dolby Atmos dominates streaming, physical media, and theatrical exhibition. DTS:X is widely decoded by AV receivers but features less frequently in consumer content libraries. In practice, format availability on your chosen content is the relevant differentiator — both formats render comparably on a well-configured 7.1.4 or larger speaker system.
Conclusion and Implementation Sequence
A successful home theater set up in 2026 is an engineering project as much as a consumer electronics purchase. The decisions made at the room planning stage — ceiling height, conduit routing, acoustic isolation, and speaker placement geometry — determine the performance ceiling for everything installed afterward. No component spend recovers performance lost to poor room geometry or absent acoustic treatment.
Follow this eleven-step implementation sequence to avoid the most common and most expensive installation errors:
- Measure and map the room — dimensions, ceiling height, HVAC positions, and structural constraints.
- Define the display geometry — screen size, throw distance, and primary viewing distance calculation.
- Plan the speaker layout — channel configuration, angular positions from the listening axis, and height speaker elevation angle.
- Design the acoustic treatment — identify first reflection points, corner bass trap positions, and rear-wall diffusion coverage.
- Install infrastructure — conduit routes, dedicated power circuits, and in-wall back-box positions before boarding.
- Build acoustic treatment and install display or screen — complete all room preparation before introducing electronic components.
- Install and wire audio components — AV receiver or processor, power amplifiers, and all loudspeakers.
- Connect source devices and control systems — streaming players, disc players, gaming consoles, and control processors.
- Calibrate the display — greyscale tracking, colour gamut, and EOTF verification using a spectrophotometer and reference test patterns.
- Calibrate the audio system — room measurement, DSP correction filter generation, and channel level verification at the primary listening position.
- Conduct a final verification pass — full-system playback across a range of reference content covering dialogue, music, and dynamic LFE passages.
Budget for calibration tools or professional calibration services from the outset. A spectrophotometer for display calibration and a calibrated measurement microphone for audio together deliver more measurable performance improvement than most single component upgrades at any system tier. The home theater sector will continue evolving rapidly through 2027, with Micro-LED display costs declining, AI-adaptive calibration becoming standard on mid-tier processors, and spatial audio content expanding across all major streaming platforms. The principles that govern this guide — correct geometry, treated acoustics, and measurement-based calibration — will remain the primary determinants of system performance regardless of which specific technologies implement them.