Getting home theater set ups right means coordinating display technology, speaker placement, room acoustics, and signal routing into a single coherent system. A well-executed home theater setup delivers reference-quality audio and video in a domestic environment — but only when every component is spec’d to the room and calibrated as a unified whole. This guide covers every stage of the process, from room selection through post-calibration verification, in the sequence a professional AV integrator would follow in 2026.
Executive Summary
- Incorrect speaker placement and uncalibrated displays account for the majority of documented performance complaints in home theater installations — yet both are fully correctable without replacing any hardware.
- In 2026, HDMI 2.1 (48 Gbps) has become the baseline connectivity standard, supporting 4K/120Hz, 8K/60Hz, variable refresh rate (VRR), eARC, and HDCP 2.3 simultaneously across a single cable run.
- Dedicated rooms with proper acoustic treatment consistently outperform untreated spaces, particularly when first-reflection absorption and corner bass trapping are correctly installed.
What Makes a High-Performance Home Theater Set Up?
A high-performance home theater is not defined by any single component. It is defined by how well every element — display, audio system, room, seating, and signal path — works together as an integrated system. The output of the weakest link sets the ceiling for the entire installation. A £10,000 projector in an acoustically live, light-contaminated room will measurably underperform a £2,500 projector in a well-treated, properly darkened space calibrated to reference standards.
Both errors are correctable through systematic process rather than additional hardware spend. The practical framework for any home theater set up rests on four pillars: the room (dimensions, acoustic properties, light control), the display system (panel or projection, screen size, calibration state), the audio system (speaker count, placement geometry, receiver processing), and the signal infrastructure (cabling, switching, power conditioning). Optimise all four and the result is a system that punches well above its price point.
The single biggest return on investment in any home theater build is room treatment — not display or speaker upgrades. Most enthusiasts spend their budget in the wrong order and then wonder why the system disappoints.
The sequence matters too. Installing acoustic treatment before positioning speakers, and calibrating the display after the room is finished, prevents having to redo work when environmental conditions change. Treating a home theater build like a controlled engineering project — with a defined sequence and verification checkpoints — is how professional integrators consistently achieve repeatable, high-scoring results.
How Do You Select the Right Room for a Home Theater?
Room selection is the most consequential decision in a home theater project. Once construction is complete, changing the fundamental acoustic characteristics of the space is prohibitively expensive. The three key variables are dimensions, ambient noise floor, and natural light intrusion. Each imposes hard constraints on what the finished system can achieve, regardless of equipment budget.
Acoustically, rectangular rooms outperform L-shaped or irregular floor plans because low-frequency standing wave patterns are more predictable and therefore more treatable. The golden ratio room dimension rule — where width, height, and length approximate a 1:1.28:1.54 ratio — minimises problematic modal resonances at low frequencies.
Ambient noise floor is equally critical and frequently underestimated. A room directly above a mechanical plant room, adjacent to a utility area, or beneath a busy residential floor introduces ambient noise that competes with low-level audio detail at reference playback levels. Aim for a noise floor below 25 dB(A) before any audio equipment is powered on. Achieving this in an existing space typically requires solid-core doors, mass-loaded vinyl barriers, decoupled wall assemblies, and minimal HVAC duct penetrations through the acoustic envelope.
Light control in a projection-based system is non-negotiable. Even marginal ambient light dramatically reduces perceived contrast. Rooms with zero windows — or windows fitted with full blackout assemblies — allow laser projectors to operate at their specified contrast ratios, which in current ALPD (Advanced Laser Phosphor Display) designs can reach 3,000,000:1 native contrast. Any uncontrolled light source in the room halves the effective contrast ratio or worse, collapsing the shadow detail that defines cinematic image quality.
Which Display Technology Should You Choose in 2026?
The 2026 display landscape offers four primary technologies for home theater use: OLED panels, MicroLED panels, laser projectors, and LCD/QLED panels. The right choice is not about which technology is objectively superior in isolation — it is about which best matches the constraints of your specific room.
| Technology | Best Room Type | Peak Brightness | Native Contrast | 2026 Entry Price (approx.) |
|---|---|---|---|---|
| OLED (WOLED / QD-OLED) | Light-controlled, ≤85″ | 1,500–3,000 nits | Infinite (pixel-level off) | ~£1,400 / $1,600 |
| MicroLED | Dedicated room, any ambient light | 5,000–10,000 nits | Very high (zone-level) | ~£8,000 / $9,500 (100″) |
| Laser Projector (UST / LST) | Dedicated dark room, 100″–160″ | 2,000–6,000 ANSI lm | Up to 3,000,000:1 (ALPD) | ~£2,500 / $3,000 |
| LCD / QLED | Multi-use room, bright environments | 1,000–4,000 nits | Moderate (FALD-dependent) | ~£700 / $800 (75″) |
The shift to 4K laser projectors reflects falling light source costs and dramatically improved lumen output over previous lamp-based designs. For screens larger than 120 inches diagonal, a throw projector paired with an acoustically transparent woven screen remains the most cost-effective path to a true cinematic field of view.
Screen selection is as technically significant as projector selection. For ambient-light-rejecting (ALR) screens in partially lit rooms, an optical gain of 0.8 to 1.0 is appropriate. In fully darkened rooms, a flat-gain screen at 1.0 provides the most uniform image across a wide seating arc. Avoid high-gain screens exceeding 1.6 — they introduce hot-spotting at the centre of the image and narrow the acceptable seating zone to a fraction of the room’s capacity.
How Should You Position Speakers for a 5.1, 7.1, or Atmos System?
Speaker placement is governed by ITU-R BS.775, the international standard for multichannel audio reproduction, and the Dolby Atmos installation guidelines for residential systems, both of which were updated in 2025 for immersive audio configurations. These standards reflect decades of psychoacoustic research into how the human auditory system localises sound in three-dimensional space — deviating from them produces measurable and audible degradation in imaging accuracy.
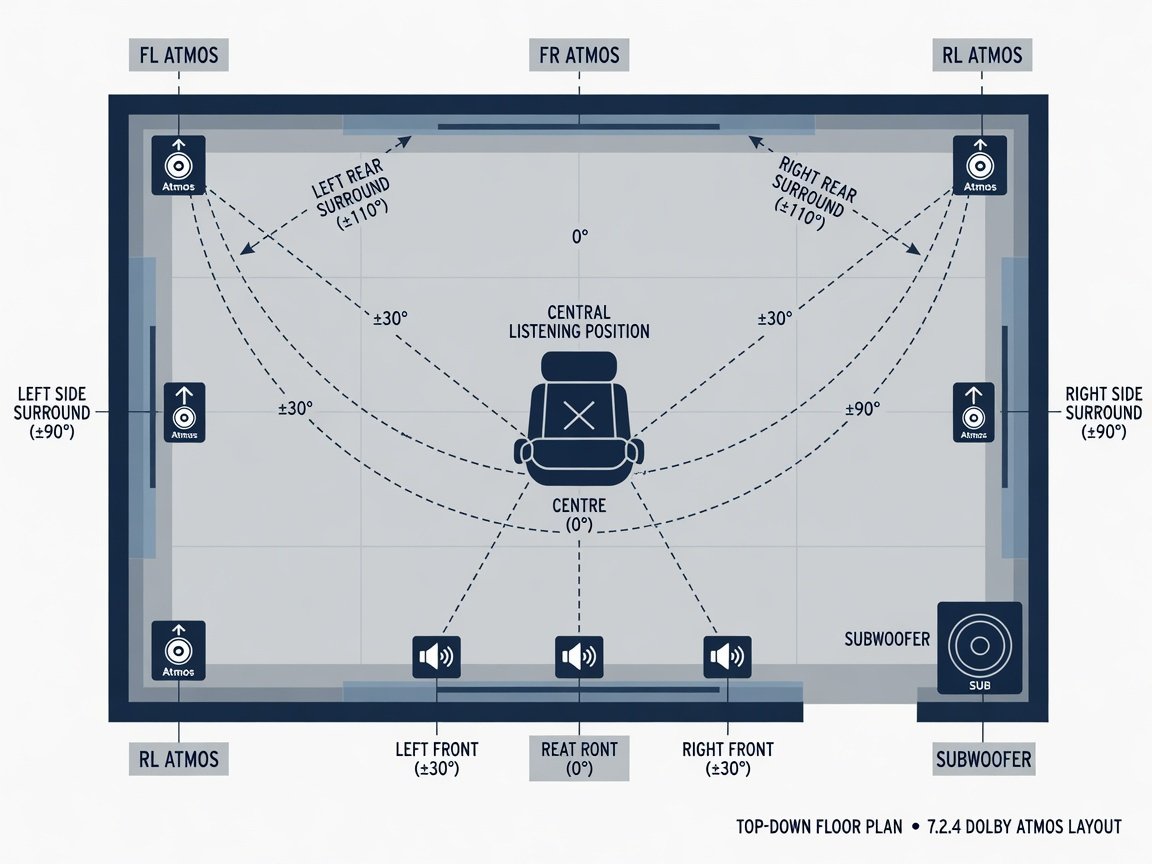
For a 5.1 configuration, the centre channel sits directly above or below the display at ear level, angled toward the primary seating position. Left and right front speakers are placed at ±30° from the centre axis, with tweeters at seated ear height. Surround channels go at ±110° from centre and are mounted 2–3 feet above ear level to prevent the listening brain from localising to the physical cabinet rather than the intended spatial image.
Upgrading to 7.1 adds dedicated side surround channels at ±90°, which substantially improves lateral sound stage definition — particularly useful in wide rooms where the 110° rear surrounds sit too far behind the primary seating zone. For Atmos height channels, whether ceiling-mounted or up-firing modules, Dolby’s specification calls for 45° elevation above the listening plane for the front height pair and 135° elevation for the rear height pair in a full 7.1.4 configuration. These angles are not suggestions — they are the result of psychoacoustic testing with large listener panels.
Most installers underestimate how much the elevation angle matters in an Atmos system. The ceiling speaker’s vertical position relative to the listener is at least as important as its horizontal placement. Get it wrong and the height layer collapses into the front soundstage and disappears.
Subwoofer placement requires a separate methodology. Low frequencies are omnidirectional below approximately 80 Hz, and their distribution in the room is governed by modal resonance patterns that are unique to every space. The subwoofer crawl method — placing the subwoofer temporarily in the primary listening seat, playing a bass sweep, then walking the room perimeter to locate the position with the smoothest response — reliably identifies the optimal permanent placement.
What Acoustic Treatments Are Essential for a Home Theater?
Acoustic treatment has three distinct functions: absorption (reducing reflections and shortening RT60), diffusion (scattering reflections to reduce comb filtering without deadening the acoustic environment), and bass trapping (controlling low-frequency modal energy in room corners). A correctly specified home theater uses all three in specific locations determined by the room’s geometry and the speaker layout.
First-reflection point treatment is the highest-priority intervention. These are the locations on the side walls, ceiling, and rear wall where direct speaker energy first bounces toward the listening position. Treating these with broadband absorbers — panels using 2–4 inch thick rigid fibreglass or mineral wool — provides effective absorption from approximately 250 Hz upward. Identify first-reflection points using the mirror technique: a person at the listening position can see the relevant speaker reflected in a mirror held flat against the wall surface at the reflection point.
Bass traps require corner installation for maximum efficiency. Floor-to-ceiling corner panels with a porous absorptive core address room modes from approximately 80 Hz upward.
How Do You Wire a Home Theater for Optimal Signal Integrity?
Signal infrastructure is invisible once walls are closed — which is exactly why it demands careful planning before any installation begins. A home theater wired to current standards in 2026 uses HDMI 2.1 (48 Gbps bandwidth) throughout the active signal chain, supporting 4K/120Hz, 8K/60Hz, VRR, eARC for lossless audio return from the display, and HDCP 2.3 for protected content. Using HDMI 2.0 or earlier cabling in a new installation creates a bottleneck that limits the system’s upgrade path for years.
Run conduit rather than direct-buried cable wherever walls will be sealed. Conduit allows cable replacement without demolition — a practical necessity as HDMI generations continue to evolve. One-inch diameter EMT or PVC conduit from the AV rack to the projector mount and to each speaker position accommodates even large-diameter active optical HDMI cables. Pull strings should be left in every conduit run after initial cable installation.
Speaker cable gauge follows a straightforward engineering rule: 16 AWG minimum for runs up to 25 feet, 14 AWG for 25–50 feet, and 12 AWG for runs above 50 feet. Resistance in undersized speaker cable creates measurable frequency response deviation at the loudspeaker terminals.
Power conditioning deserves deliberate budget allocation. Dedicated 20-amp circuits for the AV rack — separate from general room circuits — reduce shared ground noise and eliminate the voltage sag caused by large amplifier transients on shared wiring. A quality power conditioner with surge protection and EMI/RFI filtering measurably reduces noise on sensitive analogue audio input paths — not an audiophile preference but an electrical engineering improvement.
What AV Receiver Features Should You Prioritise in 2026?
The AV receiver is the signal hub, format decoder, and amplifier core of a home theater. In 2026, the minimum specification for a new performance-oriented AVR purchase is: HDMI 2.1 inputs and outputs, Dolby Atmos and DTS:X decoding, a built-in room correction system (Audyssey MultEQ XT32, Dirac Live, or YPAO Precision EQ), and a minimum of seven amplified channels with pre-amplifier outputs on all channels for external amplifier expansion.
Room correction capability has become the most technically differentiated feature category in modern AVRs. Dirac Live — available on receivers from multiple manufacturers across several price tiers — applies minimum-phase FIR filters that correct both frequency response and impulse response at the listening position simultaneously. Dirac Live addresses real, measurable seat-to-seat frequency response variation in untreated rooms, making it arguably the single highest-value feature available in a modern AVR at any price point.
Dirac Live and MultEQ XT32 are not audio enhancement tools — they are engineering corrections for real, measurable acoustic problems. Any serious home theater installation should treat room correction software as core infrastructure, not an optional extra to upgrade later.
Channel count planning should account for a future upgrade path. A 9.1.4 processing core with at least seven onboard amplified channels — leaving the remaining channels routed to pre-amp outputs for dedicated external amplification — provides the most flexible expansion path for a full Atmos installation. Confirm that the unit’s pre-amplifier outputs cover all channels before purchasing, as some mid-range receivers omit pre-outs on height channels specifically.
How Do You Calibrate Your Home Theater System?
Calibration is the step that transforms a correctly installed system into a correctly performing one. It has two components — display calibration and audio system calibration — and both must be performed after all acoustic treatment is installed and furniture is in its permanent position. Calibrating before these conditions are met produces results that become incorrect the moment the room changes.
Home Theater Calibration Sequence — 2026
- Display warm-up period: Allow any OLED panel or laser projector to accumulate a minimum of 200 hours of use before performing final calibration, allowing the light source to stabilise to its operating characteristics.
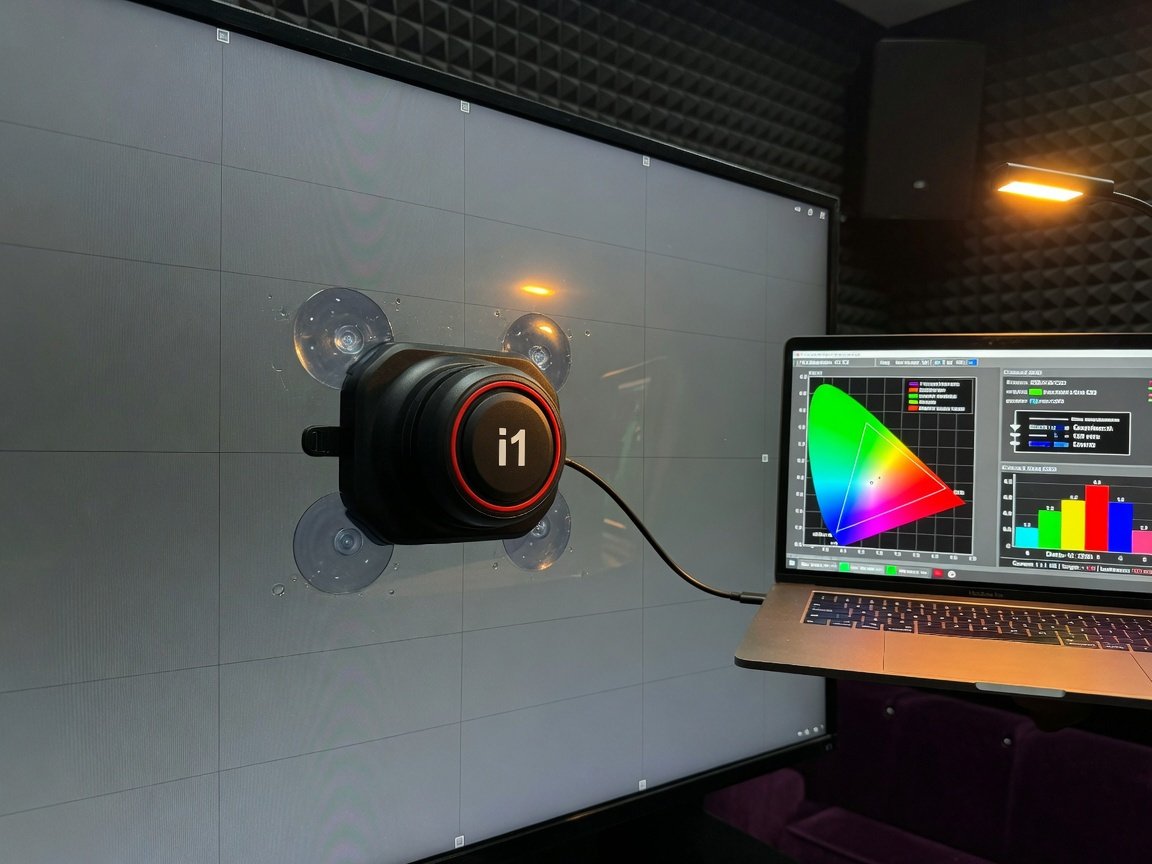
- AVR automated room correction sweep: Run the manufacturer’s room correction system (Audyssey, Dirac Live, or YPAO) with the calibration microphone placed at the primary listening position. Perform a minimum of three measurement positions within the main seating zone for a statistically representative result.
- Manual AVR trim verification: After automated correction, confirm crossover settings (80 Hz default; adjust per speaker specification), speaker distances (measured to 0.1-foot accuracy), and channel level trim (reference target: 75 dB SPL at the listening position per channel).
- Display greyscale and colour calibration: Using an approved colorimeter and calibration software, target D65 white point, gamma 2.4 (dark room), and Rec.709 colour space for SDR content (P3/D65 for HDR). Adjust two-point or 10-point greyscale tracking to within ΔE 2.0 of the D65 target at all stimulus levels.
- Bass management verification: Play a 40 Hz test tone and confirm audible subwoofer output. Walk the seating area to identify bass pressure nodes; adjust subwoofer position or phase control if significant seat-to-seat variation is detected.
- Reference level verification: Play THX or Dolby reference calibration content at 0 dB relative volume. Confirm main channels produce 85 dB SPL at the listening position and the subwoofer produces 85–88 dB SPL. Adjust master volume trim and document all final settings.
Factory default picture settings are routinely pushed cool and blue to appear vivid on a brightly lit showroom floor, introducing a white-point deviation from D65. This deviation causes measurable colour inaccuracy across all HDR and SDR content, and produces visual fatigue in extended viewing sessions. Calibrating to D65 also ensures the image matches the colour grading environment used by the content mastering facility.
Example Scenario: A 450 sq ft Dedicated Home Theater Build in 2026
The following illustrates how these principles apply to a full dedicated home theater build in a purpose-built 450 sq ft (42 m²) basement room. The room measures 18 ft × 25 ft × 9 ft ceiling — closely approximating the golden ratio — and was constructed with staggered-stud decoupled walls, a floating floor assembly on 40-mm resilient mounts, and a solid-core double-door acoustic entry system. The acoustic brief targeted an RT60 of 0.35 seconds at 1 kHz.
The display system centres on a 4K laser projector with a native contrast specification of 3,000,000:1, projecting onto a 140-inch acoustically transparent woven screen. The audio system is a full 7.1.4 Dolby Atmos configuration comprising three-way passive front LCR towers, dipole surrounds at ±90° and ±110°, four flush-mount in-ceiling Atmos drivers at Dolby-specified elevation angles, and a pair of 18-inch sealed subwoofers crossed at 80 Hz, processed through a DSP unit running FIR-corrected room filters.
The build illustrates that systematic application of acoustic science — room design, structured treatment placement, and calibrated signal processing — can produce results that significantly exceed informal installs at comparable total hardware cost.
What Home Theater Trends Will Define 2026 and Beyond?
Several converging technology developments are reshaping home theater specifications in 2026. Understanding them helps future-proof purchasing and construction decisions made today.
MicroLED at residential scale: Panel sizes from 100 to 165 inches have entered the prosumer residential market in 2026 at meaningfully reduced price points. Self-emissive pixel architecture delivers infinite contrast and sustained brightness levels that projection cannot match in ambient-light environments, opening a genuine alternative to projection for large-format installations where light control is architecturally impractical.
Object-based audio expansion: Dolby Atmos adoption in residential settings has grown substantially year-on-year and continues to accelerate into 2026. Processing cores are now shipping with 9.1.6 and 11.1.8 channel support. Dedicated room dimensions to accommodate true 7.1.4 Atmos configurations are appearing with increasing regularity in architect briefs for new-build residential projects.
AI-assisted room correction: Multiple AVR manufacturers shipped 2026 firmware updates incorporating machine-learning-assisted room correction algorithms. These systems analyse multiple measurement sweeps, identify room-specific modal patterns, and generate adaptive filter correction curves that can modify dynamically based on content type. Early independent measurement data shows improved low-frequency control consistency compared to equivalent static correction curves — a development worth monitoring as the technology matures.
HDR format consolidation: The format fragmentation between Dolby Vision, HDR10+, and HLG appears to be resolving in 2026 toward panel-side metadata processing, with most flagship displays now capable of converting between formats in hardware. Specifying a display that supports all three primary HDR formats remains best practice and eliminates the risk of content compatibility gaps as the streaming ecosystem continues evolving.
Frequently Asked Questions About Home Theater Set Ups
What is the minimum room size for a proper home theater?
A minimum footprint of approximately 12 ft × 18 ft (216 sq ft) is typically required to achieve a 100-inch diagonal screen image at the correct viewing distance, while retaining adequate space for acoustic treatment panels and speaker placement at the angles specified by ITU-R BS.775. Smaller rooms are usable but impose hard constraints on screen size, subwoofer placement options, and the achievable RT60 target.
How far should seating be from the screen?
For a 4K display, the optimal viewing distance is approximately 1.0× to 1.5× the screen diagonal. At this range the eye resolves the full 4K pixel resolution without visible pixel structure. For a 120-inch screen, that positions primary seating between 10 and 15 feet from the screen surface. SMPTE’s 30-degree horizontal field-of-view recommendation for theatrical cinema places the equivalent seating distance at approximately 1.2× the screen width, which closely aligns with the 4K resolution acuity threshold.
Can a living room work as a home theater without acoustic treatment?
A living room can function as a home theater, but expect measurable performance compromises relative to a dedicated treated space. Ambient light limits effective contrast, open floor plans scatter bass energy and reduce subwoofer loading efficiency, and hard reflective surfaces — glass, tile, hardwood floors — push RT60 well above the 0.3–0.5 second range appropriate for cinema audio reproduction. A living room system can still perform well if a high-brightness display is chosen, an ALR screen is used with projection, and at minimum first-reflection-point treatment is installed on side walls.
What is the correct crossover frequency for home theater speakers?
The THX and Dolby reference standard specifies 80 Hz as the crossover between full-range channels and the bass management subwoofer path. This applies to the majority of bookshelf, in-wall, and on-wall speaker designs. Full-range floorstanding speakers with a measured in-room extension below 40 Hz may operate with a lower crossover of 40–60 Hz, but only after verifying the speaker’s actual low-frequency output using a calibrated measurement microphone — not from specification sheet data alone.
How often should a home theater display be recalibrated?
OLED panels exhibit gradual organic emitter aging and should be recalibrated every 18–24 months for colour-critical viewing. Laser projectors should be recalibrated annually and whenever the light source module is replaced. Any significant room change — new furniture, repainted surfaces, modified acoustic treatment — warrants a fresh audio calibration sweep via the AVR’s room correction system, since these changes alter the room’s acoustic signature and invalidate the previous correction filters.
Is Dolby Atmos worth adding to an existing home theater in 2026?
Yes — provided the room geometry allows ceiling speakers or up-firing Atmos modules to be positioned at the specified elevation angles. A 5.1.2 system — adding just two height channels to an existing 5.1 installation — delivers a clearly perceptible improvement in overhead and spatial audio realism for any Atmos-encoded content. The format is now standard across all major streaming platforms, 4K Blu-ray, and gaming consoles. The incremental cost over an existing 5.1 system is modest: two additional ceiling speakers and an Atmos-capable AVR.
What Is the Right Sequence to Build Your Home Theater Set Up?
Approaching a home theater build as an ordered engineering project — rather than a series of opportunistic component purchases — separates consistently high-performing installations from expensive disappointments. Follow this implementation sequence to get the right result the first time:
- Weeks 1–2 — Room assessment: Measure dimensions and calculate modal frequencies. Map ambient noise floor. Identify all light intrusion sources. Confirm conduit routing paths and circuit capacity before any equipment is specified.
- Weeks 2–4 — Acoustic design and procurement: Produce a treatment plan targeting RT60 of 0.3–0.5 s at 1 kHz, with bass trap positions in all four floor-to-ceiling corners and absorber coverage at all first-reflection points. Order materials.
- Weeks 4–6 — Infrastructure installation: Pull all speaker cables, HDMI conduit runs, and power circuits while walls are accessible. Label every run at both termination ends. Leave pull strings in every conduit.
- Weeks 6–8 — Equipment installation: Mount screen or display, install projector, position all speakers per ITU-R BS.775 and Dolby Atmos angular specifications. Terminate all connections.
- Weeks 8–9 — Acoustic treatment installation: Install corner bass traps first, then first-reflection absorbers on side walls and ceiling, then rear-wall diffusion. Measure RT60 before and after to verify treatment effectiveness.
- Weeks 9–10 — System calibration and documentation: Run AVR room correction, calibrate display with a colorimeter, verify reference levels with a calibrated SPL meter, and document every final setting value. Store the documentation with the system.
At hometheaterinfoline.com, the consistent editorial position is that process and calibration deliver more audible and visible improvement than hardware upgrades for the majority of existing home theater systems. Before purchasing new equipment, measure what the current system actually produces at the listening position using free or low-cost acoustic measurement software. The data frequently reveals that the installed hardware is already capable of significantly better performance than it is currently achieving — and that the path to that performance costs far less than a component replacement.