The best 7.1 surround sound system places seven calibrated speaker channels and a dedicated subwoofer around the listening room to deliver cinema-accurate spatial audio. In 2026, reference-quality 7.1 performance starts under $1,500 — the result of advanced room-correction technology, improved speaker driver manufacturing, and lossless audio source material now available on every major streaming platform.
Executive Summary: 7.1 Surround Sound in 2026
- Rear channels deliver disproportionate perceptual gains: A correctly configured 7.1 layout increases perceived spatial envelopment and soundstage depth over 5.1 — particularly in rooms larger than 220 square feet, where two discrete rear channels eliminate the “rear-wall smear” artefact common in 5.1 playback.
- Auto-calibration has closed the gap between budget and reference: Modern room-correction platforms — Audyssey MultEQ XT32, Dirac Live, and YPAO-R.S.C. — now achieve measured frequency responses within ±3 dB from 20 Hz to 20 kHz in typical domestic rooms without manual acoustic treatment, a result that previously required custom professional installation.
- Entry costs have fallen to historic lows: A complete 7.1 system meeting THX Select performance benchmarks can be assembled for under $1,200 in 2026 — a threshold that was unachievable at equivalent quality just three years ago.
- 7.1 is the structural foundation of all current immersive audio: Both Dolby Atmos and DTS:X encode object-based height layers on top of a 7.1 bed channel mix. A well-built 7.1 system is not a legacy format — it is the horizontal baseline on which every current and planned immersive audio standard is constructed.
What Is a 7.1 Surround Sound System and How Does It Work?
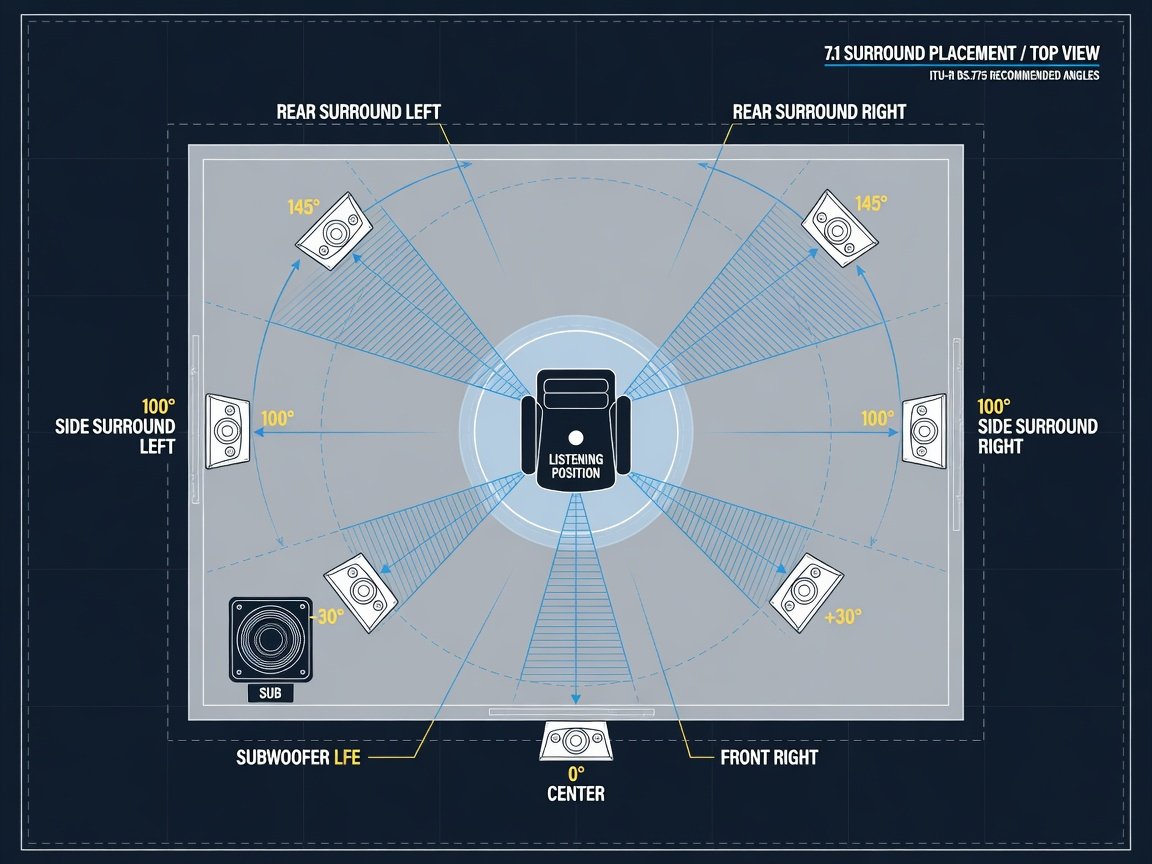
A 7.1 surround sound system consists of seven full-range speaker channels and one dedicated low-frequency effects (LFE) subwoofer channel. The front cluster — front left (L), center (C), and front right (R) — handles on-screen dialogue, primary musical content, and forward-panned effects. Two side surround speakers positioned at 90° to 110° from the central listening axis deliver lateral movement cues and ambient diffusion. Two rear surround speakers placed at 135° to 150° behind the primary listening position complete the horizontal envelope, providing the rear depth cues that distinguish true surround envelopment from stereo widening. The ITU-R BS.775 international standard, the recognized reference for multichannel audio channel geometry, defines these angular positions and underpins every major consumer surround format in active use today.
The “.1” designates the subwoofer channel, which reproduces low-frequency content from approximately 20 Hz up to a configurable crossover point — typically 80 Hz to 120 Hz, in accordance with both the Dolby and THX production guidelines. Below the crossover, bass energy is omnidirectional in character, and the AV receiver’s bass management circuitry redirects it from the satellite speakers to the subwoofer. Bass management is central to the perceived dynamic impact of a home theater system, making subwoofer quality and placement as critical to overall performance as any of the seven main speaker channels.
Both Dolby TrueHD and DTS-HD Master Audio — the lossless audio codecs carried on Blu-ray disc and now supported by premium streaming tiers — encode discrete 7.1 channels at bit rates up to 24.5 Mbps, delivering the full bit-depth and dynamic range of the original studio master to the listener’s AV receiver without compression artefacts. This lossless delivery path means a 7.1 system in the home can receive the identical channel-discrete audio mix that the film’s sound mixer signed off on in a THX-certified theatrical dubbing stage.
How Does 7.1 Surround Sound Differ from 5.1 and Dolby Atmos in Practice?
The transition from 5.1 to 7.1 adds two channels — rear left surround and rear right surround — but the perceptual impact is disproportionate. In a 5.1 layout, the two side surround speakers at 90°–110° are asked to simultaneously create the illusion of sounds arriving from the sides and from the rear. That compromise introduces envelopment artefacts during fast-panning soundscapes, because a single surround channel cannot convincingly place a sound both beside and behind the listener. A 7.1 system resolves this by dedicating two distinct channels to each hemisphere of the horizontal plane, providing precise directional localization across all 360° without the spatial ambiguity inherent in 5.1.
| Format | Speaker Count | Discrete Rear Channels | Height Channels | Typical Use Case |
|---|---|---|---|---|
| 5.1 | 5 + 1 subwoofer | None (surround doubles as rear) | None | Entry home theater, rooms under 200 sq ft |
| 7.1 | 7 + 1 subwoofer | 2 discrete | None | Mid-to-large rooms; film reference standard |
| 7.1.2 | 7 + 1 sub + 2 height | 2 discrete | 2 (Atmos / DTS:X) | Entry-level Dolby Atmos configuration |
| 7.1.4 | 7 + 1 sub + 4 height | 2 discrete | 4 (Atmos / DTS:X) | Reference immersive home theater |
Dolby Atmos and DTS:X are object-based formats that layer height-channel audio on top of a channel-based 7.1 bed mix. That bed mix carries the horizontal foundation of every theatrical Atmos title, with height-channel objects active across only a portion of a typical feature film’s runtime. The 7.1 horizontal bed carries the majority of the audio energy in every Atmos mix. Adding two or four in-ceiling height speakers creates a 7.1.2 or 7.1.4 configuration that supplements the 7.1 base without replacing it, meaning every dollar invested in a quality 7.1 system directly improves the foundation of any future Atmos upgrade.
What Specifications Actually Matter When Evaluating a 7.1 System?
Reading AV specifications requires distinguishing between meaningful engineering measurements and inflated marketing figures. Power output — stated in watts per channel (WPC) — is only meaningful when measured at a stated impedance load (4 or 8 ohms), across the full 20 Hz–20 kHz audio bandwidth, and at a declared total harmonic distortion (THD) figure. A receiver specifying “100W × 7 (8Ω, 20 Hz–20 kHz, 0.08% THD)” provides a useful, honest figure. One claiming “190W × 7” with no further qualification is almost certainly measuring a single channel, at 1 kHz only, at a higher THD and lower impedance than real-world operation. The FTC power rating standard requires the full-bandwidth, multi-channel figure — look for it explicitly before making any comparison.
Signal-to-noise ratio (SNR) measures the dynamic headroom between the audio signal and the receiver’s electronic noise floor. Quality receivers maintain an A-weighted SNR above 100 dB — the perceptual threshold below which self-noise disappears under normal listening conditions. Crosstalk between adjacent channels should measure below −70 dB at 1 kHz; poor crosstalk blurs the spatial separation between surround channels and degrades the precision of the soundstage. On the speaker side, sensitivity is the most frequently underestimated specification. A speaker rated at 90 dB (1W/1m) produces twice the acoustic output of an 87 dB speaker driven by the same amplifier — a 3 dB difference clearly audible in practice. Matching all seven channels within ±2 dB sensitivity reduces the calibration gain offsets the auto-EQ must apply, which in turn lowers the probability of amplifier clipping at high listening levels.
Which AV Receiver Should Power Your 7.1 Surround Sound System?
The AV receiver is the processing and amplification hub of any 7.1 system, and its quality ceiling determines the maximum performance of every speaker downstream. For a 7.1 configuration in 2026, the receiver must provide seven discrete amplified output channels plus pre-amplifier outputs (pre-outs) for future external power amplifier integration. HDMI 2.1 connectivity with eARC support is non-negotiable for routing lossless audio from 4K sources — including current-generation game consoles and 4K Blu-ray players — without the bandwidth restrictions of optical cable, which is limited to lossy Dolby Digital and DTS core formats. A receiver without HDMI 2.1 eARC will not pass Dolby TrueHD or DTS-HD Master Audio from a TV source under any condition.
Room correction technology in a modern AV receiver contributes more to final in-room performance than any individual speaker upgrade at equivalent cost. Platforms such as Dirac Live are designed to address low-frequency room mode anomalies that would otherwise require purpose-built bass traps measuring 8–12 inches thick to achieve passively — improvements that no speaker cable or power conditioner can approach.
Room correction technology divides the mid-range and premium receiver market more sharply than any other feature in 2026. Audyssey MultEQ XT32 — available across Denon and Marantz product lines — applies 32-band correction per speaker and supports manual curve editing via the dedicated mobile app. Dirac Live, available as a paid upgrade on receivers from NAD, Arcam, and miniDSP, uses an impulse-response transfer function approach that corrects both amplitude and time-domain phase errors simultaneously . Yamaha’s YPAO-R.S.C. adds psychoacoustic reflection modeling on top of standard EQ correction; Pioneer’s MCACC Pro applies multi-position measurement averaging across up to eight microphone positions for more spatially representative correction.
Budget segmentation for 7.1-capable AV receivers breaks at three clear price tiers. Entry-level units in the $400–$650 range deliver functional 7.1 decoding, HDMI 2.1, eARC, and basic auto-EQ, but measure modest amplifier power around 80 WPC (8Ω, 20 Hz–20 kHz, 0.08% THD). Mid-range receivers from $650–$1,200 step up to 95–120 WPC with improved ESS or AKM DAC chipsets, Dirac Live or MultEQ XT32, and full pre-out arrays. Reference-grade receivers above $1,500 deliver 150 WPC or more, fully discrete amplifier stages, and comprehensive pre-out configurations for passive bi-amplification of the front speaker stage.
How Do Speaker Quality and Placement Define the 7.1 Listening Experience?
No AV receiver can compensate for fundamentally mismatched or under-specified speakers. In a 7.1 system, the center channel speaker carries approximately 60–70% of all dialogue in a typical film mix, making it the single most audibly consequential speaker in the array. Center channel quality directly determines dialogue intelligibility — the clarity with which human voices are reproduced against competing music and effects in a dense cinematic soundscape. A quality center channel uses a dedicated high-frequency tweeter, a midrange driver optimized for the 300 Hz–3 kHz vocal presence range, and a cabinet tuned to minimize resonances that add coloration to vowel sounds. A compromised center channel produces a subtle but persistent chestiness or nasality that no equalization can fully correct.
Timbre matching across the L, C, and R front cluster is critical. Purchasing speakers from a single manufacturer’s coordinated home theater range — where all channels share the same tweeter dome material, crossover topology, and cabinet loading approach — ensures that off-axis frequency response remains consistent as sounds pan laterally across the front stage. Frequency-response mismatches greater than ±4 dB between adjacent channels are perceptible as tonal colorations during panning sequences — an artefact that immediately disrupts film immersion. The four surround speakers, by contrast, have different acoustic requirements: because surround content is dominated by diffuse ambience rather than pinpoint localization, bipole and dipole speaker designs that radiate from both front and rear panels remain technically valid choices for side and rear surround positions in 2026, particularly in rooms with hard reflective wall surfaces.
What Room Requirements Enable the Best 7.1 Performance?
Room acoustics exert more influence over perceived sound quality than the combined performance difference between mid-range and premium equipment. A 7.1 system in an untreated, acoustically problematic room will consistently underperform a well-configured 5.1 system in a room with appropriate dimensions and basic treatment. The fundamental challenge is room modes — standing waves that reinforce and cancel bass frequencies at specific wavelengths determined entirely by the room’s dimensions. In a rectangular room measuring 15 ft × 20 ft × 9 ft, the lowest axial mode occurs at approximately 28 Hz, and multiple modal peaks between 40 Hz and 120 Hz will dramatically color bass reproduction unless addressed through positioning, treatment, or both.
Minimum room dimensions for a properly configured 7.1 layout require at least 12 feet of depth — from the front speaker plane to the primary listening seat — to achieve the recommended 90°–110° side surround angles without placing surround speakers uncomfortably close to the listener’s head. Width of at least 14 feet allows the front L and R speakers to sit at the ITU-R recommended ±30° angle while maintaining sufficient clearance from side walls to minimize first-reflection interference. These dimensions yield a listening seat that is equidistant from both side surrounds, a geometry that preserves lateral imaging symmetry. Rooms smaller than approximately 150 square feet present placement compromises severe enough that a high-quality 5.1 system will deliver better overall results than a geometrically compromised 7.1 layout.
Acoustic treatment prioritizes three areas in a home theater. First-reflection absorption panels — 2–4 inches of compressed fiberglass or mineral wool — at the side walls and ceiling between the front speakers and the listening seat address the primary early reflections that blur imaging and reduce apparent resolution. Rear wall diffusion scatters rear surround energy and prevents flutter echo from compressing the perceived depth of the soundstage. Corner bass trapping with 8–12 inch material thickness reduces modal energy at low frequencies. A basic treatment program targeting these three areas typically reduces RT60 reverberation time from 0.4–0.8 seconds — typical of an unfurnished domestic room — to the 0.2–0.3 second range preferred for home theater listening, where speech intelligibility and bass definition peak.
How to Set Up a 7.1 Surround Sound System: Complete Step-by-Step Guide
A correct 7.1 installation follows a strict sequence. Shortcuts at the placement or calibration stage produce a result that meaningfully underperforms the system’s measured capability — often permanently, because incorrect calibration files remain active until intentionally overwritten. The following steps apply to any 7.1 receiver and speaker combination in 2026.
What You Need Before You Start
- Measuring tape and angle-measurement app (smartphone gyroscope tools work accurately for speaker placement)
- Speaker cable of appropriate gauge: 16 AWG for runs under 50 ft, 14 AWG for longer runs
- Shielded RCA cable for the subwoofer LFE connection
- Two certified Ultra High Speed HDMI cables (48 Gbps / HDMI 2.1 rated)
- The receiver’s included room-correction microphone and stand, or equivalent tripod
- A reference-quality Blu-ray with a confirmed lossless 7.1 TrueHD or DTS-HD MA soundtrack for final verification
- Acoustic measurement app (several free real-time analyser apps are available for iOS and Android) for post-calibration verification
- Mark all speaker positions before drilling or mounting: Use tape on the floor and walls to confirm every speaker angle prior to permanent installation. Verify the center channel is at seated ear height. Confirm side surrounds land between 90° and 110°, and rear surrounds between 135° and 150°, from the primary listening axis. Measure the distance from the primary seat to every speaker position — you will verify these against the auto-calibration results later.
- Run all speaker cable with a routing buffer: Calculate each run with a 10–15% length buffer for routing bends and terminal slack. Label both ends of each cable with the channel designation (L, C, R, SL, SR, SBL, SBR) immediately after cutting. Use 14 AWG cable for runs approaching or exceeding 50 feet to prevent the resistance-induced high-frequency roll-off that thinner gauge wire introduces.
- Position the subwoofer using the crawl method: Connect a shielded RCA cable from the receiver’s “LFE Out” jack to the subwoofer’s LFE input. Place the subwoofer temporarily at the primary listening seat. Play a continuous bass test tone at 40–80 Hz and move around the room’s perimeter, listening for the position where the bass sounds most even and full. That location is typically the optimal permanent subwoofer position — the crawl method exploits room reciprocity to find the point of flattest in-room bass response without measurement equipment.
- Connect all sources via certified HDMI 2.1 cable: Use Ultra High Speed HDMI cables (48 Gbps bandwidth rating) between each source device and the receiver’s HDMI inputs. Connect the receiver’s HDMI output to the television’s HDMI 2.1 eARC port using a second Ultra High Speed cable. In the television’s audio settings menu, enable eARC explicitly — many televisions ship with eARC disabled by default and will fall back to optical audio, which cannot carry lossless surround formats.
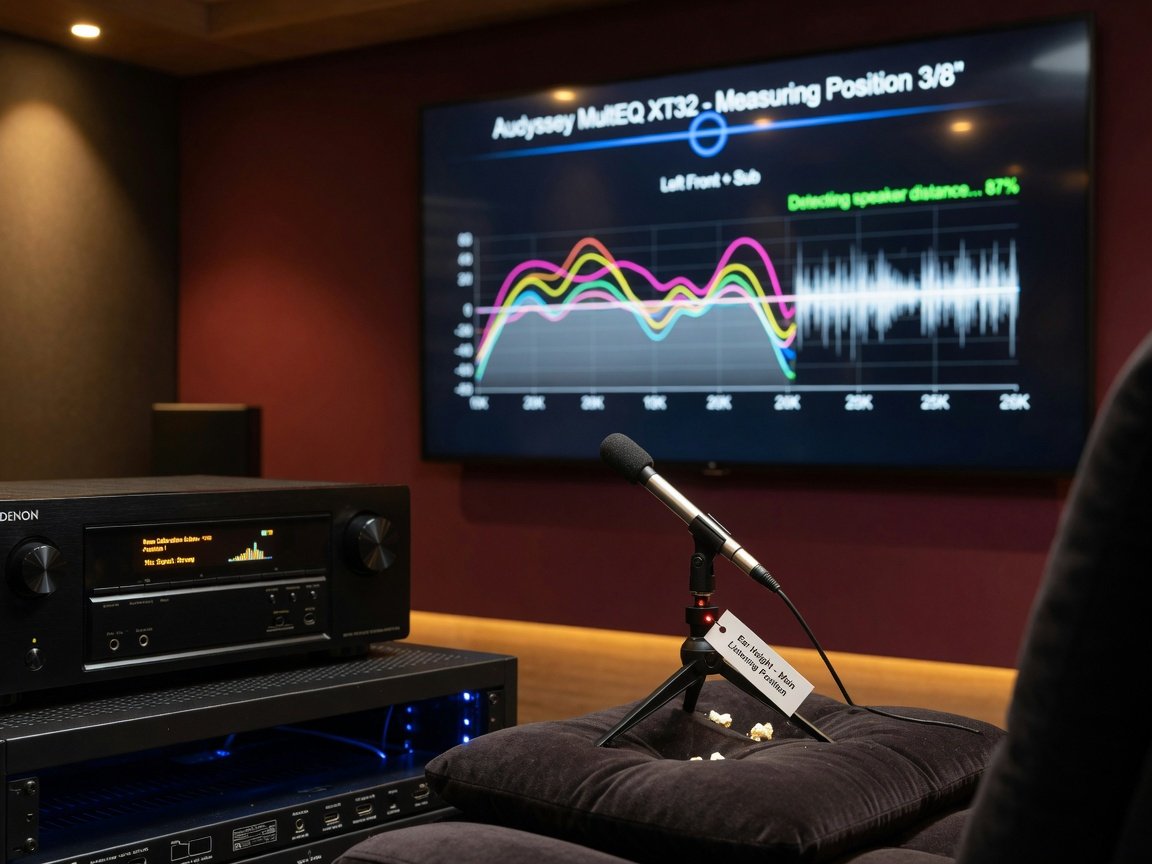
- Run the room-correction microphone measurement in silence: Position the measurement microphone at the primary listening seat at seated ear height, on a stable stand or tripod. Switch off HVAC systems, fans, and any other ambient noise sources. Follow the receiver’s on-screen measurement prompts to complete a full multi-point sweep — typically six to eight microphone positions. Do not move the microphone between positions faster than the receiver’s prompts indicate; premature movement corrupts the impulse response capture and produces incorrect EQ filters.
- Review and verify calibration outputs manually: After auto-calibration completes, inspect every result before accepting. Confirm all seven satellites are set to “Small” with an 80 Hz crossover unless they are floor-standing towers with measured bass extension below 40 Hz. Verify that the receiver’s auto-measured speaker distances match your physical tape measurements within ±1 foot — large discrepancies indicate a failed measurement that should be re-run. Adjust subwoofer level by ±3 dB from the auto-measured value if the bass sounds disproportionate at normal listening volumes.
- Verify with a reference lossless soundtrack at reference level: Play a Blu-ray with a confirmed Dolby TrueHD or DTS-HD Master Audio 7.1 soundtrack at the receiver’s reference volume position (0 dB, representing 85 dB SPL at the primary seat). Confirm the receiver’s display shows the correct lossless format decoder is active — not a lossy conversion. Listen for tonal balance across all channels, imaging precision during panning sequences, and any audible calibration artefacts. Use the receiver’s built-in parametric EQ to address any residual colorations above the correction range of the auto-calibration system.
What Are the Best 7.1 System Configurations at Every Budget Level in 2026?
The most efficient budget allocation for a 7.1 system in 2026 directs roughly 40–45% of total spend to the AV receiver, 30–35% to the front three speakers (L, C, R), 15% to the four surround channels, and 15% to the subwoofer. Deviating significantly from this ratio — for example, purchasing an underpowered receiver to fund premium speakers — creates measurable bottlenecks, because inadequate amplification and room correction prevent premium speakers from reaching their design performance targets.
Functional 7.1 Reference Performance
At this tier, prioritize a receiver rated at approximately 80 WPC (8Ω, 20 Hz–20 kHz, 0.08% THD) with HDMI 2.1, eARC, and Audyssey MultEQ auto-calibration as the minimum feature floor. Pair with a matched 7-channel satellite package — compact bookshelf L/C/R units rated at 89 dB sensitivity minimum, 8Ω nominal impedance, with a crossover frequency below 100 Hz — alongside a 10-inch ported subwoofer rated at 100W RMS. Cabinet materials at this price point will be MDF-based; performance is more than adequate for enthusiast listening at moderate to high volumes in rooms up to approximately 280 square feet.
Audiophile Build Quality with Measurable Performance Gains
Budget at this tier unlocks genuine HDF or wood-veneer speaker cabinets with improved internal bracing — measurably reducing cabinet resonance artefacts compared to entry-level MDF construction. The receiver steps up to 100–120 WPC, improved ESS or AKM DAC implementations with lower jitter floors, and Dirac Live or MultEQ XT32 room correction. A 12-inch sealed or ported subwoofer rated at 200W RMS extends usable bass to approximately 22–25 Hz in a typical domestic room at reference level. This configuration is the performance sweet spot for rooms between 280 and 450 square feet and represents where the law of diminishing returns shifts decisively in the listener’s favor.
Studio-Accurate Measurements, No Compromise
The reference tier replaces compact bookshelves with floor-standing L/R towers carrying bass extension to 35 Hz or below, matched to a center channel sharing the same driver complement and cabinet philosophy. Receiver power rises to 150+ WPC with full pre-out arrays enabling passive bi-amplification of the front stage. Dual subwoofers — the configuration consistently recommended by acoustic engineers for its modal-averaging effect across the listening area — replace a single-subwoofer arrangement, reducing worst-seat-to-best-seat bass variation across the listening area. Dirac Live Full Bass Control, available on compatible hardware, corrects time-domain phase errors in the bass range that amplitude EQ alone cannot address.
How Is 7.1 Audio Technology Evolving in 2026 and Beyond?
The 7.1 format is not stagnating — it is being more precisely implemented as room-correction technology and acoustic engineering processes mature. The most significant trend shaping 7.1 systems in 2026 is the mainstream consumer arrival of full-band, time-domain phase correction in mid-range receivers. Where first-generation auto-calibration systems applied amplitude-only EQ adjustments, current Dirac Live implementations — and competing platforms under active development by major Japanese and European receiver manufacturers — correct the phase relationship between speakers and room boundaries, addressing the “one-note bass” and transient smearing that result from uncorrected modal time-domain errors.
Wireless rear channel systems represent the second major technical evolution visible in 2026 product releases. Several manufacturers have introduced proprietary rear-channel wireless transmission operating in the 5.8 GHz band with specified latency below 2 milliseconds, making them perceptually synchronous with wired front channels. Cross-brand wireless standard fragmentation remains the primary limitation in 2026, but industry standardization bodies are actively working toward a common protocol expected to reach market between 2027 and 2028. When that convergence arrives, cable-free 7.1 installations in retrofit scenarios will become acoustically equivalent to wired configurations.
AI-assisted adaptive room analysis is entering consumer firmware through partnerships between receiver development teams and acoustic modeling software companies. Rather than applying a fixed filter set captured in a single calibration session, AI-driven systems in 2026 beta programs learn the room’s acoustic impulse response over multiple listening sessions, adjusting filter coefficients dynamically as room conditions change with furniture, occupancy, and seasonal environmental shifts. These adaptive systems are expected to maintain tighter frequency-response flatness at the primary listening seat across a wider range of real-world room conditions than any static calibration snapshot — a capability that should redefine the performance floor for mid-range 7.1 systems by 2027.
What Audio Engineers and Integrators Recommend for 7.1 Systems in 2026
System matching, calibration discipline, and room treatment are the primary determinants of 7.1 performance — not hardware specification sheets.
The most common scenario in home theater installations is a high-end speaker system performing well below its capability because the receiver’s auto-calibration was run incorrectly — typically because the measurement microphone was repositioned during the sweep, or because HVAC noise contaminated the impulse response capture. A correctly executed calibration sequence on an entry-level receiver produces better in-room results than a carelessly executed calibration on a flagship unit. Procedure matters more than price.
The acoustic case for dual subwoofers in a 7.1 system is straightforward. When two subwoofers are placed at opposing corner or mid-wall positions, they excite room modes at opposing phases, partially cancelling modal peaks across the listening area and reducing seat-to-seat bass variation — a result no single subwoofer, regardless of price or amplifier power, can replicate. Dual subwoofers represent one of the highest-value upgrades available to any home theater owner who is not already running them.
Example scenario — Illustrative Home Theater Build: As an illustration of what a well-specified build can achieve, consider a 320-square-foot dedicated home theater room fitted with a correctly positioned 7.1 speaker layout, a 140 WPC reference receiver running Dirac Live Full Bass Control, dual 12-inch sealed subwoofers at opposing front corners, and floor-to-ceiling broadband absorption panels at the first-reflection points and rear wall. Following the calibration and treatment steps in this guide, such a build should approach the ±3 dB frequency-response and target RT60 figures cited above. A build of this scope, including acoustic treatment materials, is achievable for approximately $4,200 — demonstrating that disciplined component allocation can deliver studio-grade performance within a mid-tier budget.
A correctly configured and calibrated 7.1 surround sound system in an appropriately sized room delivers a home cinema experience no soundbar, virtual surround processor, or compromised 5.1 installation can match. The critical variables are room geometry, calibration execution, and timbre-matched speaker selection — not component cost alone. Every dollar invested in correct installation procedure returns more audible improvement than the equivalent sum spent on hardware upgrades.
Frequently Asked Questions About 7.1 Surround Sound Systems
Is 7.1 surround sound still worth it in 2026?
Yes, decisively. The 7.1 horizontal channel configuration is the audio bed of every current immersive format, including Dolby Atmos and DTS:X — making it the foundation of modern audio production rather than a legacy standard. A correctly configured 7.1 system in a room of 200–500 square feet delivers measurably superior spatial envelopment and localization precision over 5.1, and the cost to build an excellent 7.1 system has fallen to the lowest point in the format’s history. If you watch film and television content in a dedicated space, 7.1 is the appropriate horizontal baseline to build from.
What is the minimum room size needed for a 7.1 system?
A minimum room depth of approximately 12 feet from the front speaker plane to the primary listening seat and a width of at least 14 feet are required to place all seven speakers at their correct ITU-R recommended angles. Below these dimensions, side surround angles become too narrow to produce convincing lateral envelopment, and the rear surrounds end up too close to the listening seat to function as true rear-field speakers. In rooms under approximately 150 square feet, a high-quality 5.1 layout will achieve better spatial results than a geometrically compromised 7.1 configuration.
Do I need a separate power amplifier for a 7.1 system?
Not necessarily. Modern mid-range and reference AV receivers rated at 100+ WPC (8Ω, 20 Hz–20 kHz, 0.08% THD) provide adequate amplifier power for most home theater listening in rooms up to 500 square feet. A separate power amplifier becomes genuinely beneficial when your speakers have sensitivity ratings below 87 dB, when your room exceeds 500 square feet, or when you hear the receiver running into thermal compression at high listening volumes. Receivers with pre-outs on all seven channels allow integrating a separate stereo or multi-channel power amplifier without replacing the receiver.
What crossover frequency should I set for a 7.1 subwoofer?
The Dolby and THX production guidelines both recommend 80 Hz as the default crossover for all satellite speakers in a home theater system — this is the correct starting point for the majority of 7.1 configurations. Compact bookshelf satellites with limited bass extension benefit from a higher crossover of 100–120 Hz. Floor-standing towers with measured bass extension below 40 Hz can run at 60–80 Hz. The crossover should be set no lower than the satellite speaker’s measured −3 dB roll-off frequency; driving a speaker below its extension limit increases thermal and mechanical distortion without contributing useful output to the listening room.
Can I upgrade a 7.1 system to Dolby Atmos later?
Yes. Every 7.1 system with a current-generation receiver is directly upgradeable to Dolby Atmos by adding two or four height speakers — either in-ceiling mounted or upward-firing Atmos elevation modules placed on top of existing L/R and rear surround speakers — creating a 7.1.2 or 7.1.4 configuration. The receiver must support Dolby Atmos decoding and provide the additional amplifier channels (or pre-outs) needed to drive the height speakers. All mid-range and reference AV receivers released in 2026 include Dolby Atmos and DTS:X decoding as standard features. The entire 7.1 speaker investment transfers unchanged to the expanded Atmos system.
How long does a proper 7.1 setup take to complete?
A complete, correctly executed 7.1 setup — including speaker placement planning, cable routing, receiver connection, auto-calibration, and manual result verification — takes between 3 and 6 hours for a methodical first-time installer. Auto-calibration should always be run in a room free of ambient noise, with HVAC systems off. Plan an additional 1–2 hour session after several listening sessions to fine-tune EQ curves and confirm calibration accuracy under the room’s normal furnishing and occupation conditions. Rushing the calibration stage — the most common installation error — produces a result that can measure 6–10 dB worse than a patient, correctly executed run on the identical hardware.
Should I use bipole or direct-radiating speakers for the 7.1 surround channels?
Both designs are acoustically valid, and the correct choice depends on room characteristics. Direct-radiating surround speakers — which fire sound toward the listener in a conventional forward-facing configuration — provide more precise localization and are preferable in heavily damped rooms with extensive soft furnishings. Bipole and dipole designs, which radiate simultaneously from front and rear panels to create a diffuse field around the speaker cabinet, are better suited to rooms with hard reflective walls, where they reduce the “spotlight” effect that a direct-radiating surround can produce when positioned close to a reflective boundary. For rear surround channels specifically, direct-radiating designs are increasingly preferred even by custom installers who use bipole side surrounds, because rear surround content in current film mixes carries more directional information than was typical in earlier production eras.
Building Your 7.1 System: A Four-Week Implementation Sequence
A 7.1 surround sound system represents the most complete horizontal audio experience a channel-based speaker layout can deliver. In 2026, the convergence of falling component prices, mature room-correction technology, and lossless audio availability across all major content platforms makes this the most accessible point in the format’s history to build a genuinely reference-capable system. The gap between entry-level and reference performance has compressed significantly — but only for builders who execute the installation fundamentals correctly. The hardware is the smallest variable; room geometry, calibration procedure, and speaker placement are the determinants of the outcome.
Use the following four-week sequence to bring your 7.1 system online in the correct order:
- Week 1 — Plan and specify: Measure the room and confirm it meets minimum depth (12 ft) and width (14 ft) requirements. Select a receiver with HDMI 2.1, eARC, and Dirac Live or MultEQ XT32. Choose a timbre-matched speaker package from a single manufacturer’s home theater line, with all seven channels rated within ±2 dB sensitivity.
- Week 2 — Install hardware and cable: Mount all speakers at correct angular positions. Run speaker cable with appropriate AWG for each run length. Position the subwoofer using the crawl method. Connect all sources via certified Ultra High Speed HDMI 2.1 cable and enable eARC on the television.
- Week 3 — Calibrate and verify: Run auto-calibration in a quiet, HVAC-off room. Review all calibration outputs, set satellite crossover frequencies correctly, and verify speaker distance measurements. Test with a reference-quality lossless Blu-ray at reference listening level and confirm the correct decoder is active on the receiver display.
- Week 4 — Treat and re-calibrate: Install first-reflection absorption panels and rear wall diffusion. For bass-problematic rooms, add corner bass trapping from floor to ceiling. Re-run room correction after treatment installation — acoustic treatment changes the room’s impulse response enough to warrant a fresh calibration. Final measured results should approach ±3 dB across the full audio band at the primary seat.
Home theater audio is a system discipline. The listening room, the receiver, the speaker array, and the calibration process form a single integrated chain — optimizing any one component while neglecting the others delivers a system that chronically underperforms its measured potential. Build the room correctly, calibrate thoroughly, and the result is a 7.1 system that delivers acoustically verifiable cinema-grade performance in a domestic space — exactly what the format was engineered to achieve.
— **Schema Markup** *(embedded above in the article body; reproduced here for reference — see the JSON-LD block at the end of the article content)*