Small rooms can deliver reference-grade home theater performance. The right home theater design — controlled acoustics, accurate screen sizing, and structured speaker placement — eliminates the disadvantages of limited square footage. In 2026, rooms under 150 square feet consistently match larger dedicated spaces for viewer satisfaction when every technical parameter is planned correctly rather than chosen by default.
Whether you are converting a spare bedroom, a finished basement corner, or a dedicated media alcove, the same engineering principles govern the outcome. This guide covers display geometry, acoustic treatment, speaker placement, seating, lighting, and smart integration for small-room home theater builds — with exact implementation steps you can follow in sequence.
Executive Summary
- A well-planned compact home theater room can match a larger but unplanned space for viewer satisfaction; planning discipline matters more than square footage.
- Display selection (ultra-short-throw laser projector versus large-format flat panel) is the single most consequential decision in a small room; throw ratio and screen gain determine whether the image is watchable at compressed seating distances.
- Acoustic treatment targeting an RT60 reverberation time of 0.3–0.4 seconds removes the three most common audio complaints in small rooms: boomy bass, harsh dialogue, and muddied surround channels.
- A structured six-phase implementation sequence — measure, display, treat, calibrate audio, seat, finalise — produces consistently better acoustic outcomes than ad hoc builds and avoids the costly rework that unsequenced projects almost always require.
What Makes a Small Room Challenging for Home Theater?
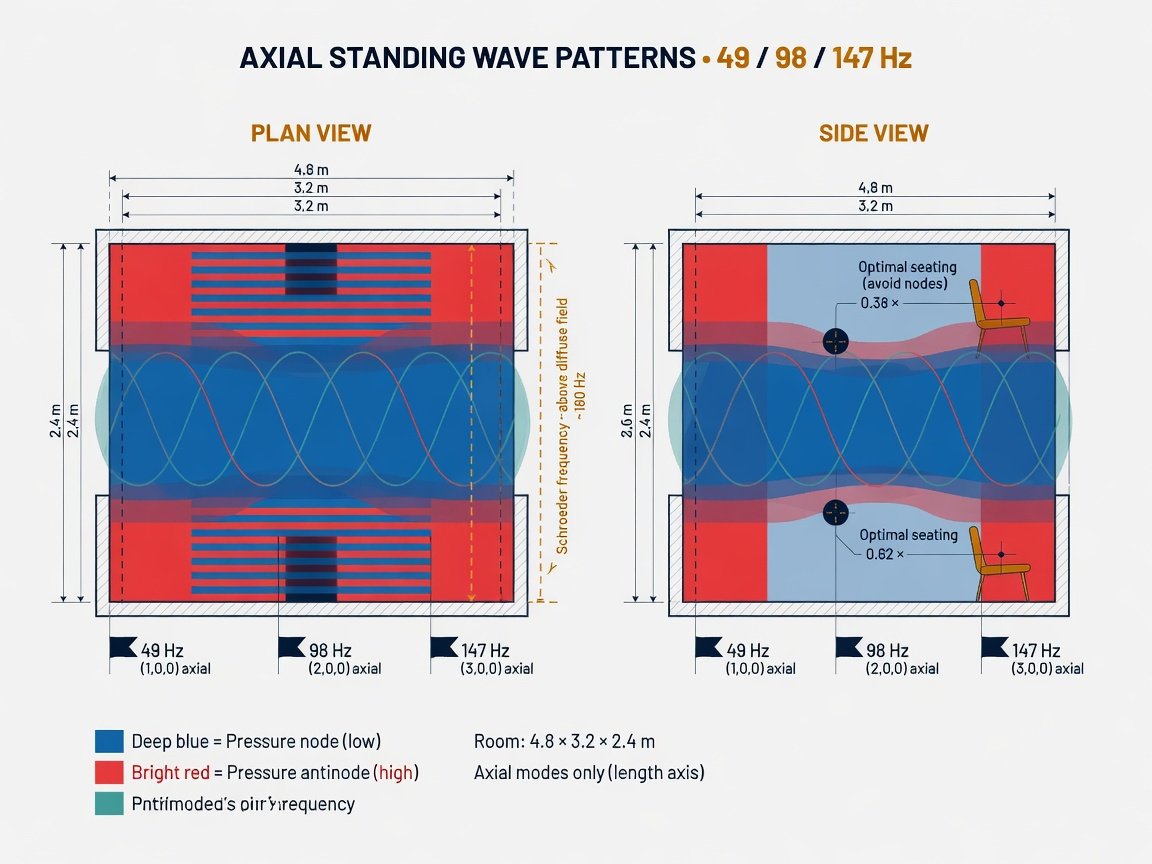
Small rooms produce three distinct technical problems that larger spaces handle naturally through propagation distance alone. The first is room mode buildup. Modal frequencies are calculated as the speed of sound (343 m/s) divided by twice the relevant room dimension. In a room with a 3.5-metre wall, the primary axial mode falls at approximately 49 Hz — directly within the most energetic band of cinematic LFE content. Without treatment, bass energy accumulates unevenly, producing dramatic seat-to-seat SPL variation that no equaliser can fully correct without also suppressing transient dynamics in the same frequency band.
The second challenge is early reflection density. In a small room, the first side-wall and ceiling reflections reach the listening position within 5–10 milliseconds of the direct sound. At these time delays, the brain cannot fully separate the reflected signal from the source, reducing speech intelligibility and artificially widening the apparent soundstage beyond its intended boundaries. Small rooms with untreated parallel walls consistently show measurably lower dialogue intelligibility than rooms with absorption panels at primary reflection points — the close-range reflections reach the listener before the brain can separate them from the direct signal.
The third challenge is screen-distance compression. Standard screen sizing guidelines assume the primary seat is more than 1.5× the screen diagonal from the display surface. In a room 10–12 feet deep, that distance may be fixed well below this threshold for any screen size large enough to feel genuinely immersive. This forces a choice between a smaller image than most owners prefer, or a display technology specifically engineered for close-range projection. Resolving this constraint correctly is the foundation on which every other small-room home theater decision rests — and the section below addresses it in detail.
How Do You Choose the Right Screen Size for a Small Room?
Screen sizing in a small room is a function of fixed viewing distance, not personal preference. SMPTE recommends a minimum horizontal viewing angle of 30 degrees; THX specifies 36 degrees as the optimum for theatrical immersion. At a 2.5-metre (8.2-foot) seating distance — typical for a 10×12 room — these angles correspond to screen widths of approximately 132 cm and 162 cm, translating to 70-inch and 86-inch diagonals on a 16:9 screen. These are not suggestions; they are geometrically derived boundaries that should anchor every display purchase decision in a small room.
A practical sizing rule used by acoustic engineers and AV designers: divide your seating-to-screen distance in centimetres by 2.5 to obtain the maximum comfortable screen diagonal in inches. At 250 cm, the result is a 100-inch diagonal — achievable with a short-throw projector but at the upper limit of comfortable viewing for most people at that distance. Most practitioners recommend 80–95 inches diagonal as the ceiling for rooms under 12 feet deep, balancing field-of-view immersion against the eye-movement fatigue that wide screens at close range produce during extended viewing sessions.
If you watch predominantly 2.39:1 anamorphic scope films, a constant-image-height (CIH) 2.35:1 screen format allows you to maximise screen width within a constrained ceiling height. CIH setups require a projector with a motorised anamorphic lens or a digital zoom mode with memory position presets — both of which are standard features on 4K projectors priced below $3,000 in 2026. The gain in horizontal screen width over a standard 16:9 letterbox crop is typically 20–26%, a meaningful immersion improvement in rooms where vertical clearance is the binding constraint rather than horizontal space.
What Display Technology Works Best in a Tight Space?
The two primary display options for small rooms are ultra-short-throw (UST) laser projectors and large-format OLED or Mini-LED flat panels. Each suits a different combination of room geometry, ambient light controllability, and target screen size. The decision matrix becomes straightforward once the room’s constraints are measured rather than assumed — and the table below maps the core trade-offs directly.
| Display Type | Throw Ratio | Screen Size Range | Peak Brightness | Key Requirement |
|---|---|---|---|---|
| UST Laser Projector | 0.2:1 – 0.4:1 | 90–130 inches | 2,500–3,000 lumens | ALR screen mandatory |
| Short-Throw Projector | 0.5:1 – 0.8:1 | 80–120 inches | 2,000–4,500 lumens | Dark room preferred |
| OLED (77–87 inch) | N/A — direct view | 77–87 inches | 800–1,000 nits peak | None — plug and calibrate |
| Mini-LED LCD (85–98 inch) | N/A — direct view | 85–98 inches | 1,500–3,000 nits peak | 1,000+ dimming zones |
Ultra-short-throw laser projectors operate at throw ratios of 0.2:1 to 0.4:1, sitting 30–60 cm from the screen wall and projecting 100-inch-plus images without lens geometry constraints or shadow interference. Third-generation UST models in 2026 deliver 2,500–3,000 ANSI lumens with DCI-P3 colour gamut coverage above 95%, sufficient for rooms with reasonable ambient light control. Their non-negotiable dependency is a dedicated ambient light rejection (ALR) screen; without one, contrast ratios collapse below 500:1 under any supplementary room lighting, producing a grey, washed-out image regardless of projector quality.
In rooms under 120 square feet, an 85-inch OLED or a UST laser system with a proper ALR screen are the two most practical display choices. The OLED wins on black level, calibration stability, and zero installation complexity. The UST wins on screen size. The deciding factor is usually ceiling clearance — if a long-throw projector cannot be mounted at the correct vertical offset without a fixed ceiling bracket, the UST removes that constraint entirely.
For rooms with ambient light that cannot be fully controlled — a shared living room theater or a basement with window wells — Mini-LED panels with local dimming zone counts above 1,000 now deliver HDR peak brightness of 1,500–3,000 nits at 85–98-inch screen sizes. This brightness advantage over OLED compensates for inferior black levels in all but completely darkened environments, making Mini-LED the pragmatic choice wherever consistent full-blackout conditions are not guaranteed throughout the viewing session.
How Do You Optimize Acoustics in a Small Home Theater Room?
Acoustic treatment is the discipline where most small-room home theaters succeed or fail definitively. The target reverberation time for a dedicated small home theater is an RT60 of 0.3–0.4 seconds across the 500 Hz–4 kHz midrange band. Untreated domestic rooms typically measure 0.5–0.8 seconds in this range. The audible consequence of the untreated state is a persistent reverberant blur that reduces dialogue intelligibility, softens transient attacks, and collapses the precise spatial positioning that Dolby Atmos and DTS:X depend on to deliver their intended envelopment effect.
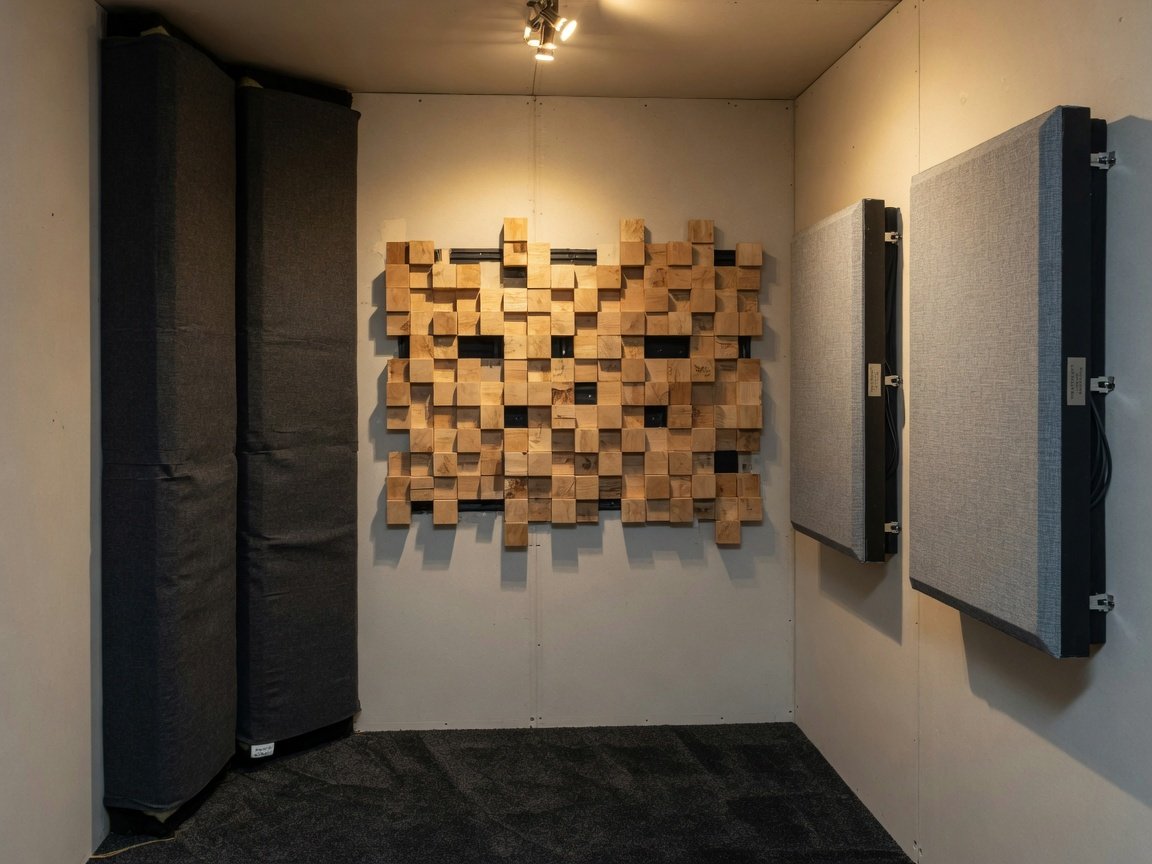
Acoustic treatment divides into three technical categories: absorption, diffusion, and bass trapping. Absorption panels — rigid fibreglass or rockwool batts at 2–4 inches thickness, fabric-wrapped — installed at primary reflection points reduce flutter echo and mid-to-high-frequency reverb. The minimum coverage needed to approach a 0.4-second RT60 in a 120-square-foot room is approximately 25% of total wall surface area, distributed across the first-reflection zone, the ceiling between speakers and seat, and the front wall flanking the display. Untreated small rooms typically exhibit significant peak-to-trough bass variation between seats; acoustic treatment can substantially narrow this variation without any digital equalisation applied.
Treatment Priority
The single highest-impact treatment in any small room is corner bass trapping. Floor-to-ceiling broadband absorbers in all four vertical corners address the modal buildup that makes bass uneven seat-to-seat. Without corner treatment, no amount of DSP correction produces genuinely flat low-frequency response at every seating position — parametric EQ can only flatten one measured point at a time.
Diffusion panels — QRD (quadratic residue diffusers) or skyline diffusers — belong on the rear wall behind the listening position. They scatter late reflections without removing acoustic energy, preserving a sense of spaciousness that pure absorption eliminates. In rooms under 4 metres deep, rear-wall absorption is counterproductive; it creates a room that sounds acoustically dead rather than controlled. The standard practice is absorption on all primary reflection surfaces, bass trapping in all corners, and diffusion exclusively on the rear wall at ear height.
Step-by-Step Acoustic Treatment Implementation
Measure the Room First
Use a calibrated measurement microphone (miniDSP UMIK-1 or equivalent) and Room EQ Wizard (free software) to document RT60 across octave bands and identify modal frequencies. These measurements set the treatment requirements before you spend anything.
Install Corner Bass Traps
Place 4–6-inch broadband absorbers floor-to-ceiling in all four vertical corners. This single step typically reduces bass variation from ±12 dB to ±5–6 dB and lowers RT60 by 0.1–0.15 seconds at low frequencies — the highest ROI treatment action in any small room.
Treat Primary Reflection Points
Use the mirror-on-the-wall method to locate first-reflection points from each speaker on each side wall. Apply 2-inch absorption panels at each identified location. Repeat the mirror check for ceiling reflection points above the primary seating position.
Add Rear-Wall Diffusion
Mount QRD or skyline diffusers across the rear wall at seated ear height. Avoid absorption panels on the rear wall in rooms shorter than 4 metres — they eliminate the late-field energy that creates the sense of spacious envelopment the format is designed to deliver.
Re-measure and Confirm RT60
Run a second full measurement sweep and verify RT60 falls between 0.3 and 0.4 seconds across the 500 Hz–4 kHz band at the primary seat. If above target, add panels to back-wall upper corners and the ceiling section directly over the seat before proceeding to speaker installation.
What Seating Arrangements Work Best in a Small Home Theater?
Seating placement in a small room is simultaneously an acoustic engineering decision and a viewing geometry decision. The acoustically optimum single-row position is at 38–42% of the room’s total depth measured from the front wall — a placement derived from modal analysis that avoids the primary floor-to-ceiling axial mode pressure maximum, which typically falls near the mid-room point. At this distance, bass response is more even across the listening area than at any other position, requiring less subwoofer EQ correction to achieve a flat frequency response at the seat.
For two-row layouts in rooms as compact as 14 feet deep, a raised rear-row platform (8–12 inches high) solves two problems simultaneously. It lifts rear-row ears above front-row headrests, maintaining an unobstructed sightline to the full screen area. It also shifts the rear seat’s floor-to-ceiling acoustic position relative to the primary room mode’s pressure maximum. A 10-inch riser in a 14-foot room typically moves the rear seat by approximately 12% of the floor mode’s half-wavelength — sufficient to reduce perceived bass boom at the rear position by 4–6 dB without any EQ adjustment.
Seat design matters acoustically as well as ergonomically. Wide, flat armrests act as close-range acoustic reflectors that alter the soundfield at ear height. Home theater seating with recessed or flush-mount armrests — a design specification increasingly common from dedicated home theater chair manufacturers in 2026 — reduces this effect measurably. Headrest height is equally important: headrests rising above ear level create a proximate reflection surface that partially collapses the front soundstage in any room under 12 feet wide. Small-room home theater builders increasingly select seating specifically for acoustic neutrality alongside ergonomic comfort.
How Should You Control Lighting in a Small Home Theater?
Lighting governs perceived display contrast ratio more directly than any hardware upgrade. Every lux of ambient light falling on the screen surface reduces the display’s effective contrast ratio. At a screen white luminance of 100 nits — the standard reference level for a calibrated home cinema — 1 lux of ambient light adds approximately 0.3 nits to the screen’s measured black level, compressing a native 10,000:1 contrast ratio to roughly 3,300:1. This is the perceptual difference between visible shadow detail in a dark scene and a flat, grey image that obscures all low-luminance content.
The target during film playback is zero lux of non-display light on the screen surface. In a small room, this requires blackout curtains or roller blinds rated for complete light block on any windows, no uplighting positioned behind or beside the display (which creates a proximity bias that reduces perceived black depth at the screen’s edges), and careful placement of any bias lighting. A 6500K LED bias light strip behind the display, calibrated to approximately 10% of the screen’s reference white luminance level, reduces eye strain during extended viewing without contributing measurable ambient light to the viewing zone itself.
Smart dimming control is a high-return addition to any small-room build. A minimum viable lighting scene setup requires three presets: Cinema (total blackout, 0 lux), Intermission (5–10 lux warm downlights at seat level only), and Setup (full output for calibration and maintenance work). These scenes can be triggered from the AV receiver’s 12V trigger output, a smart hub scene, or a single wall-mounted button — no complex programming required.
What Audio System Configuration Suits a Small Home Theater?
Audio system design in a small room must account for three constraints absent in larger spaces: short propagation distance, high early-reflection density, and severe bass mode buildup below the Schroeder frequency (typically 200–300 Hz in a compact domestic room). The Dolby Atmos home theater reference playback level is 82–85 dB SPL at the primary seat. Reaching this level in a small room at 2–3 metres from the speakers requires significantly less amplifier power than in a large room — typically 80–150 watts per channel into 8-ohm speakers — making amplification cost a minor factor in the overall small-room audio budget.
A 5.1.2 Dolby Atmos configuration — three front channels (L, C, R), two surround channels, two overhead or upward-firing height channels, and one subwoofer — provides the best balance of immersion and placement flexibility for rooms under 150 square feet. In rooms under 12 feet wide, the surround speakers are physically closer to the listener than in a standard-size room. Direct-radiating surrounds at close range localise too precisely — the listener hears the speaker rather than an enveloping soundfield. Dipole or bipole surround speakers disperse the wavefront and eliminate this problem without any acoustic treatment changes.
Subwoofer placement in a small room follows a different logic than in large rooms. Corner placement — which maximises modal excitation and therefore peak output — often produces the worst seat-to-seat consistency in a small space despite delivering the highest raw SPL. The subwoofer crawl method remains the most reliable placement technique in 2026: place the subwoofer at the primary seating position, play a 40 Hz test tone, and walk the room perimeter identifying the spot where the tone sounds most even in level and least boomy in character. Fix the sub at that position. Parametric EQ via the AV receiver or a dedicated DSP unit then addresses residual modal peaks without compressing overall dynamic range.
What Are the Top Home Theater Trends for Small Rooms in 2026–2027?
UST laser projection has matured decisively in 2026. Third-generation laser phosphor light engines in ultra-short-throw projectors now achieve Rec. 2020 colour gamut coverage above 85% — up from approximately 72% in 2023 platform generations — with corner-to-centre brightness uniformity within 10% across the full projected area. UST laser projector shipments in the residential premium segment have grown substantially in 2026, driven primarily by small-room installations where ceiling mounting is impractical or structurally constrained. The price threshold for a capable 100-inch UST system including an ALR screen has fallen below $4,000 for the first time, making this approach cost-competitive with large-format flat panels on a per-inch-of-screen basis.
Object-based audio in compact configurations is the second major shift redefining small-room capability in 2026. Beam-steering speaker arrays — which use phased array elements to aim synthesised height channels at the ceiling without physical overhead installation — now deliver height-channel localisation close to traditional in-ceiling drivers for Dolby Atmos in rooms under 12 feet in any dimension, making them a viable choice for finished rooms where cutting ceiling penetrations is prohibited by tenancy agreements or building regulations.
Predictive acoustic DSP represents the third trend with direct practical implications for small rooms. New-generation AV processors use machine-learning-driven room correction that performs continuous background calibration during playback, adapting EQ curves as room temperature, humidity, and occupancy levels change the acoustic transfer function. For small rooms where acoustic conditions shift meaningfully as occupants fill the space, these systems are designed to maintain more consistent frequency response across a playback session than standard fixed-measurement calibration systems, requiring no user intervention.
Frequently Asked Questions About Home Theater Small Room Ideas
What is the minimum room size for a home theater?
The practical lower bound is approximately 80 square feet — roughly 8×10 feet — for a single-row setup with an 80-inch display and a 5.1 audio system. Below this footprint, maintaining the THX-recommended minimum viewing distance of 1.2× screen height becomes very difficult without reducing screen size below 65 inches diagonal, which limits the sense of cinematic immersion the format is designed to deliver. In sub-80-square-foot spaces, a large monitor with a calibrated soundbar or desktop speaker system is the more practical and acoustically honest recommendation.
Can I use a projector in a small room?
Yes, but the projector type must match the room’s available throw depth. Standard long-throw projectors require 3–5 metres to project a 100-inch image and are unsuitable for rooms under 14 feet deep. Short-throw models with a 0.5–0.8:1 throw ratio require 1.5–2.5 metres. Ultra-short-throw models at 0.2–0.4:1 require only 30–60 cm from the screen wall and are specifically engineered for this use case. In rooms under 12 feet deep, UST laser projectors with an ALR screen or large-format flat panels are the only practical display options for an image exceeding 85 inches diagonal.
How many seats fit in a small home theater?
A 10×12 room comfortably accommodates two home theater recliners side by side in a single row, or four seats in a paired loveseat configuration at standard 24-inch seat widths. A 12×14 room fits four seats in a single row or a staggered two-row layout with two front seats and two rear seats on a raised platform. Attempting to seat more than four occupants in a room under 150 square feet forces front-row seats below the minimum recommended viewing distance, increasing eye fatigue and reducing the acoustic consistency of the primary listening zone.
Do I need soundproofing as well as acoustic treatment?
Acoustic treatment and soundproofing address entirely different problems and do not substitute for each other. Acoustic treatment — absorption, diffusion, bass trapping — improves sound quality inside the room by controlling reflections and reverberation time. Soundproofing reduces sound transmission through walls, floor, and ceiling to prevent disturbing adjacent spaces. Almost every small-room home theater build requires acoustic treatment. Soundproofing is necessary only when you intend to play content at reference level (82–85 dB SPL) adjacent to occupied living areas, or when external ambient noise consistently enters the room above 30 dB SPL during viewing sessions.
What flooring works best in a small home theater?
Dense medium-pile carpet with a thick underlay is the acoustically optimal choice. A carpeted floor contributes approximately 0.05–0.08 seconds of RT60 reduction at mid and high frequencies, meaningfully assisting the overall treatment budget and reducing the number of wall panels needed to hit the target reverberation time. If hard flooring is preferred for maintenance or aesthetic reasons, a large area rug covering the seating zone and the floor between the seating row and the front speakers achieves a comparable acoustic result at low cost and can be repositioned or replaced without altering the room’s permanent structure.
Should I use a 4K or 8K display in a small room?
4K is the correct resolution specification for a small-room home theater in 2026. At typical small-room viewing distances of 2–3 metres, 4K (3840×2160) resolution is fully resoluble on screens up to approximately 100 inches diagonal — meaning the viewer’s eye can perceive every available pixel. 8K offers no meaningful resolution benefit at these distances and screen sizes, and native 8K content remains effectively absent from commercial streaming and disc platforms in 2026. Budget allocated to an 8K premium is more valuably redirected toward a higher local dimming zone count, Dolby Vision support, or acoustic treatment materials.
How to Get Started: The Six-Phase Small Room Implementation Sequence
Building a high-performance home theater in a small room is a sequenced engineering process, not a shopping exercise. Each phase establishes the technical foundation for the next. Skipping phases — installing speakers before treating acoustics, or selecting a display before confirming seating distance — produces costly rework that is almost always avoided when the sequence is followed. At hometheaterinfoline.com, this six-phase framework is the structured approach to small-room home theater design, applying each decision in the sequence that minimises rework and maximises performance outcomes.
- Week 1 — Measure first. Use Room EQ Wizard and a calibrated measurement microphone to document RT60 across octave bands, identify modal frequencies, and record the background noise floor before purchasing any equipment. These measurements set hard technical requirements for every downstream decision and cost nothing to obtain.
- Week 2 — Establish display geometry. Determine your fixed seating distance, calculate maximum comfortable screen size using the distance-divided-by-2.5 formula, and select display technology — UST laser, short-throw projector, or flat panel — that delivers the target image size at your room’s available throw depth. Budget for an ALR screen if specifying a UST projector.
- Week 3 — Treat the acoustics. Install corner bass traps first, then primary reflection point absorption panels, then rear-wall diffusion. Re-measure after each stage. Do not proceed to speaker installation until RT60 is confirmed at 0.3–0.4 seconds at the primary seat across the 500 Hz–4 kHz band.
- Week 4 — Install and calibrate audio. Position speakers per ITU-R BS.775 recommended angles for the selected channel configuration. Set crossover frequencies using the measured speaker roll-off data, not receiver defaults. Run automated room correction (Audyssey MultEQ XT32, Dirac Live, or equivalent) and apply manual parametric EQ corrections to the three most audible remaining bass modal peaks.
- Week 5 — Optimise seating and lighting. Position the primary seat at 38–42% of the room’s total depth measured from the front wall. Install LED bias lighting behind the display at 10% of screen white reference luminance. Programme a minimum of three lighting scenes — Cinema, Intermission, and Setup — via smart dimmer or AV receiver trigger output.
- Week 6 — Final calibration and documentation. Perform colorimetric display calibration using a hardware colorimeter or spectrophotometer and calibration software. Measure final SPL at the primary seat with all occupants in position to account for the acoustic loading of seated bodies. Document all equipment settings, calibration reports, and REW measurement files in a permanent room log for future reference.
The constraint in a small-room home theater is never the room size. It is always the planning depth applied to it. Every technical barrier described in this guide — room modes, screen-distance compression, early reflection density — has a known, well-documented, implementable solution. The six-phase sequence exists to apply those solutions in the right order so that none of them create downstream problems for the step that follows. Start with measurement, end with documentation, and the room size becomes a parameter you work within rather than a limitation you accept.
— **Schema Markup (reference — already embedded above):** Article, HowTo, and FAQPage schemas are embedded in the article body as a “ JSON-LD block. No additional action required.
Pingback: How to Design a Home Theater: A Practical Guide for 2026 - Home Theater InfoLine