Effective home theater design fuses room acoustics, display geometry, and AV system integration into a single coherent environment. Nail all three and you achieve reference-quality performance that rivals a commercial cinema. Miss one and the most expensive hardware available will underperform. This guide covers every technical decision — from room selection through final calibration — using current 2026 standards and best-practice specifications.
Executive Summary
- Room acoustics are a dominant factor in perceived audio quality — hardware upgrades deliver diminishing returns inside an untreated room, regardless of price tier.
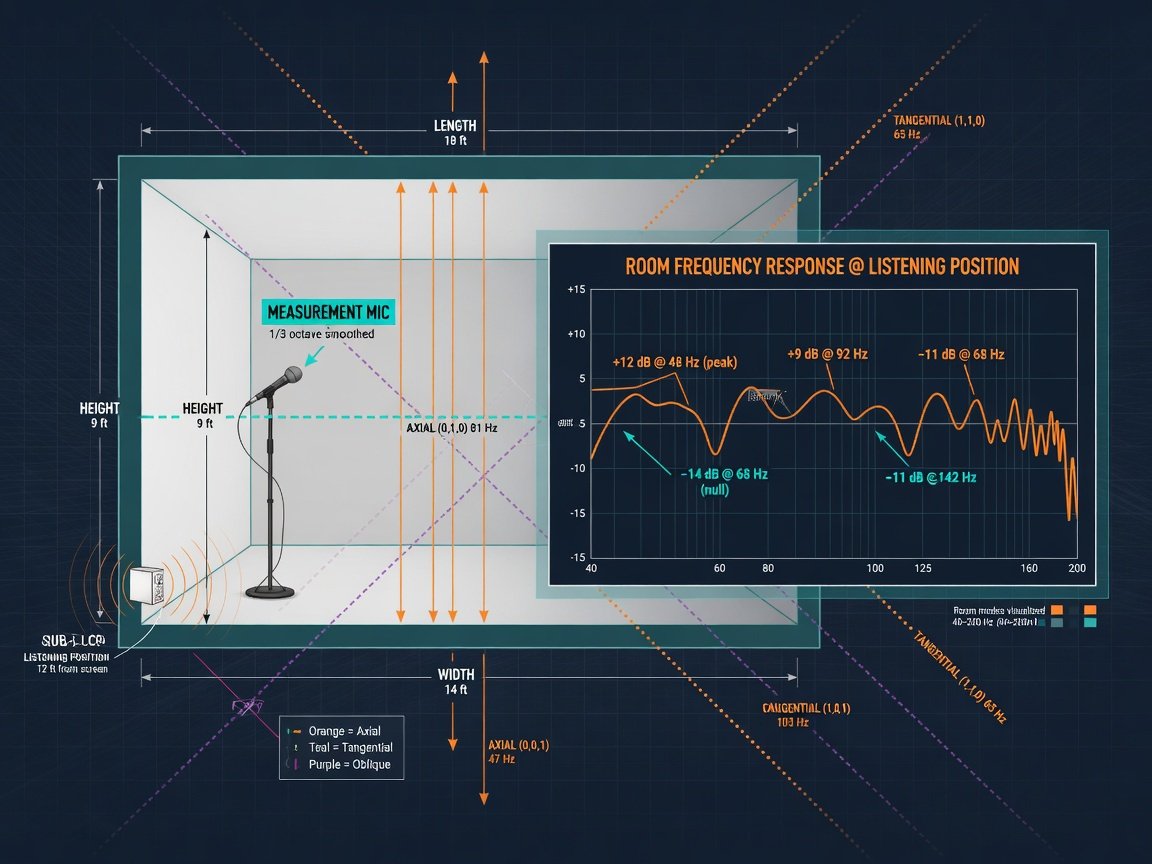
- The most common design error is inadequate bass management: seat-to-seat bass variance exceeding ±20 dB SPL at the primary listening position is a predictable result in untreated rooms — a problem no equalizer can fully resolve without upstream physical treatment.
What Makes Home Theater Design Different from a Standard AV Install?
A standard AV install places equipment in an existing space and optimizes around existing constraints. Home theater design inverts that logic: the room itself becomes the primary acoustic instrument. Every surface — floor, ceiling, lateral walls, rear wall — either supports or degrades the acoustic field. Every dimensional ratio either reinforces modal resonance or distributes it. Before a single component is selected, a design-first approach evaluates room geometry, reverberation targets, viewing angles, and isolation requirements simultaneously.
The practical stakes are significant. An integrator deploying a 7.1.4 Atmos system into an unfinished basement with parallel concrete walls will measure severe comb filtering and modal stacking regardless of speaker pedigree. The same system inside a room built to ITU-R BS.1116 proportions with appropriate acoustic treatment will perform near its rated specification.
Design-first thinking also governs structural decisions that must be made before the walls close: conduit runs for low-voltage cabling, in-wall speaker blocking, subwoofer footing reinforcement, and dedicated electrical circuits. Retrofitting these elements after construction routinely doubles labor cost. Every complete home theater setup should therefore begin with architectural planning — not with a trip to the equipment showroom.
How Do You Choose the Right Room for a Home Theater?
Room selection is the highest-leverage decision in the entire project. The ideal candidate has no parallel wall pairs (or the structural ability to add splayed surfaces), sits below grade for natural sound isolation, and has at least one axis of 15 feet or more to support bass wavelengths in the 40–80 Hz range. Basements satisfy all three criteria and are the most common choice for dedicated home theater installations in North America.
Above-grade rooms are viable but require more aggressive isolation investment. Sound transmission class (STC) ratings for the combined assembly — walls, ceiling, and floor — should target STC 60 or higher for a room adjacent to occupied living spaces. Achieving STC 60 typically requires decoupled double-stud or staggered-stud wall assemblies with mass-loaded vinyl and resilient channel. In 2026, budget approximately $8–$15 per square foot of wall and ceiling surface for full isolation construction, depending on existing structure type and local labor rates.
If your only viable space is compact, that is not a project-stopper — it simply changes the design parameters. A guide to home theater small room ideas provides geometry-corrected layouts specifically engineered for rooms under 200 square feet, where speaker placement tolerance tightens and bass treatment must be budgeted earlier in the specification process.
What Are the Optimal Room Dimensions and Geometry Rules?
Room modal behavior is governed entirely by the mathematical relationship between length, width, and height. When two or more dimensions share a common ratio, axial modes stack at identical frequencies, creating deep nulls and peaks that room-correction processors cannot fully resolve. The classic Sepmeyer ratios — 1.0 : 1.28 : 1.54 and 1.0 : 1.60 : 2.33 — distribute modal frequencies most evenly across the audible spectrum and remain the starting point for every serious acoustic designer working in 2026.
Applied practically: a room with a 9-foot ceiling following the 1.0 : 1.28 : 1.54 ratio yields interior dimensions of approximately 9 × 11.5 × 13.9 feet — 1,438 cubic feet, which sits at the lower threshold for dedicated theater use. A 10-foot ceiling running the same ratio pushes all modal frequencies down by roughly 11% and provides measurable headroom for bass extension to 30 Hz. Extending the plan footprint to 16 × 22 feet at 10-foot ceiling height is a widely recommended configuration for two-row seating layouts.
Non-rectangular rooms — those with splayed walls, coffered ceilings, or angled rear-wall geometry — diffuse mid-frequency reflections naturally but still require deliberate treatment at low frequencies. Geometry alone cannot eliminate bass buildup in corners; it must be paired with tuned absorptive mass to address modes below 100 Hz.
How Does Acoustic Treatment Transform Home Theater Sound Quality?
Acoustic treatment addresses three distinct problems: early reflections, late reverberation, and low-frequency modal energy. Each requires a different solution class, and conflating them is a defining design error. Absorptive panels at first-reflection points — the lateral walls beside the primary listening seat and the ceiling panel directly overhead — reduce time-delayed signal copies that blur stereo imaging and degrade dialogue intelligibility. A 10 ms reduction in early reflection delay produces a measurable improvement in speech intelligibility scores (STI) that listeners reliably detect, even without technical reference.
Late reverberation targets a room RT60 of 0.25–0.35 seconds at mid-frequencies for a reference-grade home theater — roughly half the RT60 of a typical untreated living room. Achieving this requires a balanced mix of absorption and diffusion. Pure absorption without diffusion creates an over-damped, claustrophobic signature. Diffusion at the rear wall restores spatial openness without adding blur to the direct sound. Integrating high-performance home theater sound panels at first-reflection points and the rear wall is the most cost-effective path to a controlled mid-frequency balance.
Low-frequency treatment demands physically large solutions. A bass trap effective at 63 Hz requires an absorber depth or air gap approaching 18–24 inches. Corner-loaded, floor-to-ceiling traps are the highest-efficiency configuration because they intercept tri-corner modes — points where axial, tangential, and oblique modes stack simultaneously. Budget for corner treatment first: it delivers the greatest measured acoustic improvement per dollar of any single treatment investment in the room.
Which Display Technology Is Right for Your Home Theater in 2026?
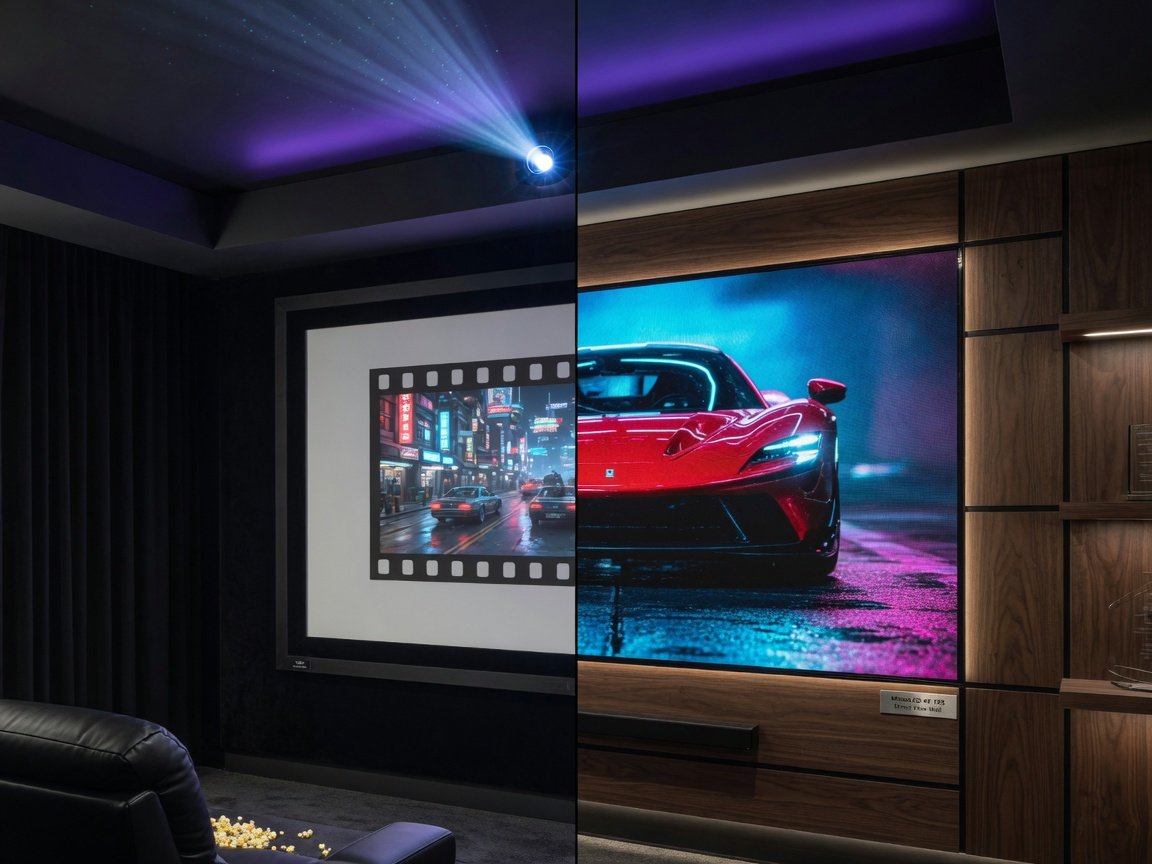
The 2026 display landscape has converged on four mature technology paths: 4K laser projectors, 8K laser projectors, direct-view LED (DVLED) walls, and high-brightness OLED panels. Each carries a distinct performance envelope and installation footprint. The right choice follows from ambient light control capability, viewing distance, screen size target, and total budget — not brand loyalty or specification sheet comparison.
| Technology | Native Contrast | Max Screen Size | Ambient Light Tolerance | 2026 Entry Price |
|---|---|---|---|---|
| 4K Laser Projector | 3,000:1 (native) | Unlimited | Controlled dark room | ~$3,500 |
| 8K Laser Projector | 5,000:1 (native) | Unlimited | Dark to dim | ~$15,000 |
| Direct-View LED Wall | ∞ (true black per pixel) | Custom, 100″–600″+ | Any | ~$40,000+ |
| OLED Panel (98″) | ∞ (true black per pixel) | 98″ maximum | Controlled | ~$7,000 |
For most dedicated dark rooms targeting a 120–150-inch image, a 4K laser projector on a fixed-gain acoustic-transparent screen remains the strongest value-to-performance proposition in 2026. Laser light sources now deliver 30,000+ hours of rated life at near-original brightness, eliminating the lamp replacement cycle that characterized earlier projector ownership and elevating the total cost of ownership calculation decisively in laser’s favor.
Screen gain selection is frequently misunderstood. Unity gain (1.0) provides the widest off-axis viewing angle and the most uniform brightness distribution across the image plane. Gains of 1.3–1.6 concentrate luminance at the center seat and lose significant brightness off-axis. For single-row seating in a narrow room, a moderate gain of 1.1–1.2 adds peak brightness without unacceptable hot-spotting. Acoustic-transparent screen materials — which allow a center-channel speaker to sit behind the image plane — are the standard specification for any build targeting true reference-quality audio-video integration.
How Do You Design a Surround Sound System for a Home Theater?
Modern home theater audio is defined by object-based spatial formats. A properly implemented Dolby Atmos system encodes sound as three-dimensional objects rather than fixed channel assignments, allowing the AV processor’s renderer to place audio anywhere within a sphere surrounding the listener. This changes speaker layout logic fundamentally: height channels are no longer optional additions — they are load-bearing elements of the format’s spatial rendering engine and cannot be omitted without degrading the core presentation.
The Dolby Atmos reference configuration for a dedicated home theater is a 7.1.4 layout — seven bed channels (L, C, R, Ls, Rs, Lrs, Rrs), one LFE subwoofer channel, and four overhead or forward-overhead height channels. Moving from a 5.1 flat layout to a 7.1.4 Atmos configuration delivers significantly improved listener envelopment — a perceptually meaningful difference that justifies the height channel investment for any serious installation.
Subwoofer placement has an outsized effect on bass uniformity. A single subwoofer positioned at a room corner or front wall creates predictable modal asymmetry across seating positions. The industry-standard solution is a distributed subwoofer array (DSA): four subwoofers positioned at the midpoints of each wall, driven with phase-correction DSP, which reduces seat-to-seat bass variance from a typical ±15 dB to ±3 dB across all seats before any digital correction is applied. A simplified dual-opposed configuration — two matched subwoofers at the front and rear wall midpoints — achieves most of this benefit at considerably lower cost and integration complexity.
A well-treated room with a DSA subwoofer array will deliver more from a 7.1.4 system than adding channels beyond that configuration. Diminishing returns above 7.1.4 are steep; that incremental budget almost always delivers more impact when redirected to room treatment.
What Seating Layout Maximizes Comfort and Sightlines?
Seating geometry determines the viewing experience as directly as screen size. The THX-recommended primary viewing distance for a 120-inch screen at 4K resolution is approximately 10–12 feet, placing the viewer at a 40-degree horizontal field of view — the perceptual threshold at which screen edges disappear from conscious awareness. At 4K resolution and this distance, the angular resolution limit of human foveal vision resolves all 3,840 pixels horizontally without perceptible pixelation, making the format’s full resolution advantage tangible rather than theoretical.
For two-row configurations, row spacing requires a minimum of 48 inches center-to-center between row positions, combined with a platform riser of 12–18 inches of height for the second row to achieve unobstructed sightlines over first-row headrests. A 12-inch riser is adequate when the screen bottom sits at 42 inches from the finished floor. Move the riser to 16 inches when screen bottom height approaches 24–30 inches, as is common with projector-and-screen configurations that prioritize a lower visual center.
Seat selection for a dedicated theater should prioritize lumbar support depth, seat pan depth, and armrest clearance over purely aesthetic criteria. Motorized recliner-style seating with power-adjustable headrests has become the default specification for custom installs, ranging from $600 to $1,800 per seat position at the quality tier designed for daily use. For a comprehensive breakdown of configuration options, materials, and platform construction details, the home theater seating guide covers row layouts, fabric selection, and riser construction methodology in full.
How Do You Plan Electrical, HVAC, and Lighting for a Home Theater?
Electrical planning is the discipline most frequently deferred until it becomes expensive. A reference home theater requires at least two dedicated 20-amp circuits for the AV rack, with a separate circuit for display power. High-current amplifier designs — Class A/B topologies running 500+ watts per channel — generate inrush current spikes that trip shared breakers and introduce ground-loop noise artifacts. Surge-protected, filtered power distribution units from manufacturers such as Furman or SurgeX are the standard rack power management specification, providing both protection and line conditioning in a 1U or 2U footprint.
HVAC requires a dedicated return duct to prevent positive pressure buildup in a sealed room — a common source of door-seal noise intrusion at 50–200 Hz. Fan coil units should be sized for the combined thermal load of equipment plus occupancy heat: a four-seat theater with a 1,000-watt projector and 2,000-watt amplifier stack generates approximately 10,800 BTU per hour of continuous heat that must be managed without audible fan noise reaching the listening position. Variable-speed, low-velocity air delivery — with duct velocities below 300 FPM — keeps air-handling noise inaudible against a 25 dB NC background noise floor target.
Lighting control integrates with AV automation via protocols such as Lutron RadioRA 3, Caséta, or KNX. Scene-based programming ties lighting states to AV activity: a “Watch Movie” scene dims mains to 0%, activates aisle safety lighting at 5% intensity, and switches the AV processor to the primary input simultaneously via a single command. LED accent lighting in cornice details and step lighting at seat riser edges should be specified at 2,200–2,700K color temperature to preserve night-vision adaptation during low-luminance content without creating distracting warm-spectrum glare.
What Does Professional Home Theater Design Cost in 2026?
Budget ranges in home theater design span an order of magnitude depending on scope, but the same three cost buckets appear at every tier: acoustic construction (isolation, treatment, and finish work), AV equipment, and seating, lighting, and control systems. The most expensive pattern in the category is skewing heavily toward equipment while under-investing in acoustic construction: the room’s deficiencies simply amplify the system’s cost without improving its performance.
| Tier | Total Budget | Room Footprint | Key Specifications |
|---|---|---|---|
| Entry | $15,000–$30,000 | 200–300 sq ft | 4K laser projector, 5.1.2 audio, basic corner treatment, fixed seating |
| Mid-Range | $30,000–$75,000 | 300–450 sq ft | 4K laser, 7.1.4 Atmos, full treatment suite, motorized recliner seating |
| Reference | $75,000–$200,000 | 450–700 sq ft | 4K/8K laser, 9.2.6, full acoustic isolation, custom cabinetry, automation |
| Ultra | $200,000+ | 700+ sq ft | DVLED wall, 13.1.6+, architect-designed acoustics, full smart-home integration |
Retrofit builds consistently cost more than equivalent new-construction rooms — demolition, construction access constraints, and resurfacing costs add substantially to both labor and materials, reinforcing the economic case for incorporating theater design at the architectural planning stage whenever possible.
What Are the Step-by-Step Stages of a Home Theater Build?
A disciplined build sequence prevents the costly rework that results when structural and low-voltage elements are addressed out of order. The following ten-stage process maps to the critical path for new-construction dedicated theater projects and applies directly to controlling both timeline and budget.
- Acoustic and AV design: Complete room geometry, speaker layout, display specification, AV rack design, and control system architecture before any construction begins. Produce dimensioned CAD drawings for contractor use.
- Structural framing: Frame staggered-stud or double-stud isolation walls, install resilient channel ceiling mounts, and build soffits for in-ceiling speaker enclosures at the specified positions.
- Electrical and low-voltage rough-in: Pull dedicated branch circuits, install conduit for speaker cable and HDMI/fiber runs, block for in-wall and in-ceiling speaker enclosures, and install back-boxes for all control keypads and low-voltage outlets.
- Acoustic insulation: Fill all wall and ceiling cavities with mineral wool acoustic insulation (NRC 0.95 or higher) and install mass-loaded vinyl layers where specified by the isolation design.
- Drywall and acoustic sealing: Apply double-layer 5/8-inch Type X drywall with staggered joints. Seal all penetrations with acoustic caulk; treat outlet back-boxes with putty pads. The acoustic chain is only as strong as its weakest penetration seal.
- Flooring and riser construction: Build platform risers for second-row seating to specification, install subfloor isolation pads under hard flooring materials, and lay finish flooring with appropriate acoustic underlay.
- Acoustic treatment installation: Install floor-to-ceiling corner bass traps, first-reflection-point absorption panels, rear-wall diffusion, and any cloud absorber panel over the primary listening position.
- AV equipment installation: Mount display or install fixed projection screen, pull and terminate all speaker cables, rack and interconnect all AV components, and install control system processors and touchpanel interfaces.
- Lighting and automation programming: Install fixtures, commission lighting control scenes, integrate with AV control system macros, and commission motorized seating controls and HVAC integration.
- Acoustic and AV calibration: Measure room response using REW or Dirac Live Full Bass Control, apply target-curve corrections with time-alignment and level matching, and verify all parameters against the original design targets.
For visual inspiration across aesthetic directions — from traditional wood-panel designs to contemporary minimalist builds — explore home movie theater designs, a curated gallery of finished rooms spanning every budget tier and design vocabulary.
What Are the Emerging Trends in Home Theater Design for 2026–2027?
Several converging forces are reshaping home theater design practice in 2026. The most significant is the commoditization of advanced room correction DSP. Platforms like Dirac Live Full Bass Control and Audyssey MultEQ-X now deliver per-seat, full-range optimization that was commercially available only to professional studios five years ago. Dirac Live’s multi-seat correction algorithm significantly reduces seat-to-seat variance compared to uncorrected response — closing the gap between dedicated acoustic construction and software correction, though not eliminating the case for physical treatment as the first line of defense.
8K content delivery infrastructure is also maturing rapidly. Native 8K streaming from platforms entering the market in late 2026 requires a minimum of 100 Mbps sustained throughput to the media server at the AV rack. This pushes network infrastructure into the home theater design specification for the first time: dedicated 2.5GbE or 10GbE wired connections from the home network core switch to the AV rack are now standard practice in forward-looking reference and ultra-tier builds.
Haptic transducer systems — bass shakers integrated into seating platforms and floor structures — are seeing growing adoption in custom installations. Platforms such as Buttkicker and Clark Synthesis deliver tactile low-frequency extension below the acoustic cutoff of the room, adding visceral impact at frequencies — particularly 10–40 Hz — that the room volume and speaker system cannot pressurize efficiently.
The best outcomes come from treating the room and the DSP correction platform as co-designed elements — selecting the correction platform before finalizing the acoustic treatment plan, so the two work as complementary parts of the same system rather than sequential afterthoughts.
Frequently Asked Questions About Home Theater Design
What is the minimum room size for a dedicated home theater?
The practical minimum for a functional dedicated theater is approximately 12 × 16 feet (192 square feet) with a 9-foot ceiling — around 1,728 cubic feet of interior volume. This supports a 100–110-inch screen at a 10-foot viewing distance and a 5.1.2 speaker layout. Rooms under 150 square feet require geometry-specific design adjustments to manage bass modes and maintain adequate viewing distance, but they are architecturally viable with the right approach.
Should I choose a projector or a TV for my home theater?
For dedicated dark rooms targeting 100 inches of image size or larger, a 4K laser projector on a fixed screen delivers substantially better value-per-inch than any direct-view panel. For rooms where ambient light cannot be fully controlled — or where screen size targets sit below 98 inches — a high-brightness OLED or QLED panel will outperform most projectors in contrast ratio and color accuracy under mixed light conditions. In 2026, the performance crossover point where projector image quality surpasses OLED sits at approximately 110 inches in a controlled-light environment.
How many subwoofers does a home theater need?
Two subwoofers at the front and rear wall midpoints is the minimum effective configuration for even bass distribution across multiple seats. A single subwoofer creates inherent seat-to-seat variance that digital correction cannot fully resolve. Four subwoofers in a distributed array (DSA) is the reference approach — it reduces seat-to-seat variance to ±3 dB or better without correction, and to ±1–2 dB with full-range Dirac correction applied. For single-seat or intimate two-seat rooms, one high-quality sealed subwoofer with Dirac Full Bass Control is an acceptable and cost-effective solution.
Do I need a professional acoustic designer for my home theater?
For builds above $30,000 in total budget, or any project involving new construction framing, a CEDIA-certified acoustician or AV designer is a sound investment — professional design fees prevent specification errors that cost substantially more to correct after walls are closed. For entry-level builds under $25,000 in existing finished rooms, a well-informed DIY approach using free acoustic measurement tools such as REW (Room EQ Wizard) and published room design guidelines is entirely viable and widely practiced.
What is the difference between soundproofing and acoustic treatment?
They solve entirely separate problems. Soundproofing (acoustic isolation) prevents sound energy from transmitting between spaces — it is a structural concern that must be addressed during framing and drywall stages. Acoustic treatment controls reflections and reverberation within the room — it is an interior finish concern that can be addressed post-construction. A common and costly error is using wall-mounted absorption panels as a substitute for structural isolation: panels affect in-room acoustics meaningfully but do nothing to stop airborne or structure-borne sound transmission through walls, floors, or ceilings.
What screen aspect ratio is best for a home theater?
The dominant film distribution aspect ratio in 2026 is 2.39:1 (CinemaScope/Scope), followed by 1.85:1 (Flat) and 1.78:1 (16:9 HDTV). For a purist cinema experience, a 2.39:1 fixed screen with a CIH (constant image height) lens memory projector eliminates black bars on scope content and minimizes them on flat material. For living-room-hybrid spaces where broadcast and streaming television content carries equal weight, a 1.78:1 screen with a lens-memory zoom configuration is the practical compromise. Dedicated cinema rooms in 2026 increasingly specify 2.39:1 screens as scope-format content continues to dominate premium streaming catalogs from major studios.
How Do You Start Your Home Theater Design Project in 2026?
The governing principle of home theater design is sequence. Decisions made early — room selection, isolation specification, acoustic geometry — constrain or enable every decision that follows. Starting with equipment selection and working backward to the room consistently produces a compromised result, regardless of budget tier. Working outward from the room — with acoustic performance targets and viewing geometry established before the AV system is specified — produces measurably superior outcomes at every price point.
Use this implementation timeline as a practical roadmap for a new-construction build in 2026:
- Weeks 1–2: Select room, take baseline acoustic measurements, and establish performance targets — RT60, maximum SPL, NC rating, screen size, and seating capacity.
- Weeks 3–4: Complete acoustic and AV system design. Produce CAD drawings. Engage a CEDIA-certified integrator if total budget exceeds $30,000.
- Weeks 5–8: Framing, dedicated electrical rough-in, low-voltage conduit, and speaker enclosure blocking.
- Weeks 9–12: Acoustic insulation, isolation layer installation, double-layer drywall, and penetration sealing.
- Weeks 13–16: Finish flooring, riser platform construction, and acoustic treatment installation.
- Weeks 17–20: AV equipment installation, display or screen mounting, lighting commissioning, and automation programming.
- Week 21: Full acoustic and AV calibration, measurement verification against design targets, and project handover.
hometheaterinfoline.com maintains detailed technical guides on every discipline in this process — from projector calibration to riser construction tolerances. Whether your project is a compact dedicated room or a full reference build, the same foundational sequence applies: measure the room first, treat it deliberately, then calibrate the system to the treated space.