Great home movie theater designs combine precise acoustics, calibrated visuals, and ergonomic seating into one cohesive environment. Whether you are converting a basement or building a dedicated room from scratch, the core principles of home theater design — room geometry, screen placement, and acoustic treatment — determine overall performance more reliably than any single component choice.
What Are the Core Elements of a Successful Home Movie Theater Design?
The most successful home movie theater designs treat the room as an integrated system rather than a collection of separate components. Six elements work together to create an immersive experience: room geometry, display technology, speaker configuration, acoustic treatment, seating layout, and lighting control. Isolate any one element from the others and you inevitably compromise overall performance — a reality that equipment-focused buyers discover after the first screening in an untreated room.
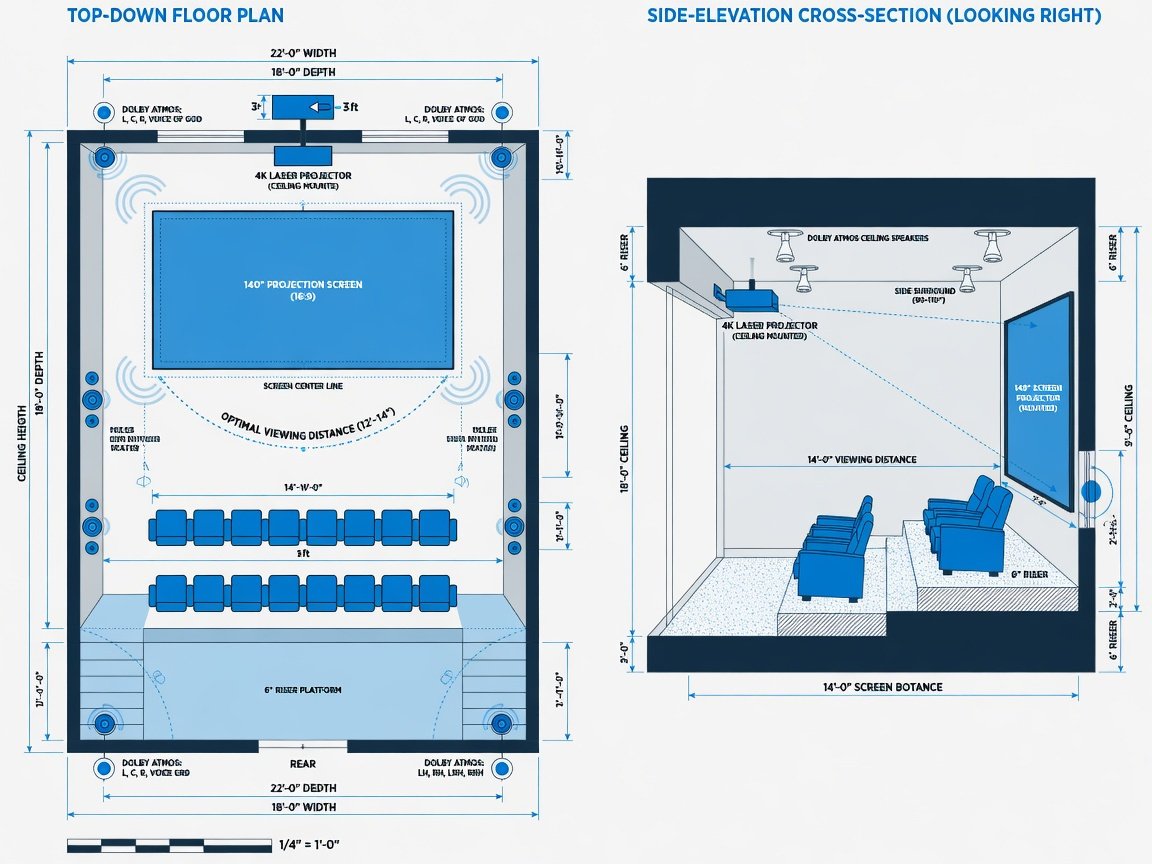
Room geometry sets the acoustic and visual foundation. Rectangular rooms between 12 × 18 feet and 20 × 28 feet hit the performance sweet spot for most residential builds. Rooms approaching a square floor plan generate severe standing waves below 300 Hz. These axial modes distort bass reproduction regardless of speaker quality or downstream equalization. Rooms with length-to-width ratios between 1.2:1 and 1.5:1 produce the most even modal distribution below 200 Hz — the frequency range where most room correction tools struggle most.
Display technology defines the visual layer. In 2026, the primary choice falls between a 4K laser projector paired with a 120–150-inch screen, or a large-format direct-view display in the 85–110-inch class. Both deliver reference-quality images when correctly specified, but they demand different room brightness levels and installation geometries. The Society of Motion Picture and Television Engineers specifies that screen luminance between 14 and 22 foot-lamberts (ft-L) produces the most accurate perceived contrast for film content in a darkened room — a figure that should drive projector lumen selection before any other specification is evaluated.
Most homeowners focus entirely on the screen and the speaker brand and overlook the room itself. Investing heavily in hardware while neglecting acoustic treatment consistently produces mediocre results — the room’s acoustic properties determine overall performance more than any single component choice.
How Do You Choose the Right Room for Your Home Theater?
Room selection is the most consequential decision in any home theater project because the physical envelope constrains every downstream choice. Below-grade spaces — basements — provide inherent structural isolation from airborne noise in the living areas above. They typically have no windows, simplifying light control completely. However, concrete slab floors and masonry walls create highly reflective, reverberant surfaces that require significant acoustic treatment to achieve the ITU-R BS.1116-3 target RT60 of 0.20–0.35 seconds across the 500 Hz–4 kHz band. Untreated concrete rooms routinely measure 0.7–1.2 seconds in this range.
Above-grade rooms offer more construction flexibility but require careful attention to structural isolation from flanking transmission paths. Floor joists conduct low-frequency energy efficiently. Without decoupling measures — resilient channel, staggered-stud walls, or a full room-within-a-room construction — bass energy from high-output subwoofers travels throughout the house. The THX Home Theater Design Guidelines recommend a minimum noise isolation class (NIC) of 55 between the theater and any adjacent occupied space. Achieving NIC 55 in a retrofit application typically requires double-layer drywall on resilient channel with acoustic sealant at all perimeter penetrations.
Ceiling height is a frequently underestimated constraint. Dolby Atmos ceiling-speaker configurations require a minimum ceiling height of 8 feet, with 9–10 feet strongly preferred. At exactly 8 feet, height-channel speakers mounted at the CEDIA-specified position achieve approximately 30 degrees of elevation from the listening position — the lower boundary of the Dolby-specified 30–55-degree elevation window. At 9 feet, all four height channels simultaneously achieve optimal elevation angles.
⚠ Common Design Mistake: Selecting a room based on available square footage rather than aspect ratio. A long, narrow room exceeding a 1:2 width-to-length ratio creates strong flutter echo between the parallel front and rear walls. Always calculate the ratio before committing to a space — reshaping a room is expensive; measuring one costs nothing.
What Screen and Projection Technology Should You Choose in 2026?
Display technology selection in 2026 requires matching the technology to the room’s actual operating conditions rather than to headline marketing specifications. The 4K projector market has matured rapidly. Entry-level 4K DLP units now deliver genuine native 4K resolution — not pixel-shifted approximations — at price points below $2,000. Meanwhile, laser phosphor light engines have displaced lamp-based projectors across the mid-market. Laser projectors have rapidly expanded their share of new dedicated home theater installations, reflecting both the cost reduction and the operational advantage of 20,000-hour rated laser life versus 3,000–5,000-hour lamp cycles.
ALR (ambient-light-rejecting) screens have made large-format projection technically viable in rooms that cannot be fully darkened. Fresnel ALR screens reject overhead ambient light while preserving image luminance from a low-angle projector. Standard 1.0-gain screens remain the correct choice for fully controlled dark rooms — higher-gain screens narrow the viewing cone and introduce hot-spotting at off-axis seating positions. Direct-view options — residential-format LED panels with pixel pitches as fine as 0.9 mm — now deliver true HDR peak brightness above 1,000 nits at any ambient light level. Their installed cost remains high, but installed costs have declined significantly since 2023, accelerating their adoption in premium builds.
| Display Technology | Best Environment | Peak Brightness | 2026 Price Range | Panel / Lamp Life |
|---|---|---|---|---|
| 4K Laser Projector | Dedicated dark room | 2,000–5,000 lumens | $2,500–$15,000 | 20,000+ hours |
| 4K Lamp Projector | Budget builds, controlled dark rooms | 1,500–3,500 lumens | $700–$2,500 | 3,000–5,000 hours |
| Short-Throw Laser | Tight throw distances (<2 ft) | 2,500–4,000 lumens | $3,000–$9,000 | 20,000+ hours |
| Direct-View LED Wall | Any ambient-light condition | 600–2,000 nits | $18,000–$120,000+ | 100,000+ hours |
| Large-Format OLED / LCD | Rooms with some ambient light | 500–1,500 nits | $2,000–$35,000 | 30,000–100,000 hours |
How Do You Optimize Acoustics for a Home Movie Theater?
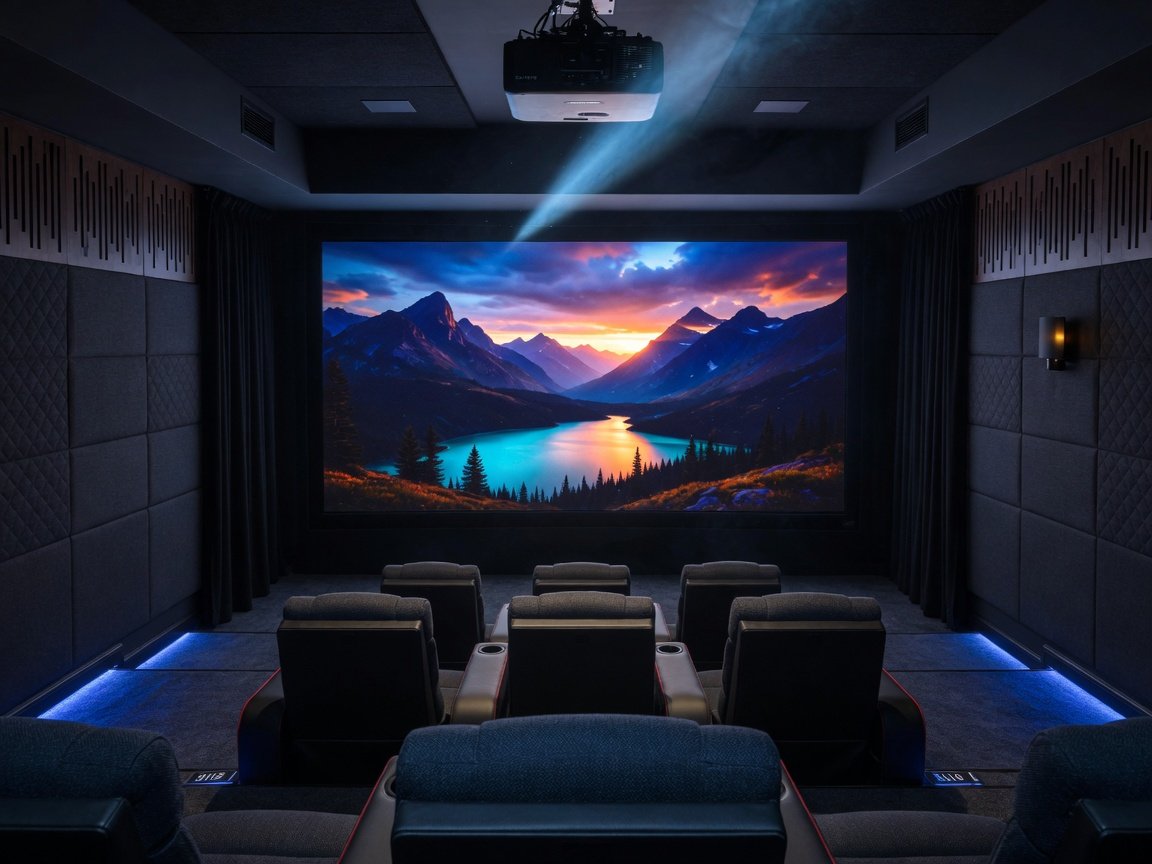
Acoustic treatment is the most technically demanding aspect of home movie theater design, and the element most frequently under-specified in both DIY and professionally integrated builds. The target RT60 — the time for sound to decay 60 dB from an impulse — for a home theater is 0.20–0.35 seconds across the 500 Hz–4 kHz octave band, per the ITU-R BS.1116-3 critical listening environment standard. Untreated rooms typically measure 0.5–1.2 seconds in this range. That additional reverberation smears transients, degrades dialogue intelligibility, and obscures the spatial detail encoded in Dolby Atmos height channels that mixing engineers assume a listener will hear cleanly.
Treatment strategy divides into three categories: absorption, diffusion, and bass control. Broadband absorption panels — typically 2–4-inch rigid fiberglass (703 or 705 density) or rockwool wrapped in acoustically transparent fabric — address mid and high frequencies. Panel thickness determines the lowest effective frequency: a 2-inch panel begins absorbing efficiently at approximately 500 Hz; a 4-inch panel at approximately 250 Hz. Diffusion panels scatter mid-high reflections rather than absorbing them, preserving a sense of spatial energy and preventing the acoustically “dead” quality that excessive absorption produces in small rooms. The first reflection points on the side walls and ceiling are the highest-priority treatment locations — a fact supported by every major room measurement standard.
Bass control requires dedicated low-frequency absorbers. Corner-placed broadband absorbers — 4–8-inch rigid fiberglass panels installed floor to ceiling — target axial and tangential modes in the 40–200 Hz range. Untreated room modes below 300 Hz are among the primary sources of perceived acoustic problems in residential listening rooms. Distributed bass arrays (DBA) — multiple subwoofers positioned to cancel primary room modes via destructive interference — can reduce modal variation by up to 20 dB without acoustic construction. A four-subwoofer DBA typically reduces seat-to-seat bass variation from ±14 dB to ±3 dB, ensuring every seat in the room hears an equivalent bass response.
The biggest performance gain in any home theater acoustic design comes from addressing the first reflection points — side walls, ceiling, and rear wall — before adding any speaker or subwoofer upgrade. Room geometry consistently outperforms gear upgrades in an untreated space.
What Seating Layout Works Best in a Home Movie Theater?
Seating layout involves three interdependent calculations: viewing distance, sightlines, and surround speaker geometry. The THX Reference standard and SMPTE 196M recommended practice both place the optimal viewing distance at 1.0–1.5 times the screen width, targeting approximately a 36-degree horizontal viewing angle at the prime listening position. A 140-inch screen in a 2.35:1 scope aspect ratio has a picture width of approximately 130 inches. That arithmetic places the ideal first-row seat between 10.8 and 16.2 feet from the screen surface — a range that must be established before room length is finalized.
Riser platforms transform multi-row seating from a performance compromise into a genuinely immersive arrangement. A standard riser height of 12–18 inches elevates the second row above the head line of first-row occupants, maintaining unobstructed sightlines without requiring steep inclines. AV designers specify riser depth at a minimum of 48 inches to accommodate standard home theater seating with a deployed leg rest. Tiered configurations meaningfully increase usable row capacity compared with flat-floor arrangements while maintaining equivalent sightlines for every seat in the room.
Surround speaker geometry constrains seating row width. The Dolby Atmos home theater specification places side surround speakers at 90–110 degrees azimuth from the center channel. At a typical room width of 16 feet, this positions the side surrounds approximately 2 feet behind the primary listening position on the side walls. The seating row must be narrow enough that no viewer sits so close to a side wall that the surround speaker appears at a dramatically off-axis angle relative to its intended position. Standard industry practice limits row width to no more than 70% of the room’s clear interior width — a constraint that affects both seating model selection and overall row configuration.
How Should You Design Lighting for a Home Movie Theater?
Lighting design in a home theater serves four distinct functions: pre-show ambiance, viewing bias illumination, aisle safety, and maintenance access. Each function requires a dedicated circuit and independent dimmer control to avoid operational compromise. Architectural LED fixtures recessed into soffits and coves replace general overhead lighting in a properly designed space. Flush-mounted ceiling downlights create specular reflections on both matte and ALR screen surfaces and should be absent entirely from the forward third of the room — the zone extending from the screen wall back to the primary listening row.
Bias lighting behind the screen — perimeter LED illumination mounted on the rear screen surface — reduces eye fatigue during extended HDR viewing sessions. Calibrated 6500K bias lighting set to roughly 10% of screen peak luminance reduces eye fatigue during extended HDR viewing sessions in a darkened room. The D65 (6500K) color temperature matches the reference white point used in the content mastering process. A bias light with a different color temperature will shift the perceived white point of the screen at the periphery of vision, compromising color accuracy for the viewer.
Aisle lighting — low-level LED strip lights mounted at baseboard height along seating aisles and riser edges — provides safety illumination without elevating the room’s overall ambient light level during viewing. Smart control system integration allows a single “movie” scene button to simultaneously dim general lighting to 0%, activate bias lighting at a specified level, lower the motorized screen, power on the projector, and route the correct audio input. Lutron Homeworks QSx and Control4 Lighting both support this scene-based architecture natively, typically executing a complete scene within 500 milliseconds — fast enough to feel instantaneous.
What HVAC, Wiring, and Infrastructure Decisions Matter Most?
HVAC noise directly affects the perceived dynamic range of the audio system in ways that no amount of equalization can correct. A home theater should target an ASHRAE NC-25 rating or lower — equivalent to a background noise level of approximately 34 dBSPL. NC-30, audible as a faint broadband hiss, is detectable during quiet dialogue passages in a well-isolated room. Achieving NC-25 requires supply-duct air velocity below approximately 400 feet per minute at the final diffuser, flexible duct connections to decouple mechanical vibration from the main ductwork trunk, and low-velocity diffusers selected for high acoustic attenuation. Purpose-designed home theaters with properly attenuated HVAC can achieve NC ratings well below NC-30, compared with the higher noise floors typical of rooms adapted from general residential spaces without mechanical attenuation.
Wiring infrastructure is the element most difficult and expensive to retrofit after construction is complete. The correct approach installs conduit home runs for every anticipated component — even components not yet purchased. At lengths beyond approximately 15 feet, passive HDMI 2.1 cables at 48 Gbps begin to show signal integrity degradation. Active optical HDMI cables convert the signal to fiber for the cable run and reconvert at each end, supporting lengths of 30–300 feet reliably at full 8K/60 and 4K/120 bandwidth. Installing a minimum 1-inch conduit between the equipment rack location and the projector mount preserves the ability to replace or upgrade cable types without wall disruption if the display technology changes in future years.
Power infrastructure requires dedicated 20-amp circuits for amplifier racks, projectors, and high-output subwoofer amplifiers. Sharing circuits with lighting or HVAC loads introduces ground loops and power-line noise into the audio chain. A surge-protected power conditioner — not a basic power strip — should be specified at the equipment rack to protect components against transient voltages and provide regulated power to source components. Equipment rack enclosures should be dimensioned and ventilated to maintain an ambient temperature below 75°F under full operational load. A 2,000-lumen laser projector dissipates approximately 400 watts as heat; a full 9.1.6 amplifier rack operating at reference SPL adds approximately 1,200–2,000 BTU per hour to the room’s total cooling load.
How Do You Plan a Home Movie Theater from Start to Finish?
A structured planning sequence eliminates the most common and expensive home theater design mistakes. The following ten-step framework follows the order used by CEDIA-certified design firms, accounting for the critical dependencies between architectural, acoustic, and AV decisions. Skipping steps — particularly performing AV specification before room acoustic design — consistently produces rooms that underperform relative to their equipment investment.
What Home Theater Design Styles Are Trending in 2026?
The aesthetic vocabulary of home movie theater design has expanded well beyond the classical velvet-and-tiered-seating paradigm of the early 2000s. Four distinct styles define the high end of the 2026 market, each with a different spatial logic, material palette, and acoustic treatment strategy. Choosing the right style early in the design process avoids costly finish changes later, since acoustic treatment placement and surface material selection are both structurally and aesthetically load-bearing decisions.
Modern Minimalist is characterized by flush-mounted in-wall speakers, retractable tensioned screens that disappear into ceiling housing when not in use, fabric acoustic panels in neutral tones that read as wall architecture, and integrated control systems hiding all cables and hardware from view. The result is a room that functions as a sophisticated media lounge until the screen descends and lights fade. This style is the most popular choice in contemporary open-plan homes where the theater must double as a daily-use living space, and requires careful coordination between the acoustic designer and the interior designer from the first design meeting.
Classic Cinema references commercial movie theater design language — stepped risers, velvet upholstered stadium seating, coffered or scalloped ceilings that conceal acoustic treatment, and perforated acoustic masking around the screen surface. Fiber-optic star-field ceiling panels remain a recurring feature. Industrial preserves the structural honesty of its host space, using exposed concrete finishes, raw-fabric absorption panels, and steel riser railings — most appropriate for converted warehouse or loft environments. Biophilic design, which integrates timber slat wall panels, natural textile acoustic wraps, and occasionally living moss acoustic surfaces into precision AV engineering, is the fastest-growing aesthetic category among new commissions in 2026, reflecting a broader shift toward natural materials in high-performance residential interiors.
How Much Does a Home Movie Theater Design and Build Cost in 2026?
Home theater project costs in 2026 divide into three tiers based on scope, specification level, and acoustic construction complexity. Understanding these tiers before engaging a design firm prevents the misalignment between budget expectations and real-world build costs that derails a significant percentage of residential AV projects.
| Tier | Typical Total Budget | Key Specifications | Best Suited For |
|---|---|---|---|
| Starter | $5,000–$15,000 | 5.1 speaker layout, 4K lamp projector, painted or basic fixed-frame screen, minimal acoustic panels, standard seating | Converted spare rooms, media rooms, first-time builds on a budget |
| Mid-Range | $15,000–$45,000 | 7.1.4 Atmos layout, 4K laser projector, ALR or motorized tensioned screen, full acoustic treatment, tiered seating, smart lighting control | Dedicated rooms where performance is the primary objective |
| Premium | $45,000–$120,000+ | 9.1.6 Atmos or Auro-3D, dual-stacked 4K laser or direct-view LED, room-within-a-room isolation construction, bespoke seating, full Crestron or Savant control system | New construction, reference builds, whole-home AV integration projects |
Labor represents 35–45% of total project cost on mid-range and premium builds. AV equipment accounts for 30–40%, with construction and acoustic finishing representing the remaining 20–30%. These proportions shift for starter builds, where DIY labor and consumer-grade equipment reduce integration cost fractions. One underappreciated cost driver is control system programming — a comprehensive Control4 or Crestron installation typically adds $3,000–$8,000 in programming labor to any project tier, independent of hardware cost, and is frequently omitted from early-stage budget estimates.
Essential Tools for Home Theater Design and Commissioning (2026)
- Room EQ Wizard (REW): Free acoustic measurement software for RT60, frequency response, and waterfall decay analysis. Requires a calibrated measurement microphone such as the miniDSP UMIK-1.
- Dirac Live / Audyssey MultEQ XT32: Room correction platforms applying frequency-domain and time-domain correction based on multi-point acoustic measurements taken at the listening positions.
- Calman Ultimate / ChromaPure: Display calibration software paired with a colorimeter or spectroradiometer for grayscale, color gamut, and HDR tone curve calibration to ST.2084 PQ (HDR) and Rec.709 (SDR) standards.
- CEDIA Design Standards (2026 Edition): The primary industry reference document for screen geometry, speaker placement, noise isolation, and performance verification procedures across all build tiers.
- Dolby Atmos Home Theater Installation Guidelines: Speaker placement specifications for all supported configurations from 5.1.2 through 9.1.6, including elevation angle requirements and minimum room dimension tables.
- THX Home Theater Design Guidelines: Room geometry, noise isolation targets, and recommended viewing angle specifications developed specifically for the residential cinema environment.
- SketchUp / AutoCAD LT: 3D and 2D modeling tools for verifying sightlines, speaker angle geometry, and riser cross-sections in scale before construction begins.
What Home Theater Trends Are Shaping 2026 and 2027?
Several converging technical trends are reshaping residential home theater design practice in 2026 and will continue to define best practices through 2027. Understanding them now allows current builds to be infrastructure-ready for technology shifts that will affect both content formats and hardware performance expectations within the next 24 months — particularly relevant for homeowners making wiring and conduit decisions that will be difficult to reverse.
Micro-LED display scaling into the residential market is the most consequential hardware development of 2026. Residential-format micro-LED panels entered the sub-$20,000 price band for 85–100-inch configurations this year, having previously been accessible only in commercial deployments. Their combination of infinite contrast ratio, HDR peak brightness exceeding 2,000 nits, zero burn-in risk, and multi-decade panel longevity makes them technically superior to OLED for home theater use cases. Their technical advantages are expected to drive growing adoption in high-specification builds and a gradual long-term shift away from projection in the premium segment.
AI-driven room calibration is reducing commissioning complexity significantly. Room correction platforms are integrating machine-learning inference that predicts and compensates for acoustic anomalies from room geometry inputs — reducing reliance on exhaustive multi-point measurement sweeps. Dirac Live Bass Control and comparable platforms can now model low-frequency modal behavior from as few as five measurement positions.
8K infrastructure maturation is progressing even as 8K content remains a niche in 2026. Streaming delivery of 8K content via efficient HEVC and AV1 codecs is technically viable on standard residential broadband connections. HDMI 2.1 — the baseline standard for all new home theater AV infrastructure installations in 2026 — natively supports 8K/60 and 4K/120, ensuring current wiring and switching investments remain forward-compatible through the 8K content transition without requiring conduit or cable replacement.
Immersive audio format convergence is simplifying hardware decisions. Dolby Atmos, DTS:X Pro, and Auro-3D are converging around common object-audio metadata frameworks. AV processors decoding all three formats from a single unified object-audio rendering engine are now commercially available from several major manufacturers. This convergence eliminates the format-fragmentation problem that previously forced hardware selection decisions based on studio content licensing partnerships rather than technical merit — a meaningful simplification for both integrators and homeowners planning installations intended to last a decade or more.
Frequently Asked Questions About Home Movie Theater Designs
What is the minimum room size for a dedicated home movie theater?
The practical minimum for a functional dedicated home theater is approximately 10 × 14 feet with an 8-foot ceiling. At this size, a 100–110-inch screen is achievable with a standard long-throw projector, and a 5.1 speaker configuration fits within the geometry. CEDIA recommends a minimum of 12 × 18 feet for a 7.1.4 Dolby Atmos layout with tiered seating and optimal elevation angles. Rooms below 10 × 12 feet can function as media rooms but will not meet CEDIA or THX home theater performance specifications for any full-surround speaker configuration.
How much does it cost to soundproof a home movie theater?
Soundproofing cost depends on the isolation method and target performance level. Resilient-channel-and-double-drywall treatment for an existing room typically costs $3,000–$8,000 for a 400-square-foot space, providing STC 48–52 isolation — sufficient to prevent audible sound transmission to adjacent spaces at moderate playback levels. A full room-within-a-room construction — decoupled floating floor, isolated stud walls, resilient ceiling — costs $12,000–$25,000 for the same footprint but achieves STC 60–65, enabling reference-level playback with 115 dB peaks without audible transmission outside the room.
Do I need a dedicated room, or can my living room serve as a home theater?
A living room can function as a home theater but involves unavoidable performance compromises. Open floor plans allow low-frequency energy to dissipate rather than pressurize, reducing bass impact and dynamic range. Ambient light from windows requires a high-lumen projector or a direct-view display. Acoustic treatment is generally incompatible with residential living room aesthetics. The performance ceiling of a living room setup is typically equivalent to a starter-tier dedicated theater — genuinely enjoyable but not technically equivalent to a purpose-built room regardless of equipment quality or budget.
What is the best projector resolution for a home theater in 2026?
4K (3840 × 2160) is the current reference standard for home theater projectors in 2026. At typical screen sizes of 100–150 inches and standard viewing distances of 10–15 feet, 4K resolution exceeds the angular resolving capability of human vision — meaning 8K provides no perceptible resolution benefit at those geometry parameters. The more impactful specification is HDR peak brightness above 1,500 lumens for effective HDR10 tone mapping, and color volume — target DCI-P3 coverage above 90% measured at native operational brightness rather than reduced brightness modes.
How many speakers do I need for a proper home theater?
A functional home theater requires a minimum of 5.1 channels: left, center, right, two surround channels, and one subwoofer. For Dolby Atmos height-channel reproduction, a minimum of 5.1.2 is required; 7.1.4 is the recommended configuration for rooms larger than 12 × 16 feet. The center channel is the most critical individual speaker in the system — approximately 70% of film dialogue is anchored to the center channel in modern theatrical mixes, and its clarity determines overall speech intelligibility more than any other single component in the signal chain.
Can I design a home theater in a room with windows?
Yes, but windows require active management on both the optical and acoustic levels. Motorized blackout shades engineered to eliminate light leakage at frame edges can reduce ambient intrusion to near-zero levels for projection use. ALR screens with negative-gain Fresnel structures reject light from all angles above the screen plane, enabling viable projected images even with moderate ambient light spill from windows. Acoustically, windows are among the most reflective surfaces in a room and should be treated with heavy drapes or absorption panels layered over the blackout shade system. Double-glazed windows also improve the room’s STC isolation by approximately 8–12 points relative to single-pane glazing.
How long does it take to design and build a home theater?
A complete professional home theater design and build spans 12–20 weeks from initial design engagement to commissioning. The design phase takes 2–4 weeks. Permitting and structural preparation add 2–4 weeks. AV rough-in and construction take 4–6 weeks. Finish installation, equipment rack build, and calibration take a further 2–4 weeks. Custom elements — bespoke upholstered seating, specialty acoustic panels, motorized equipment lifts — can extend the finish phase by 4–8 additional weeks, making early specification of long-lead custom items critical to overall timeline management.
Next Steps: Turning Your Home Movie Theater Design into Reality
Home movie theater design rewards sequential, system-level thinking. The room defines the system — not the other way around. Committing to display technology before completing acoustic and structural design locks throw ratio, screen-size, and geometry decisions before the room’s actual constraints are fully understood. That sequence error is the single most common and most expensive mistake in home theater projects of every budget tier, from DIY builds to professionally managed premium installations.
Use the following phased implementation sequence to move from concept to a commissioned, calibrated room in 2026:
- Weeks 1–2: Define use case and identify the candidate room. Verify all dimensions, ceiling height, structural constraints, and proximity to mechanical noise sources.
- Weeks 3–4: Complete screen-size and speaker-layout calculations. Produce a preliminary AV specification with target acoustic parameters — RT60, NC rating, and maximum SPL at the primary listening position.
- Weeks 5–6: Engage a CEDIA-certified AV designer and acoustic consultant. Finalize construction drawings, conduit plans, and complete AV design documentation before any construction activity begins.
- Weeks 7–12: Execute structural, electrical, HVAC, and AV rough-in work per design drawings. Install all conduit home runs, dedicated circuits, and structural backing for acoustic panels, speaker mounts, and projector hardware.
- Weeks 13–18: Install acoustic treatment, seating, finish lighting, and AV equipment. Build and wire the equipment rack. Commission the control system and define all scene automation macros.
- Weeks 19–20: Measure and calibrate. Verify RT60 against the ITU-R BS.1116-3 target range. Calibrate the display to reference standards using professional colorimetry software. Run audio room correction and verify SPL headroom at the primary listening position under reference-level signal conditions.
Every home theater build that begins with accurate room measurements and a structured, dependency-aware design plan — rather than a component wishlist — consistently delivers better performance at the same budget. The technology available in 2026 is the most capable and cost-effective in the history of residential AV. The limiting variable is almost always the approach, not the hardware.