Home theater sound panels are the single most cost-effective acoustic upgrade most rooms never receive. Untreated parallel walls generate standing waves, flutter echo, and early reflections that degrade even a $20,000 speaker system. A properly treated room, by contrast, can make a mid-range system perform at near-reference quality. Acoustic treatment is a foundational element of home theater design, and getting it right demands an understanding of both acoustic physics and room geometry. This guide covers every practical aspect of home theater sound panels in 2026: panel types, NRC ratings, placement mapping, material comparisons, DIY versus commercial options, and a complete step-by-step installation sequence.
Executive Summary
- An untreated home theater room typically measures a reverberation time (RT60) of 0.6–1.0 seconds — two to three times the 0.3–0.4 second target established by professional cinema acoustic standards for critical listening environments.
- Effective acoustic treatment requires three panel categories working in combination: broadband absorbers for mid- and high-frequency reflections, bass traps for low-frequency modal buildup in corners, and diffusers for rear-wall energy management.
- First-reflection-point treatment delivers the largest perceptible improvement per panel installed, making placement strategy more important than total panel count or raw coverage area.
- A properly treated 250 sq ft home theater can achieve a flat in-room frequency response within ±3 dB across the 80 Hz–10 kHz range — a standard that translates directly to cleaner dialogue, deeper spatial imaging, and significantly reduced listener fatigue during extended sessions.
What Are Home Theater Sound Panels and How Do They Work?
Home theater sound panels are purpose-built acoustic treatment devices that modify how sound energy behaves inside an enclosed room. When a speaker fires, only a fraction of what reaches your ears travels directly from the driver. The rest reflects off walls, ceiling, and floor — arriving milliseconds later as copies of the original signal that interfere with and corrupt it.
This interference is quantified by reverberation time, or RT60: the time it takes for a sound to decay by 60 dB after the source stops. In a typical untreated domestic room, RT60 runs between 0.6 and 1.0 seconds. Professional home cinema standards set the optimal RT60 at 0.3–0.4 seconds. That gap is not subtle. A room sitting at 0.9 seconds smears transients, degrades dialogue intelligibility, and produces the perception of inflated, one-note bass regardless of how well the speakers or subwoofers are calibrated. Home theater sound panels reduce RT60 to the target range by converting acoustic energy into negligible heat through friction within their porous fibrous cores — or, in the case of diffusers, by scattering energy across many angles simultaneously rather than allowing a coherent, high-amplitude reflection to reform.
Three primary acoustic problems require different panel solutions. Broadband mid- and high-frequency reflections are handled by absorbers. Late-arriving diffuse energy from the rear wall is managed by diffusers. Low-frequency modal pressure accumulation in room corners is controlled by bass traps. Addressing only one or two of these categories — the most common error in DIY acoustic treatment — produces a room that is simultaneously over-treated at one end of the spectrum and under-treated at the other, resulting in a thin, bright, or boomy character that persists regardless of how many panels are added.
What Types of Acoustic Panels Work Best in a Home Theater?
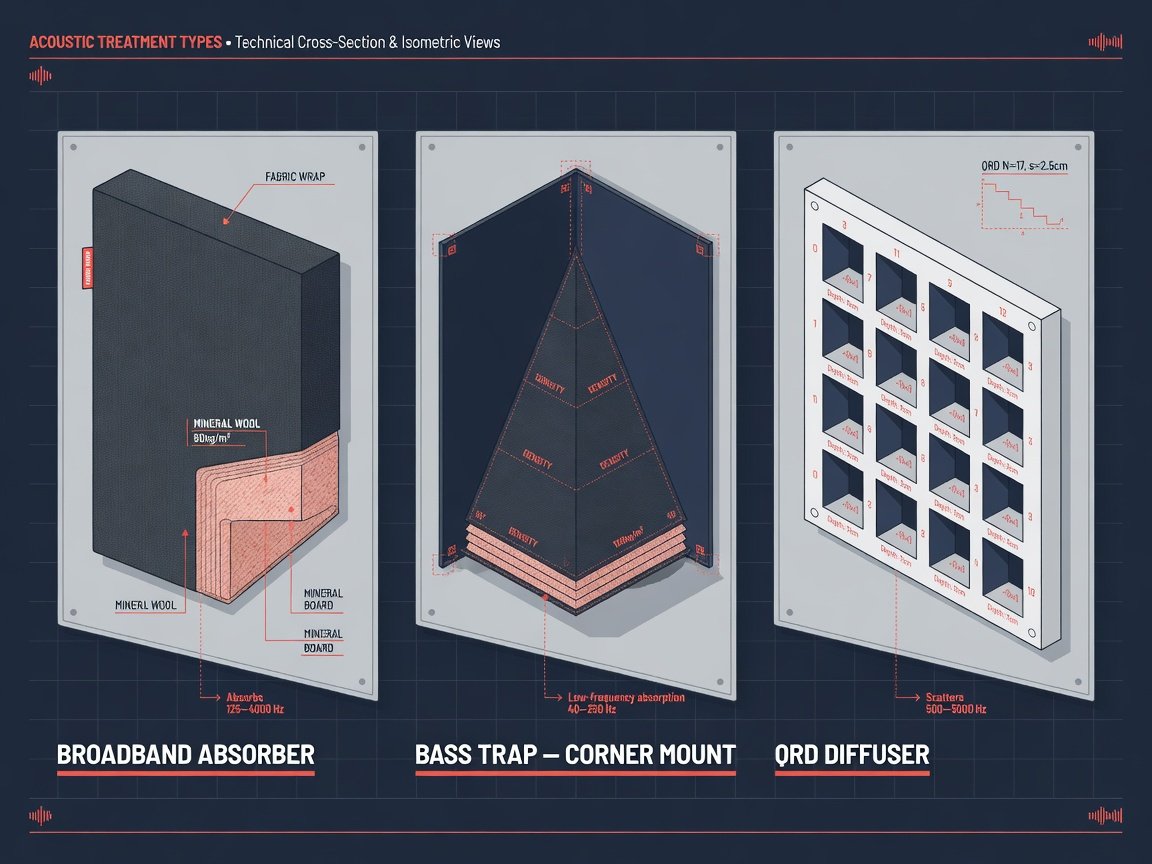
Panel selection starts with understanding what acoustic problem each type solves. The three core categories have distinct physical designs, frequency responses, and placement requirements. Applying the wrong type to a given location produces minimal benefit and can create new problems.
Broadband Absorbers
Broadband absorbers are the workhorses of home theater acoustic treatment. They consist of a dense porous core material — typically rigid fiberglass, mineral wool, or open-cell foam — housed in a fabric-wrapped frame. Sound waves penetrate the panel, cause the individual fibers to vibrate microscopically, and lose energy as heat through viscous friction. Panel thickness is the primary determinant of low-frequency performance: a 2-inch panel provides meaningful absorption above approximately 500 Hz, while a 4-inch panel extends effective absorption down to around 250 Hz. Panels targeting the 125–250 Hz mid-bass range require 4–6 inches of dense core material. Most commercial and DIY home theater panels are 2–4 inches thick and measure 24×48 inches, providing approximately 8 sq ft of treated surface per panel.
Diffusers
Diffusers do not absorb energy — they redistribute it. A well-designed diffuser scatters an incoming sound wave into many simultaneous angles, preventing a coherent reflection from reforming while preserving acoustic energy and the natural sense of room spaciousness that pure absorption eliminates. The most widely used type is the Quadratic Residue Diffuser (QRD), which uses a mathematically derived sequence of wells of varying depths to produce statistically uniform scattering across a defined frequency range. In a home theater, diffusers belong on the rear wall behind the primary listening position and occasionally at the ceiling mid-point. They are not appropriate for first-reflection points, where absorption is required to eliminate early reflections rather than scatter them.
Bass Traps
Low-frequency room modes — standing waves — are among the most destructive acoustic phenomena in home theaters and among the hardest to eliminate. Rectangular rooms create pressure maxima at corners and nodes along wall centerlines. Bass traps are thick, dense absorbers designed specifically for these low frequencies. Corner placement is acoustically critical: pressure is highest in tri-corner junctions where two walls meet the ceiling or floor, making those locations the most efficient positions for bass trap installation. A floor-to-ceiling corner bass trap constructed from 4-inch-thick, high-density mineral wool can reduce modal resonance peaks by 6–12 dB at frequencies below 200 Hz — a dramatic improvement perceived as tighter, more controlled bass with far less room-induced bloom and overhang.
What Is NRC and Why Does It Matter for Home Theater Panels?
Noise Reduction Coefficient (NRC) is a single-number rating from 0.0 to 1.0 that describes how much sound a material absorbs, averaged across four test frequencies: 250 Hz, 500 Hz, 1,000 Hz, and 2,000 Hz. An NRC of 1.0 indicates the material absorbs all incident sound at those frequencies. An NRC of 0.0 means it reflects everything. For home theater applications, NRC is a useful but incomplete specification: it reports nothing about performance below 250 Hz, which is exactly where the most damaging low-frequency room modes reside.
High-quality acoustic panels for home theater use typically carry NRC ratings of 0.85–0.99. Panels rated below NRC 0.70 are generally insufficient for critical listening environments and require significantly greater surface area coverage to compensate. When comparing products, request the full third-octave absorption coefficient data rather than relying solely on the single-number NRC figure. A panel with NRC 0.90 achieved primarily through very high absorption at 1 kHz and poor performance at 250 Hz is less useful in a home theater than a panel with NRC 0.85 that maintains consistent absorption across the entire mid-frequency range.
Sound Absorption Average (SAA) is a newer, more precise metric that averages absorption across twelve one-third-octave frequencies from 200 Hz to 2,500 Hz and is increasingly appearing on technical datasheets alongside NRC. SAA tracks closely with NRC in most cases but provides a more representative picture of real-world mid-frequency performance. When both figures are listed by a manufacturer, prefer SAA for specification and comparison work — it is the more complete number.
How Many Sound Panels Does a Home Theater Actually Need?
Panel quantity is a function of room volume, existing surface materials, and the target RT60. A practical rule of thumb widely used by professional acoustic consultants is to treat 25–35% of the total wall and ceiling surface area with absorptive material. For a standard 12×18×9 ft home theater room — total wall and ceiling surface area approximately 1,188 sq ft — this translates to roughly 300–415 sq ft of treated surface, achievable with 38–52 standard 2×4 ft panels.
However, raw coverage percentage is a starting point, not a fixed prescription. Panel count should be refined by identifying specific acoustic problem areas and prioritizing them. First-reflection points on side walls, ceiling, and the zone behind the screen are the highest priority surfaces. Corner bass traps address a disproportionately large share of low-frequency energy and should be installed before deciding whether additional wall panels are required. Treating corners first frequently reveals that fewer mid-wall panels are needed than a coverage-percentage formula would initially suggest.
Quick Reference: Estimated Panel Count by Room Size
| Room Size | Approx. Surface Area | Recommended Coverage | Est. Panel Count (2×4 ft) |
|---|---|---|---|
| Small (10×12×8 ft) | ~752 sq ft | 25–30% | 24–28 panels |
| Medium (12×18×9 ft) | ~1,188 sq ft | 28–32% | 42–48 panels |
| Large (15×24×9 ft) | ~1,602 sq ft | 25–30% | 50–60 panels |
Dedicated home theater rooms that already contain soft furnishings — carpet, upholstered seating, fabric curtains, acoustic drapes — naturally absorb more broadband energy than bare concrete or drywall environments. In heavily furnished rooms, required panel counts can be meaningfully reduced from the baseline estimate. Always measure RT60 with a calibrated microphone and acoustic measurement software after each treatment phase, before adding more panels, to avoid over-damping the room beyond the 0.3–0.4 second target.
Where Should You Place Sound Panels in a Home Theater?
Panel placement follows a defined priority order that maximizes acoustic benefit per panel installed. Deviation from this sequence — for example, treating rear walls before first-reflection points, or adding mid-wall coverage before addressing corners — produces suboptimal results and frequently leads to wasted investment in panels that deliver marginal additional improvement.
Priority 1: First-Reflection Points
First-reflection points are the locations on side walls and ceiling where sound from the main speakers bounces directly to the listening position before any other reflective path. These early reflections arrive 5–20 ms after the direct sound — too short an interval for the auditory system to resolve as separate events. Instead, they are perceived as a smearing of the direct sound that reduces stereo image precision, degrades tonal accuracy, and reduces the perceptual separation of individual instruments and voices. To locate side-wall first-reflection points, position a mirror flat against the side wall at seated ear height and slide it forward and back until a speaker is visible in the reflection from the listening seat. That is the first-reflection point. A 2×4 ft absorber centered on each identified point is the minimum treatment requirement.
Priority 2: Corner Bass Traps
All four floor-to-ceiling corners should receive full-height bass trap treatment before mid-wall absorbers are considered. Tri-corner junctions at the front of the room — where the front wall, side walls, and ceiling converge — are the most critical locations because they are nearest to the speaker sources and accumulate the highest acoustic pressure concentration. Floor-to-ceiling stacks of 4-inch mineral wool panels, or purpose-built cylindrical or wedge-shaped corner trap units, are the standard approach. In rooms with persistent bass modal problems, extending 4-inch panel coverage across the full width of the front wall behind the screen provides additional low-frequency absorption with a high return per square foot of material.
Priority 3: Rear Wall Treatment
The rear wall behind the listening position returns sound directly forward toward the screen at high velocity, creating what is perceptible as a harsh flutter echo in rooms shorter than approximately 18 ft. A combination of absorption and diffusion is recommended: a diffuser panel centered at ear height on the rear wall, flanked by absorber panels, eliminates the discrete echo while preserving a sense of room ambience. Rooms shorter than 12 ft are too small for effective diffuser operation — diffusers require a minimum listener distance of approximately 1 metre to function correctly — and should receive full absorption coverage on the rear wall instead.
Priority 4: Ceiling Cloud
A ceiling cloud — a horizontal absorber panel or panel cluster mounted directly above the listening position — addresses the ceiling reflection, which is typically the most energetic early reflection after the side walls. A cloud sized 4×6 ft or larger, centered over the primary seating row, delivers a measurable improvement in imaging focus and mid-frequency clarity. Ceiling panels must be mounted with hardware capable of supporting a minimum of three times the panel’s static weight load; consult structural references for ceiling joist loads before installation and err on the side of significant overengineering.
The ceiling cloud is among the most overlooked elements of home theater acoustic treatment. The ceiling reflection arrives just as early as side-wall reflections and carries nearly as much energy — it cannot be dismissed as optional.
What Materials Perform Best for Home Theater Acoustic Panels?
The acoustic performance of a home theater sound panel depends primarily on its core absorptive material, not on its fabric covering, frame finish, or mounting hardware. Five core materials dominate both the DIY and commercial panel markets. Each offers a distinct trade-off between acoustic performance, cost, safety, workability, and availability.
| Material | Typical NRC | Low-Freq Performance | DIY Suitability | Cost (Core Only, per sq ft) |
|---|---|---|---|---|
| Rockwool / Mineral Wool | 0.90–0.95 | Excellent — 4 in. effective to ~250 Hz | High — rigid, easy to score and snap | $1.50–$2.50 |
| Owens Corning 703 / 705 Fiberglass | 0.90–0.99 | Excellent — 705 at 2 in. effective to ~350 Hz | Moderate — requires gloves and dust mask | $2.00–$3.50 |
| Open-Cell Acoustic Foam | 0.70–0.90 | Poor — 2 in. effective only above ~700 Hz | High — lightweight, adhesive-mountable | $1.00–$2.00 |
| Commercial Fabric-Wrapped Panels | 0.85–0.95 | Good — most use 2 in. or 4 in. mineral wool or fiberglass core | N/A — ready to hang | $6.00–$15.00 (finished cost) |
| Recycled PET / Cotton-Denim Batts | 0.75–0.85 | Fair — 4 in. effective to ~315 Hz | High — no skin or respiratory irritation | $1.50–$2.00 |
Mineral wool — such as Rockwool Safe ‘n’ Sound or Rockboard 60 — is the preferred DIY core material for most home theater builds. It combines high NRC performance, excellent low-frequency extension at practical thicknesses, mechanical rigidity that allows clean panel construction, Class A fire rating, and a material cost substantially below finished commercial panels. Rigid fiberglass (OC 703 at 3 lb/ft³ density, or OC 705 at 6 lb/ft³) performs comparably but requires more careful handling during construction. Open-cell acoustic foam should be used only for supplementary high-frequency treatment or cosmetic studio finishes — it provides wholly inadequate absorption across the mid-bass frequencies most critical to home theater dialogue clarity and bass control.
How Do You Install Home Theater Sound Panels Step by Step?
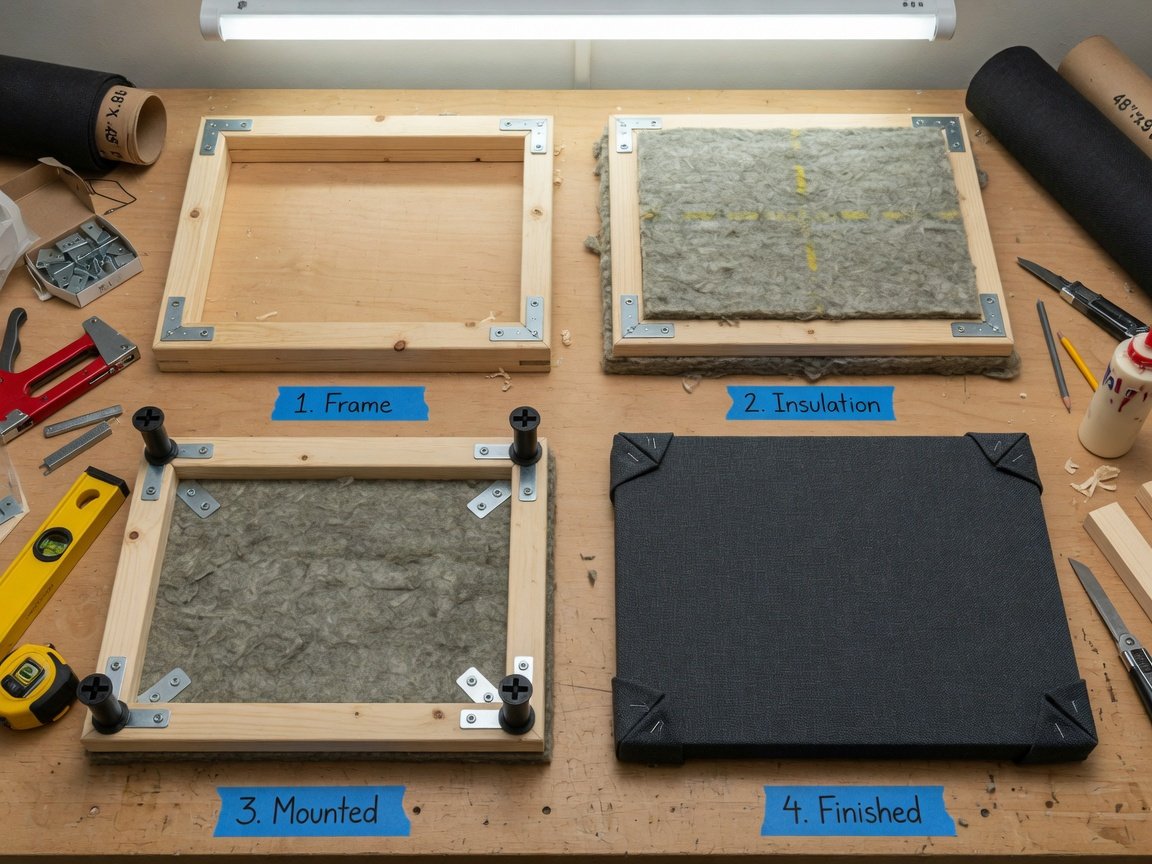
Installation divides into two tracks: constructing DIY panels from raw materials and mounting pre-finished commercial panels. The steps below cover the complete DIY construction and installation sequence. Total project time for a medium-sized room requiring approximately 40 panels runs 16–24 hours across two weekends. Commercial panel installation follows steps 1, 2, 7, and 8 only, with total installation time of 4–8 hours once panels are on-site.
How Much Do Home Theater Sound Panels Cost in 2026?
Cost varies dramatically between DIY construction and commercial purchase. A DIY panel built from mineral wool core and fabric-wrapped timber framing costs approximately $18–$35 per panel in materials — around $2.25–$4.50 per square foot of treated surface. A commercial fabric-wrapped acoustic panel of equivalent acoustic performance costs $80–$250 per panel at retail, or $10–$30 per square foot of treated surface. For a medium-sized home theater requiring 40 panels, this produces a material cost of approximately $800–$1,400 for DIY construction versus $3,200–$10,000 for commercial equivalents.
The acoustic performance difference between a well-built DIY panel using high-density mineral wool and a premium commercial panel is minimal for home theater applications. Both achieve NRC ratings in the 0.90–0.95 range when properly constructed with appropriate core materials. The primary practical advantages of commercial panels are aesthetic finish consistency, faster installation, and elimination of construction time — not meaningfully superior absorption. For cost-conscious builds, the DIY approach allows budget to be redirected toward measurement tools, mounting hardware quality, or additional panels rather than manufacturing markup.
What Are the Most Common Home Theater Acoustic Treatment Mistakes?
Several systematic errors appear repeatedly in home theater acoustic treatment projects. Understanding them before starting prevents expensive rework, wasted materials, and disappointing acoustic results.
- Treating only high frequencies with thin foam: Studio foam tiles and thin open-cell panels address frequencies above roughly 800 Hz but leave mid-bass and low-frequency modes completely untouched. The result is a room that sounds simultaneously bright and boomy — a common complaint from owners who applied foam tiles without installing any bass traps or using panel materials thicker than 1–2 inches.
- Over-damping the room: Applying too much absorption removes the natural reverberant energy that makes cinematic audio feel immersive and three-dimensional. Rooms treated below RT60 of 0.2 seconds sound unnaturally dead, closed-in, and fatiguing during extended listening. Measure after every treatment phase; stop adding panels when the target range is reached.
- Omitting the ceiling: The ceiling reflection is a primary first-reflection surface, particularly pronounced in rooms with 8–9 ft ceilings. A ceiling cloud above the primary seating row is not an optional addition for a serious acoustic treatment — it is as important as the side-wall panels.
- Asymmetric treatment between left and right walls: Acoustic treatment must be distributed symmetrically relative to the room’s center axis. Asymmetric coverage produces asymmetric frequency response and imaging that electronic room correction cannot fully compensate for at all frequencies and listening positions.
- Placement driven by aesthetics rather than measurement: Decorative panels clustered for visual balance, or placed on only one wall to avoid covering a window, produce uneven treatment with predictable acoustic artifacts. Use RT60 measurements and first-reflection mapping — not visual symmetry — to drive placement decisions.
Example Scenario: A Home Theater Acoustic Treatment Plan
This illustrative scenario shows how a four-phase treatment plan might address a challenging room. Consider a 12×20×9 ft dedicated home theater in a poured-concrete basement — a configuration expected to present severe acoustic challenges: RT60 well above the 0.3–0.4 second target, significant low-frequency modal buildup in corners, and flutter echo between front and rear walls. Even a quality 7.1.4 Atmos configuration, correctly placed and calibrated, is likely to sound congested and lacking in spatial definition in such an environment until the room acoustics are addressed.
Treatment was implemented in four sequential phases over six weeks, with RT60 measurements taken after each phase. Phase one: full-height corner bass traps in all four floor-to-ceiling corners using stacked 4-inch Rockwool Rockboard panels — 192 sq ft of absorptive material total. Phase two: first-reflection absorbers on both side walls and the ceiling at the measured first-reflection positions — six 2×4 ft panels at 4-inch thickness, covering 48 sq ft. Phase three: a 4×6 ft ceiling cloud of 4-inch mineral wool mounted above the primary seating row at 7.5 ft. Phase four: a rear wall combination of one 2×4 ft purpose-built QRD diffuser panel centered at ear height, flanked by two 2×4 ft absorbers.
What Are the Emerging Trends in Home Theater Acoustic Treatment for 2026?
The home theater acoustic treatment market is undergoing meaningful technological evolution in 2026, driven by advances in active acoustic control, accessible measurement tooling, and materials science. Understanding these trends helps buyers and builders make forward-looking investment decisions rather than purchasing technology that will be superseded within a product cycle.
- Active acoustic control at prosumer price points: DSP-driven systems that combine passive panel treatment with active room correction algorithms — using precisely delayed and phase-shifted secondary sources — are moving from professional studio applications into the home theater segment. These systems can suppress low-frequency modes that passive bass traps cannot fully address in small rooms where corner trap surface area is physically limited by room geometry.
- Tunable variable-depth absorber panels: Panels that allow users to mechanically adjust the air gap behind the absorptive core — and therefore the effective lower cutoff frequency — are transitioning from professional studio inventory into the premium home theater panel market. A single panel can be optimized for different frequency targets as room conditions change, eliminating the need to build additional panels when low-frequency treatment requirements evolve.
- App-guided real-time acoustic measurement: Smartphone-based acoustic analysis applications using machine learning room models now provide real-time placement recommendations via the device’s built-in microphone. While not a substitute for calibrated microphone measurements in critical applications, they significantly reduce the barrier to basic acoustic diagnosis for first-time home theater builders who would otherwise proceed without any measurement data.
- Recycled PET panel cores as a market-share challenger: Panels built from compressed recycled polyethylene terephthalate (PET) fibers are gaining meaningful market penetration in 2026, offering NRC ratings competitive with traditional fiberglass at lower handling complexity — no respiratory protection or skin protection required during cutting and installation — and with a substantially reduced environmental manufacturing footprint.
Looking into 2027, the proliferation of height-channel speaker configurations for Dolby Atmos, DTS:X, and Auro-3D will drive increased demand for ceiling and overhead acoustic control products designed specifically for immersive audio. Current room correction processors are largely limited to horizontal-plane equalization; the next processor generation will apply full three-dimensional acoustic correction, making ceiling acoustic treatment more technically important than it has been in any previous era of home cinema.
Frequently Asked Questions About Home Theater Sound Panels
Do home theater sound panels actually make a noticeable difference?
Yes — in most domestic rooms the improvement is immediately and plainly audible. The most consistent gains are cleaner dialogue intelligibility, more precise stereo and surround imaging, and a reduction in the low-frequency bloom that characterizes untreated rectangular rooms. The magnitude depends on how reflective the room was at baseline: bare concrete or drywall rooms with hard floors show the most dramatic results. Heavily furnished rooms with carpet and upholstered seating see more modest but still meaningful improvements, typically in imaging precision and mid-frequency clarity.
What is the difference between acoustic foam and proper acoustic panels?
Acoustic foam is an open-cell material that provides meaningful absorption only at frequencies above approximately 700–800 Hz in standard 2-inch thickness. It contributes almost nothing to mid-bass or low-frequency room mode control. Proper acoustic panels for home theater use high-density rigid fiberglass or mineral wool as the core material, which provides effective absorption from as low as 125–250 Hz at 4-inch thickness. For home theater environments where bass management and dialogue clarity are the primary goals, acoustic foam used as the primary treatment material is an inadequate solution that will produce an unbalanced result.
Can furniture and soft furnishings replace acoustic panels in a home theater?
No — furnishings supplement panels but cannot replace them. Carpet, upholstered seating, and fabric curtains provide useful incidental absorption, primarily at frequencies above 500 Hz, and will reduce the total number of panels needed in a given room. However, furnishings cannot be precisely positioned at specific first-reflection points, and they provide negligible low-frequency absorption. Bass traps in corners specifically cannot be substituted by any practical furniture arrangement. Treat furnishings as a modifier to the panel count calculation, not as a substitute for a deliberate acoustic treatment plan.
How do I know if my home theater is over-damped?
An over-damped room sounds unnatural: dialogue and music lack presence and air, transients feel artificially suppressed, and extended listening becomes fatiguing rather than enjoyable. Measurement is the definitive diagnostic. Measure RT60 with Room EQ Wizard and a calibrated microphone. An RT60 below 0.2 seconds at 1 kHz in a home theater indicates over-treatment. Removing some absorbers and replacing them with diffusers on the rear wall restores the natural diffuse energy field without reintroducing the harsh early reflections that made treatment necessary in the first place.
Do sound panels provide soundproofing — do they stop sound leaving the room?
No. Acoustic treatment and soundproofing (sound isolation) are categorically different technologies that address entirely different physical problems. Acoustic panels manage sound behavior inside the room — reducing reflections and reverberation time. Sound isolation prevents sound energy from transmitting through walls, floors, and ceilings into adjacent spaces. Isolation requires mass, mechanical decoupling, and airtight construction — adding acoustic panels has essentially no measurable effect on sound transmission through room boundaries. If noise transmission to adjacent rooms is the priority, a dedicated room-within-a-room construction approach is required.
What is the minimum panel thickness for home theater acoustic treatment?
For side-wall and ceiling first-reflection absorbers, 2 inches of mineral wool or rigid fiberglass provides adequate absorption above 500 Hz. Four-inch thickness is strongly preferred because it extends meaningful absorption down to approximately 250 Hz — covering male vocal fundamentals, upper bass, and lower-midrange modal frequencies that significantly affect dialogue clarity and perceived tonal balance. For corner bass traps, 4 inches is the practical minimum; 6 inches delivers noticeably better performance at frequencies below 150 Hz. Never use panels thinner than 2 inches as the primary wall treatment material in a home theater environment.
Conclusion: A Practical Implementation Timeline for Home Theater Sound Panels
Home theater sound panels deliver their greatest value when installed in a deliberate, measurement-guided sequence that prioritizes acoustic impact per dollar invested. The following timeline is structured for a medium-sized dedicated room with a total DIY treatment budget of $1,000–$1,500 in materials.
- Week 1 — Baseline measurement and planning. Measure RT60 at five positions using REW and a calibrated microphone. Record modal resonance peaks across the 63 Hz–250 Hz range. Map first-reflection points on both side walls and ceiling using the mirror method. Draft a complete panel layout before purchasing any materials.
- Weeks 2–3 — Corner bass traps. Build and install full-height corner bass traps in all four floor-to-ceiling corners using 4-inch mineral wool. Re-measure RT60 and low-frequency modal response.
- Week 4 — First-reflection absorbers. Install 4-inch absorber panels at all first-reflection points on both side walls and the ceiling. Re-measure. This phase produces the most dramatic improvements in imaging precision and dialogue intelligibility of any treatment phase.
- Week 5 — Ceiling cloud. Mount a 4×6 ft ceiling cloud at 4-inch thickness above the primary seating row. Re-measure RT60. Verify the result is within the 0.3–0.4 second target across the 250 Hz–4 kHz octave bands.
- Week 6 — Rear wall and final verification. Install a diffuser-plus-absorber combination on the rear wall. Take final full-room RT60 measurements. Add supplementary panels only in specific octave bands where RT60 remains above 0.4 seconds, targeting those frequency ranges specifically rather than adding general coverage.
Acoustic treatment is one of the few home theater upgrades where incremental, measurement-guided installation consistently outperforms a single large-scale deployment. Measure, build, mount, and measure again — the data will tell you precisely what each phase achieved and exactly what remains. A fully treated room is not a luxury addition to a capable system. It is the physical foundation on which every speaker, amplifier, and processor in the chain performs as designed — and without it, no amount of upstream investment reaches its potential.
Pingback: How to Design a Home Theater: A Practical Guide for 2026 - Home Theater InfoLine