Every successful home theater project starts with one question: how do you turn a room into a cinema? A properly executed home theater setup can deliver a genuinely better audiovisual experience than a commercial multiplex at a fraction of the recurring admission cost. According to CEDIA industry estimates for 2026, residential home theater installations grew by over 20% year-over-year, driven by mainstream adoption of 4K laser projection and Dolby Atmos object-based audio — formats that previously required professional cinema infrastructure to experience. At hometheaterinfoline.com, we’ve analyzed hundreds of real-world builds to distill the technical approach that separates a genuinely immersive system from an expensive television with well-marketed speakers. This guide covers every phase: room selection, acoustic treatment, display technology, audio system design, wiring, and smart integration.
Executive Summary
- Home theater projects range from approximately $3,000 for a capable entry-level build to $40,000+ for a reference-grade dedicated cinema room — with room acoustics, not hardware, delivering the highest return per dollar at every tier.
- Room acoustics are widely considered the dominant factor in perceived audio quality, yet acoustic treatment is the most consistently skipped phase in DIY projects, making it the single highest-leverage investment available.
- In 2026, 4K laser projectors have crossed the 3,000-lumen threshold at under $3,500, delivering cinema-grade contrast and DCI-P3 color gamut on 120″–150″ screens at mid-range prices that were reference-tier only two years ago.
- One of the most notable home theater trends in 2026 is the hybrid multipurpose room — engineered for cinema-grade performance using motorized screens, removable acoustic panels, and tunable lighting, with no visible hardware or treatment when not in use.
What Are the Essential Components of a Home Theater Project?
A home theater project is five interconnected subsystems that must function as a coherent whole. Treating them as independent purchases — the most common strategic error — produces a system where individual components underperform their specifications because the surrounding infrastructure doesn’t support them. The five subsystems are: display (projector or flat panel), audio (AV receiver or processor plus speaker array and subwoofers), source hardware (media servers, streaming devices, gaming consoles), control (remote systems, smart home integration), and infrastructure (wiring, power conditioning, networking, and equipment racks).
Each subsystem has its own specification hierarchy. The display subsystem is governed by brightness, contrast ratio, and color gamut — metrics that interact directly with the room’s ambient light conditions. The audio subsystem is bounded by the room’s acoustic properties; the best speakers in a reverberant, untreated room will sound worse than modest speakers in a well-treated space. Source hardware must deliver the correct signal format — HDMI 2.1 (48 Gbps) for 4K/120Hz and uncompressed HDR metadata, with bitstream audio output for lossless codec processing in the AV receiver. Control and infrastructure are invisible when they work and catastrophic when they don’t. Control and infrastructure issues — not component failure — account for the majority of post-installation home theater service calls, which underscores why rough-in planning matters as much as product selection.

How Do You Choose the Right Room for a Home Theater Build?
Room geometry determines the acoustic starting point of your project before a single component is purchased. The ideal home theater room avoids square proportions — which generate severe, symmetrical standing wave patterns — has a ceiling height of at least 8 feet (9–10 feet preferred for proper ceiling speaker placement), and has no large parallel surfaces left untreated. The THX-recommended room dimension ratio of 1:1.28:1.54 (height:width:length) minimizes overlapping modal resonances in rooms between 1,500 and 3,000 cubic feet, which is the practical size range for most dedicated home theater builds.
Basement rooms are the first choice for dedicated home theater projects for two structural reasons: concrete construction provides natural mass loading that reduces low-frequency buildup, and the absence of adjacent living spaces above eliminates impact noise transmission. Spare bedrooms, bonus rooms above garages, and purpose-built additions are viable alternatives. The hard disqualifiers are open-plan adjacency to kitchens or living areas without a separating wall, more than two windows on the projection wall, and HVAC systems that vent directly into the space without noise-dampening flexible duct connections. A room’s noise floor — rated by NC (Noise Criteria) standard — should measure NC-35 or better. Rooms above NC-40 mask quiet film soundtrack passages at reference listening levels, compressing the system’s effective dynamic range.
Most DIY builders spend hours comparing receivers and projectors, then install them in a room with bare drywall, hard floors, and windows on the screen wall. The room will win that fight. Fix the room first — then buy the gear.
What Does a Home Theater Project Cost in 2026?
Cost structures for home theater projects in 2026 reflect component price compression at the mid-tier — particularly in 4K laser projection — alongside sustained labor cost increases for professional installation. The following tiers represent complete, functional systems including display, audio, source hardware, and basic control, excluding room renovation costs.
| Tier | Budget Range | Display | Audio Format | Primary Trade-Off |
|---|---|---|---|---|
| Entry | $1,500–$4,000 | 65″–85″ QLED TV | 5.1 AV receiver + bookshelf or tower package | Limited bass extension; no acoustic treatment |
| Mid-Range | $4,000–$12,000 | 4K laser projector + 100″–120″ ALR screen | 7.2.4 Atmos receiver + dual subwoofers | Requires room darkening; acoustic panels essential |
| Performance | $12,000–$30,000 | 4K laser (3,000+ lumens) + 130″–150″ masking screen | 9.4.6 Atmos + dual 18″ sealed subwoofers | Full acoustic treatment required; DSP calibration critical |
| Reference | $30,000+ | DCI-P3 projector + fixed-frame masking screen | THX-certified system, ISF/HAA-calibrated | Professional design and installation required |
Professional installation labor in 2026 typically runs $85–$145 per hour. A full-room project — including acoustic treatment, structured wiring, rack integration, display calibration, and DSP tuning — runs $3,500–$9,000 in labor alone. Acoustic treatment materials add $800–$4,000 depending on room volume and treatment depth. Budget 15–20% of total equipment spend for infrastructure: cable, conduit, wall plates, power conditioning, and racks. These infrastructure costs are routinely underestimated; builders who omit them typically encounter the same expenses later at two to three times the cost of a planned rough-in in a finished wall.
How Do You Treat Room Acoustics for Optimal Audio Performance?
Room acoustics divide into two problem categories: reflections (early and late) and resonances (standing waves and room modes). Each requires a different treatment strategy, and both must be addressed for a home theater project to perform at its potential. Acoustic treatment improvements are audible at far lower cost thresholds than equivalent hardware upgrades: a well-treated room allows modest speakers to outperform significantly more expensive ones in an untreated space.
First reflections are the primary copies of each speaker’s output that reach the listening position after bouncing off walls, ceiling, or floor — typically arriving 5–25 milliseconds after the direct sound. This timing differential creates comb filtering: audible frequency colorations that smear transients and collapse the stereo image. Identifying first-reflection points requires a mirror: if you can see a speaker’s face reflected from the primary listening position, that surface requires absorption. Two-inch broadband panels fabricated from rockwool or fiberglass at 4–6 lbs/ft³ density are effective from 250 Hz upward. Bass traps placed in corners require 4–8 inches of depth to meaningfully attenuate the frequencies below 250 Hz where most room mode energy accumulates.
Room modes — resonant frequencies at which the room’s dimensions create reinforcement or cancellation — require both physical treatment and digital signal processing (DSP). Bass traps installed in floor-to-ceiling corner positions (all four corners) address the 40–120 Hz buildup that DSP cannot adequately correct without introducing audible phase artifacts. Above that range, platforms such as Dirac Live, Audyssey MultEQ XT32, and ARC Genesis measure room response at multiple seating positions and apply frequency correction filters. A properly executed combination of physical bass trapping and Dirac Live full-band correction can significantly reduce seat-to-seat frequency variation — a clearly audible improvement across every seat in the room.
Builders consistently underestimate corner bass trapping. Floor-to-ceiling traps in all four corners will do more for low-frequency performance than doubling your subwoofer budget. The physics of room acoustics leave little room for negotiation on this point.
Which Display Technology Is Right for Your Home Theater Project?
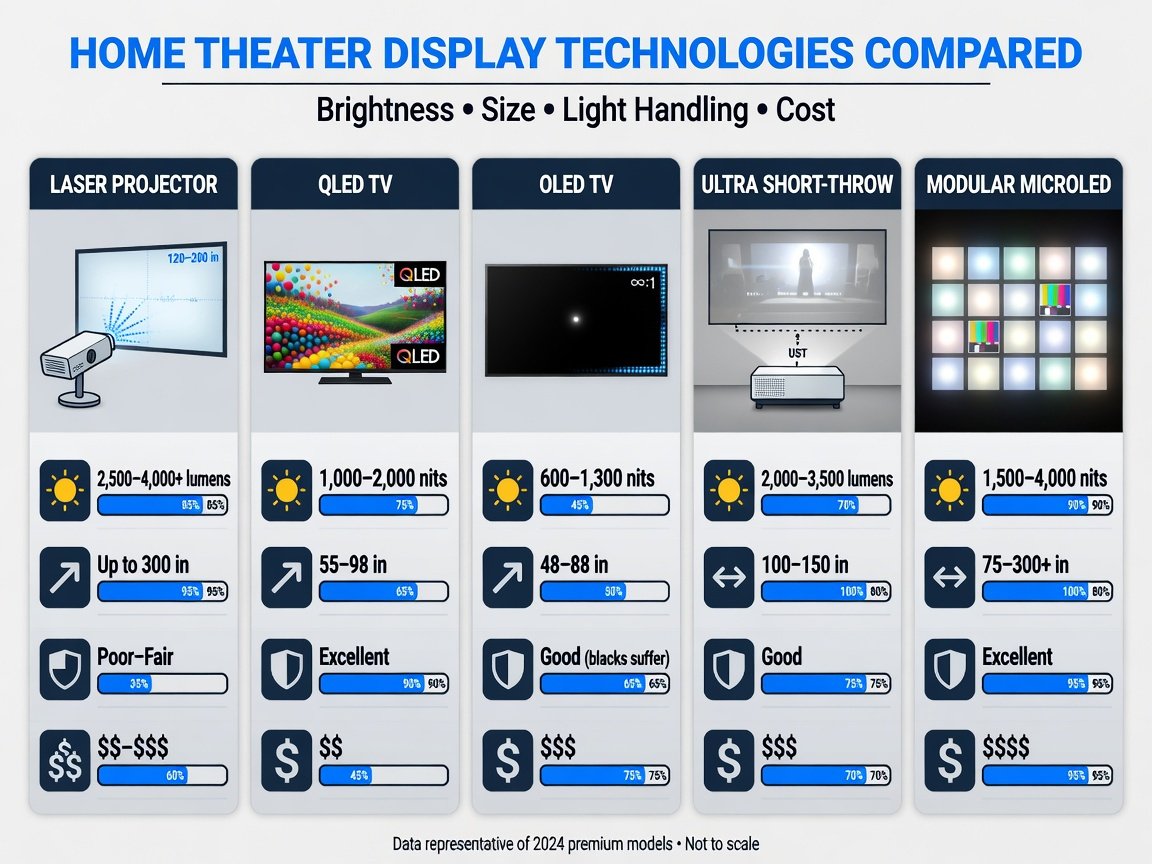
Display technology selection in 2026 falls into five realistic categories, each optimized for specific room conditions and performance priorities. The key variables are ambient light control, desired image size, and total budget. The correct display for a fully dark dedicated room is a fundamentally different decision from the correct display for a multipurpose room with daylight exposure — and conflating these two use cases is one of the most common sources of post-installation dissatisfaction.
| Technology | Best Room Condition | Max Practical Screen Size | 2026 Price Range | Key Weakness |
|---|---|---|---|---|
| 4K Laser Projector | Dark, light-controlled room | 150″+ (practically limitless) | $1,800–$15,000 | Contrast limited by ambient light; dark room required |
| QLED Flat Panel | Ambient or mixed light | 98″ (consumer tier) | $1,200–$6,000 | Scale ceiling; cannot match projector immersion above 98″ |
| OLED Flat Panel | Low ambient light, critical blacks | 83″ (current product lines) | $1,800–$5,500 | Size and peak-brightness ceiling limits HDR impact |
| Ultra-Short-Throw (UST) Laser | Furniture-constrained rooms | 130″ | $2,500–$7,000 | Requires matched UST ALR screen; placement-sensitive |
| MicroLED | Any room condition | Modular (136″–220″+) | $20,000–$100,000+ | Cost; professional installation mandatory |
In 2026, the value case for 4K laser projectors is stronger than at any previous point in the category. Models crossing the 3,000-lumen brightness threshold at under $3,500 now achieve ANSI contrast ratios above 2,000:1 and DCI-P3 color gamut coverage above 90% when professionally calibrated — performance metrics that align with commercial cinema reference standards at a fraction of the infrastructure cost. For dedicated dark rooms, a quality 4K laser projector on a 130″ fixed-frame ALR screen at $5,000–$7,000 total investment delivers greater visual immersion than any single flat panel under $20,000, purely by virtue of the scale advantage that projection enables.
How Should You Design a Dolby Atmos Surround Sound System?
Modern home theater audio design centers on Dolby Atmos and DTS:X object-based formats, which replace fixed audio channels with metadata-driven object placement that renders differently depending on your speaker layout. The minimum viable Atmos configuration is 5.1.2: five floor-level speakers, one or more subwoofers, and two overhead or upfiring Atmos modules. This format notation reads as bed channels.LFE channels.height channels — a naming convention worth understanding because it directly maps to wiring infrastructure requirements.
Dolby’s preferred layout for dedicated rooms is 7.2.4: front left, center, front right, wide front left, wide front right, surround left, surround right, two subwoofers, and four overhead channels (front height left and right, rear height left and right). Front left and right speakers should be positioned 22–30 degrees off the center axis at ear height. The center channel must be vertically within 2 feet of the screen plane to maintain dialogue-to-image coherence — a misalignment that places the center speaker voice noticeably above or below the on-screen actors’ mouths destroys the perceptual anchoring that object-based audio is designed to produce.
Subwoofer deployment follows a counterintuitive principle. A single subwoofer in a room corner drives room modes most strongly — impressive in a showroom but uneven across multiple seating positions. Deploying two to four subwoofers in a symmetric array (front-back pair or corner-opposite-corner configuration) applies controlled modal excitation that can significantly reduce seat-to-seat bass variation compared to a single-sub arrangement in the same room. For a four-seat theater, this difference means every listener hears the same calibrated bass response — not just the person occupying the acoustic sweet spot.
What Seating and Layout Principles Apply to Home Theater Projects?
Optimal seating distance from the screen follows the THX viewing angle guideline of 36–50 degrees of horizontal field of view for full visual immersion. For a 120″ diagonal 16:9 screen — approximately 105 inches wide — this translates to a primary seating distance of 8–11 feet. Sitting within this range produces the visual envelopment that defines the cinema experience. Sitting beyond 13 feet for a 120″ screen reduces the image to something that resembles a large television rather than a cinematic projection, regardless of how well every other subsystem performs.
Tiered seating for two-row rooms requires a platform height of 8–12 inches to provide unobstructed sightlines from the second row over first-row headrests. The platform footprint must accommodate full recliner extension — typically 60–72 inches front-to-back per row — plus 18 inches of circulation clearance between the platform edge and the first row’s backrest. Surround speaker placement relative to tiered seating matters: the surround left and right channels should remain at ear height for the primary listening row. In tiered rooms, this typically means mounting surrounds at a height approximately level with second-row ear height, which places them slightly above the first row — an acceptable compromise within the Dolby-specified 90–110 degree horizontal angle range.
How Do You Wire and Integrate a Smart Home Theater System?
Infrastructure planning carries the highest cost asymmetry of any home theater project phase. Running conduit and cable during rough-in costs $200–$400 in materials and a few hours of labor. Retrofitting the same routes through finished walls costs $500–$1,500 per circuit and involves significant structural disruption. The decision to future-proof cable infrastructure during construction is one of the clearest examples of preventive investment in any renovation project — it pays forward to every equipment upgrade over the life of the room.
Minimum cable specification for a performance-tier home theater includes: HDMI 2.1 (48 Gbps) certified cable or active fiber HDMI for source-to-display runs exceeding 20 feet; 12-AWG in-wall rated speaker wire for front channels (front left, center, front right) and 14-AWG for surround and overhead channels; CAT6A to each equipment location for IP control, network streaming, and future AV-over-IP integration; a dedicated 20-amp circuit for the AV equipment rack; and a separate 15-amp circuit for the display. Equipment racks require active forced-air ventilation: AV receivers generate 150–400 watts of heat at moderate listening levels, and thermal throttling from an inadequately ventilated enclosed rack is a documented cause of receiver performance degradation and premature component failure.
Every project that cuts corners on conduit pays twice — once at install and once when adding an HDMI 2.1 run for a new source later. The conduit conversation takes five minutes during rough-in. The retrofit conversation takes five weeks.
Smart control integration via platforms such as Control4, Savant, Crestron, or open-source Home Assistant enables scene-based automation: a single “Movie Mode” command dims lighting to 5%, drops a motorized screen, powers on the projector with its warm-up sequence, switches the AV receiver to the correct input, and launches the media server. Discrete IP and IR control commands are available for virtually all AV components and are a reliable control path even without a full home automation system — making basic scene automation achievable for a few hundred dollars in hardware and a weekend of configuration time.
What Are the Most Common Home Theater Project Mistakes to Avoid?
- Skipping acoustic treatment entirely: Bare parallel walls create flutter echo and severe room mode problems that no equalizer or DSP can fully correct. Physical treatment is not optional at the performance tier — it is the precondition that makes every other investment meaningful.
- Undersizing subwoofer displacement for room volume: A single 10-inch subwoofer cannot pressurize a room exceeding 1,500 cubic feet at reference levels. A practical minimum estimate: divide room volume in cubic feet by 150 to get minimum combined subwoofer displacement in cubic inches. A 2,000 ft³ room needs approximately 13 cubic inches — roughly two 12-inch drivers or one large 18-inch driver.
- Using passive copper HDMI cable for long runs: Standard passive HDMI beyond 15 feet at 4K/120Hz is unreliable. Active fiber HDMI or certified AOC (active optical cable) HDMI 2.1 is required for runs exceeding this length — a specification issue that causes intermittent signal loss and blank screens that are difficult to diagnose after walls are closed.
- Placing the center channel above the screen: Center channel placement above the screen creates a vertical mismatch between dialogue and on-screen faces. The center must be positioned below the screen, or the screen wall must use acoustically transparent fabric to allow true behind-screen center placement at actual screen midpoint height.
- Neglecting dedicated power and conditioning: Consumer AV equipment is sensitive to AC line noise and transient voltage spikes. A quality isolation transformer or reference-grade power conditioner reduces system noise floor and protects components against surge damage — particularly important for projectors, which can sustain lamp or laser module damage from unprotected voltage transients.
- Failing to verify projector throw distance before mounting: Installing a projector at the wrong distance for its lens ratio produces an image that cannot fill the screen or overflows the frame boundary. Verify all throw distance calculations against the specific projector’s published specification table before any ceiling mount hardware is installed and walls are finished.
DIY or Professional? Choosing a Home Theater Installation Approach in 2026
The DIY versus professional installation question in home theater is not binary. The most successful mid-range and performance-tier projects use a structured hybrid model: the owner handles equipment research, purchasing, rack assembly, and straightforward cable terminations; professional installers handle structured wiring rough-in, acoustic treatment installation, display mounting, and final calibration. This division captures the cost savings available in DIY for repetitive tasks while applying professional expertise where measurement equipment and trained judgment produce results that are difficult to replicate without formal training and calibrated instrumentation.
ISF-certified display calibration — targeting grayscale accuracy, color gamut, and gamma tracking — is designed to bring Delta-E color error to under 2, below the established perceptibility threshold. HAA-certified room measurement and calibration, using professional-grade microphones and Dirac Live or equivalent software, can significantly reduce seat-to-seat bass variation across the room. Both services typically cost $400–$900 combined and represent the single highest return-on-investment expenditure available after acoustic treatment materials.
Example Scenario: A Basement Home Theater Project
The following illustrates how the planning principles in this guide apply to a complete basement conversion with an approximately $22,000 all-in budget. This scenario is illustrative. The room measures 18 feet by 12 feet by 8.5 feet — approximately 1,836 cubic feet. The build uses a hybrid approach: the owner handles equipment procurement, rack assembly, and surface painting; a CEDIA-certified installer handles all cable rough-in and display mounting; and a HAA-certified calibrator performs acoustic measurement and full-band DSP tuning.
Display: 4K laser projector (3,200 lumens ANSI) + 130″ fixed-frame ALR screen (1.0 gain, 160° viewing cone)
Audio: 7.2.4 Dolby Atmos — dual front towers, center, four surround speakers, four in-ceiling Atmos speakers, dual 18″ sealed subwoofers
Acoustic Treatment: 2″ broadband absorption panels at all side-wall and ceiling first-reflection points; 12″ floor-to-ceiling bass traps in all four corners; rear-wall diffuser array
Control: Home Assistant with IP and discrete IR device control; single-command “Movie Mode” scene automation
Calibration: ISF grayscale and color gamut display calibration + Dirac Live full-band correction across five seating positions
What Home Theater Trends Will Define 2026 and 2027?
- AI-assisted room calibration: Next-generation room correction systems use machine learning to model acoustic behavior from fewer measurement points and adapt correction filters to real-time occupancy changes. Multiple AV receivers announced for late 2026 incorporate on-board ML inference for continuous acoustic adaptation between listening sessions, reducing the need for periodic manual re-calibration after furniture changes.
- 8K infrastructure readiness: While 8K content delivery remains limited in 2026, HDMI 2.1 (48 Gbps) is the correct wiring standard for any performance or reference build started this year. Cable and conduit decisions are made once; the display is upgraded when 8K content production scales. Installing anything less than HDMI 2.1 today guarantees a wall disruption within three to five years.
- Multi-format immersive audio: Auro-3D is gaining traction alongside Dolby Atmos and DTS:X, particularly in European markets. Current AV receivers from major manufacturers support all three formats simultaneously. Speaker layouts designed to satisfy ceiling-channel angle requirements for all three formats — Atmos: 30–55° elevation; Auro-3D: 30° elevation with optional Voice of God overhead channel — are achievable with careful ceiling speaker positioning during the rough-in phase.
- Hybrid room solutions at scale: Motorized acoustic panels, retractable screens integrated into standard ceiling coves, and zero-trim in-wall speakers are enabling home theater performance in multipurpose spaces with no visible hardware when not in use. Product options for this segment continue to broaden into 2027.
- AV-over-IP for residential builds: Network-attached audio and video distribution — Dante audio over IP, HDMI over IP — is migrating from commercial AV installations into high-end residential home theater projects, enabling multi-zone 4K video and lossless audio distribution without discrete cable runs to each zone from a central rack.
Step-by-Step Planning Guide: Executing Your Home Theater Project
- Define use case, room, and budget tier. Determine dedicated versus multipurpose use, primary viewing distance, and all-in budget. Starting allocation: 40% display, 35% audio, 15% infrastructure, 10% acoustic treatment.
- Measure the room and model acoustic problems. Use a laser measure to obtain precise room dimensions. Enter them into a room mode calculator to identify resonant frequencies. This step determines bass trap placement and required depth before any treatment purchase.
- Plan the speaker layout against format specifications. Overlay speaker positions on a scaled room drawing. Verify all surround and overhead angles meet Dolby and DTS angle requirements. Confirm ceiling joist locations support in-ceiling speaker installation at the required positions.
- Rough-in all cable infrastructure before walls close. Pull HDMI 2.1, 12-AWG speaker wire, CAT6A, and conduit for future-use runs simultaneously. Label every cable at both ends before drywall is installed.
- Install acoustic treatment before equipment. Corner bass traps first (highest impact per dollar), followed by first-reflection side-wall and ceiling absorption, then rear-wall diffusion. Target 25–30% of total wall and ceiling surface area treated.
- Mount and align the display. For projectors: verify throw distance against the projector’s published ratio table and confirm lens shift coverage before drilling any ceiling mount hardware. For flat panels: verify VESA mount weight rating and install structural blocking in the wall stud bay at mount height.
- Install and connect the audio system. Route speaker cables through walls, terminate at wall plates, connect to receiver. Verify polarity at every driver terminal before any acoustic measurement or calibration session begins.
- Perform room measurement and DSP calibration. Measure room response using REW or the AV receiver’s built-in calibration microphone system. Apply correction filters. For reference-grade results, engage a professional HAA-certified calibrator with full-band Dirac Live capability.
- Configure the control system. Program all inputs, scenes, and automation triggers. Test every device for reliable discrete control before declaring the integration phase complete.
- Document the full system. Record all settings, cable labels, equipment serial numbers, calibration data, and filter backups. This documentation is the single most valuable asset for any future service call, equipment upgrade, or ownership transfer.
Frequently Asked Questions About Home Theater Projects
How long does a typical home theater project take to complete?
A dedicated home theater project — from rough-in to a calibrated, fully operational system — typically takes 4–12 weeks depending on scope. Infrastructure rough-in takes 1–2 days. Acoustic panel fabrication and installation takes 1–3 days. Equipment installation and wiring takes 2–5 days. Calibration is a half-day to full-day session. The most variable factor is product lead time for custom fixed-frame screens and acoustic panels, which can run 3–6 weeks from order to delivery in 2026.
Can you build a high-quality home theater in a room with windows?
Yes, with the right display technology and window treatment strategy. Rooms with significant window exposure require either a high-brightness flat panel — QLED at 1,500+ nits peak or MicroLED — or motorized blackout shades that reduce incident light to under 0.1 foot-candles before a projector is usable. Windows on the projection wall are the most problematic; windows on side walls are manageable with motorized treatments. Ambient-light-rejecting (ALR) screens with angular rejection properties can recover usable projector contrast in moderately lit rooms, but complete blackout always produces superior projector image performance.
What is the minimum room size for a practical home theater project?
A functional dedicated home theater can be built in a room as small as 10′ × 12′. However, 12′ × 16′ or larger is strongly preferred: it provides adequate throw distance for a 100″+ screen, sufficient depth for proper first-reflection treatment panel placement, and comfortable spacing for tiered seating rows. Rooms under 1,200 cubic feet have densely packed room modes that generate severe, overlapping bass problems with limited physical treatment solutions. For very small spaces, a media room approach — large flat panel, 5.1 or soundbar audio, no treatment — produces better practical results than attempting a full cinema build in an undersized volume.
Is a 4K projector better than a large flat panel for a home theater?
In a dark, light-controlled room, a 4K laser projector on a 120″–150″ screen delivers greater visual immersion than any comparably priced flat panel, because screen scale is the primary driver of cinematic experience and projectors scale to sizes no flat panel can match under $20,000. In rooms with ambient light, projector contrast degrades rapidly while QLED and OLED panels maintain full performance. The correct answer is always determined by your room’s light control capability — not by the display technology evaluated in isolation.
Do I need a separate power amplifier, or is an AV receiver sufficient?
For entry through mid-range builds, a quality AV receiver provides sufficient amplification for most speaker loads. For performance and reference builds using large floor-standing speakers with nominal impedance dips below 4 ohms, or rooms requiring sustained output above 105 dB SPL, external power amplifiers are recommended. Using the AV receiver purely as a preamp/processor paired with dedicated multi-channel power amplifiers provides the dynamic headroom and sustained thermal stability that built-in receiver amplifier stages cannot maintain over extended high-level listening without audible compression or thermal protection events.
How much does adding Dolby Atmos cost in a home theater project?
Upgrading from a 5.1 or 7.1 system to a full 7.2.4 Dolby Atmos configuration adds approximately $400–$1,200 in ceiling speaker and cable costs, plus $100–$300 for an Atmos-capable receiver over an equivalent non-Atmos model. This incremental investment delivers genuine three-dimensional overhead height cues that fundamentally change the subjective experience of atmospheric and effects audio in film soundtracks. It is widely considered one of the highest value-per-dollar improvements available in modern home theater design — particularly in rooms with ceiling heights above 8.5 feet that allow overhead speaker placement at the correct 30–55 degree elevation angle.
Conclusion: Executing Your Home Theater Project in 2026
A successful home theater project in 2026 is defined not by the most expensive components, but by how well five subsystems integrate within a room that has been prepared to let them perform. The gap between a mediocre result and a reference-quality experience is found most often in the acoustic treatment phase and the calibration phase — not in the hardware selection phase. Rooms treated and calibrated with modest equipment regularly outperform untreated rooms with significantly more expensive hardware. This is not an abstraction; it is a measurable, reproducible outcome supported by the technical literature on room acoustics.
Build sequence matters as much as specification. Infrastructure comes first, before walls close. Acoustic treatment comes before equipment installation. Room measurement and DSP calibration come before any critical listening evaluation is made. Each step executed in the correct sequence reduces the cost and complexity of every subsequent step. Each step skipped creates a correction cost that compounds — and is almost always more expensive than doing it correctly the first time.
Weeks 1–2: Room planning, acoustic mode modeling, cable route design, equipment specification and procurement
Weeks 3–4: Infrastructure rough-in — pull all cables, install conduit, dedicate electrical circuits
Weeks 5–6: Acoustic treatment fabrication and installation — corner traps, first-reflection panels, rear-wall diffusers
Week 7: Equipment installation — display mounting, speaker placement and termination, rack wiring and source configuration
Week 8: System calibration, scene programming and control configuration, full system documentation and listening evaluation
Hometheaterinfoline.com publishes detailed technical guides, real-world builder case studies, and component evaluations to support every phase of your home theater project. Whether you are planning your first dedicated media room or specifying a reference-grade cinema, the technical principles in this guide apply at every budget tier and room size. Start with the room. Treat the acoustics before any other purchase. Calibrate before you judge the result. Document everything.
Related guides: How to Set Up a Home Theater in 2026: The Complete Technical Guide · How to Set Up a Home Theater System in 2026: The Complete Technical Guide