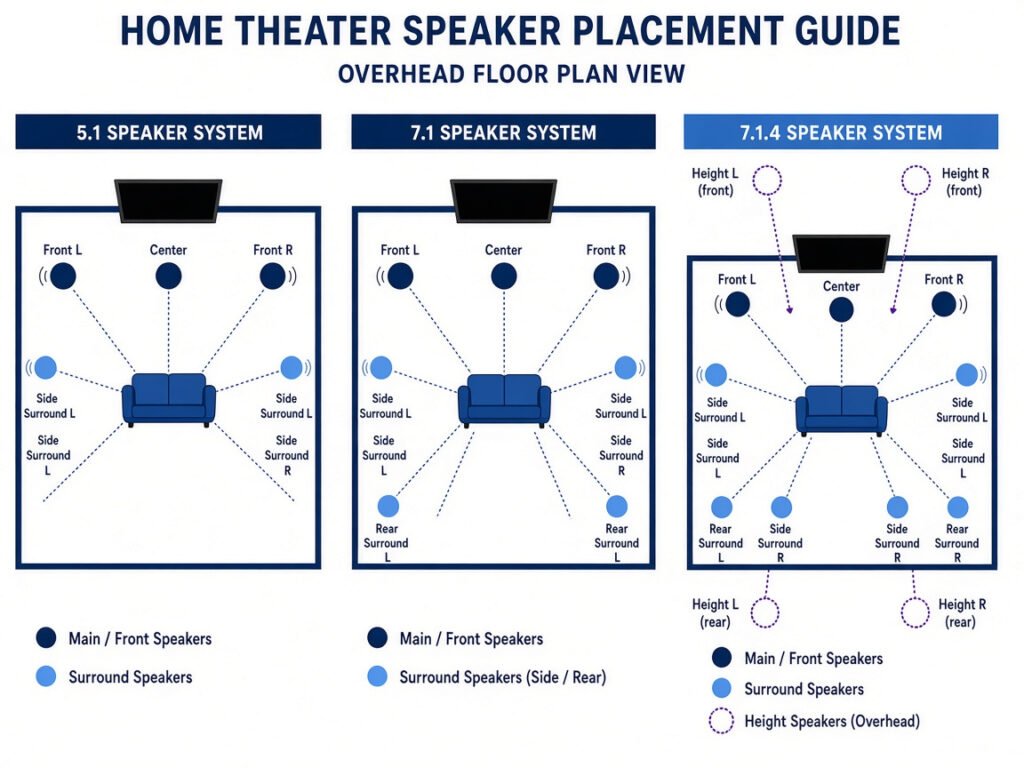
Home theater speaker configurations define the number, role, and position of every audio channel in a system. The compact X.Y.Z notation — where X counts main speakers, Y counts subwoofer channels, and Z counts overhead drivers — governs receiver selection, wiring, and acoustic treatment strategy before you purchase a single speaker for your home theater. Selecting the correct configuration at the outset prevents the most expensive and disruptive build errors: an underpowered receiver, cable runs that cannot support the final channel count, and speaker positions that the room geometry simply cannot accommodate.
- The X.Y.Z notation counts main speakers (X), subwoofer channels (Y), and overhead drivers (Z) respectively — a 7.1.4 layout has seven main speakers, one subwoofer channel, and four height-channel drivers across twelve physical drivers total
- 5.1 is the most broadly supported surround configuration and the baseline for virtually all commercial surround mixes; Dolby lists 5.1.2 as the minimum for Atmos processing and 7.1.4 as the recommended reference home layout
- Room dimensions, ceiling height, receiver channel count, and wiring access determine physical feasibility — a correctly matched configuration consistently outperforms a larger one forced into the wrong space
- Adding a second subwoofer (.1 → .2) often delivers more audible improvement than adding additional main speakers at the same budget increment, particularly in rooms with uneven bass response across seating positions
What Does the X.Y.Z Notation Mean in Home Theater Speaker Configurations?
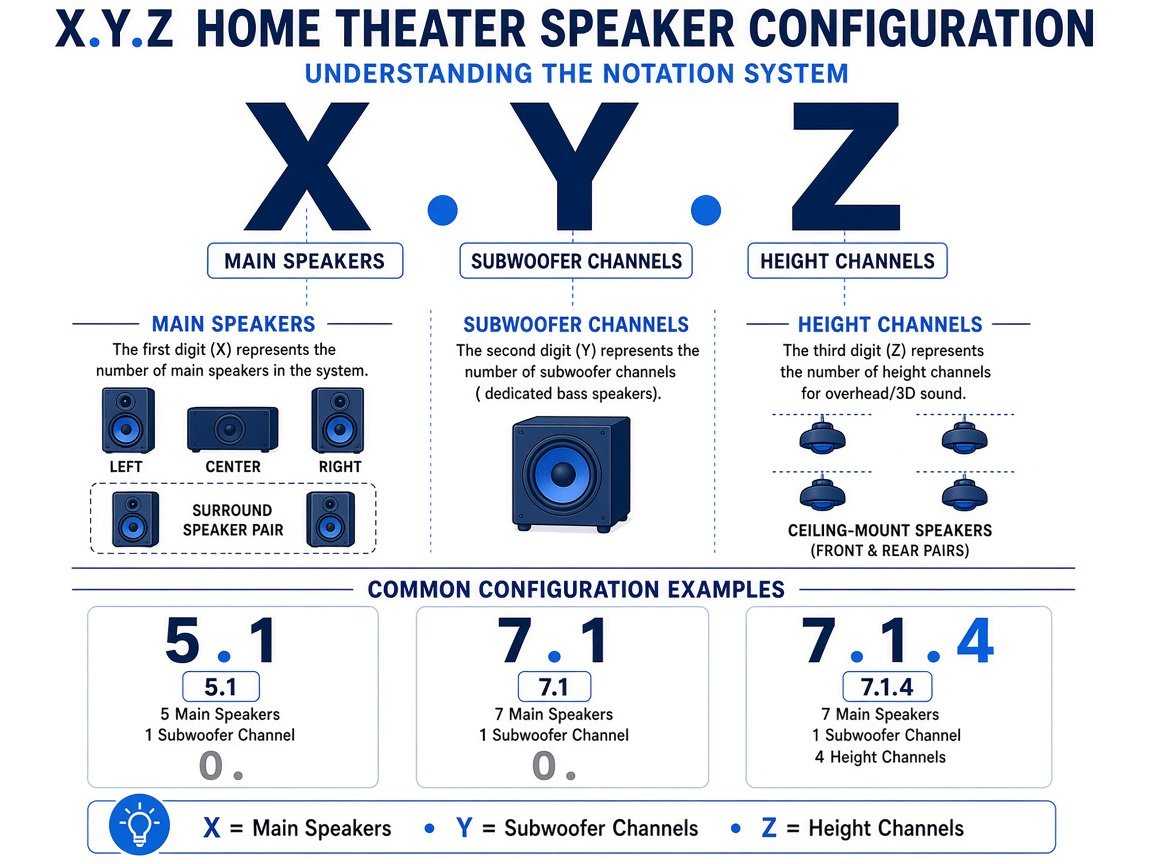
The three numbers in any speaker configuration label each represent a distinct category of audio channel. The first digit — X — counts the main full-range speakers in the system: the front left, front right, center, and any surround or rear-surround positions. The second digit — Y — indicates how many dedicated low-frequency effects (LFE) subwoofer channels are active. A single subwoofer is .1; two independently driven subwoofers are .2. The third digit — Z — appears only in configurations designed for object-based audio and counts the overhead or height-channel speakers used by formats like Dolby Atmos, DTS:X, and Auro-3D.
A system labeled 7.1.4 therefore has seven main speakers, one subwoofer channel, and four height-channel drivers — twelve physical drivers in total. This notation is industry-standard across Dolby, DTS, Sony, Yamaha, Denon, and every major AV equipment manufacturer. It applies equally to source content and hardware: a Blu-ray disc encoded in Dolby Atmos 7.1.4 describes the channel bed the mix was designed for, and a receiver marketed as “11.4-channel” is designed to output eleven main channels and four subwoofer outputs simultaneously. Understanding what each digit means makes it possible to match source content, receiver capability, and physical speaker layout with precision before purchasing any equipment.
What Speaker Configurations Are Available and How Do They Compare?
Home theater speaker configurations range from a basic stereo pair to elaborate installations exceeding fifteen channels. The practical range for most home environments runs from 2.1 through 9.1.6, with each step adding channel separation, spatial resolution, or bass extension at the cost of additional hardware, wiring complexity, and acoustic demands. The table below maps the most common configurations to their speaker counts, amplifier channel requirements, and typical use cases.
| Configuration | Main Speakers | Subwoofers | Height Channels | Total Drivers | Min. Amp Channels | Typical Use |
|---|---|---|---|---|---|---|
| 2.0 | 2 | 0 | 0 | 2 | 2 | Stereo music / compact rooms |
| 2.1 | 2 | 1 | 0 | 3 | 2 | Music and casual movie viewing |
| 3.1 | 3 | 1 | 0 | 4 | 4 | Dialogue clarity without full surround |
| 5.1 | 5 | 1 | 0 | 6 | 6 | Standard home surround |
| 5.2 | 5 | 2 | 0 | 7 | 6 | 5.1 with improved bass coverage |
| 7.1 | 7 | 1 | 0 | 8 | 8 | Dedicated rooms with adequate depth |
| 5.1.2 | 5 | 1 | 2 | 8 | 7 | Entry-level Atmos |
| 5.1.4 | 5 | 1 | 4 | 10 | 9 | Atmos in mid-size rooms |
| 7.1.2 | 7 | 1 | 2 | 10 | 9 | 7.1 with overhead layer added |
| 7.1.4 | 7 | 1 | 4 | 12 | 11 | Dolby reference home layout |
| 9.1.6 | 9 | 1 | 6 | 16 | 15 | Large dedicated theaters |
It is worth noting that adding a second subwoofer — moving from .1 to .2 — often improves the listening experience more perceptibly than adding additional main speakers at the same budget increment. In rooms where standing-wave nodes create uneven bass response across multiple seating positions, two subwoofers placed at different locations break up those nodes and produce more consistent low-frequency energy across the listening area. A 5.2 system is frequently a stronger intermediate step than a 7.1 system in a budget-constrained build, particularly in rooms where geometry does not support effective rear-surround placement.
What Does a 5.1 Configuration Actually Deliver in Practice?
A 5.1 system positions five full-range speakers around the listening area — front left, center, front right, left surround, and right surround — plus a dedicated subwoofer handling the LFE channel. The center channel is the single most critical element in a cinema mix. It carries on-screen dialogue, anchors the front soundstage to the picture, and keeps speech locked to the display regardless of where the listener is seated. Without a center channel, dialogue reverts to phantom imaging between the left and right fronts — an effect that works acceptably on-axis but collapses for anyone seated off-center.
The two surround speakers in a 5.1 layout are typically positioned to the sides of the listening area at approximately 90 to 110 degrees from the front, as defined in the ITU-R BS.775 multichannel audio standard. The .1 LFE channel carries frequencies below the crossover point — defined at 120 Hz in both the Dolby and DTS specifications — and feeds exclusively to the subwoofer. The subwoofer’s output quality and room placement carry disproportionately large influence over perceived audio performance relative to their cost share in the overall system. Careful bass speaker selection for a home theater build deserves careful attention before the rest of the system budget is allocated.
When Does a 7.1 Configuration Outperform 5.1 — and When Does It Not?
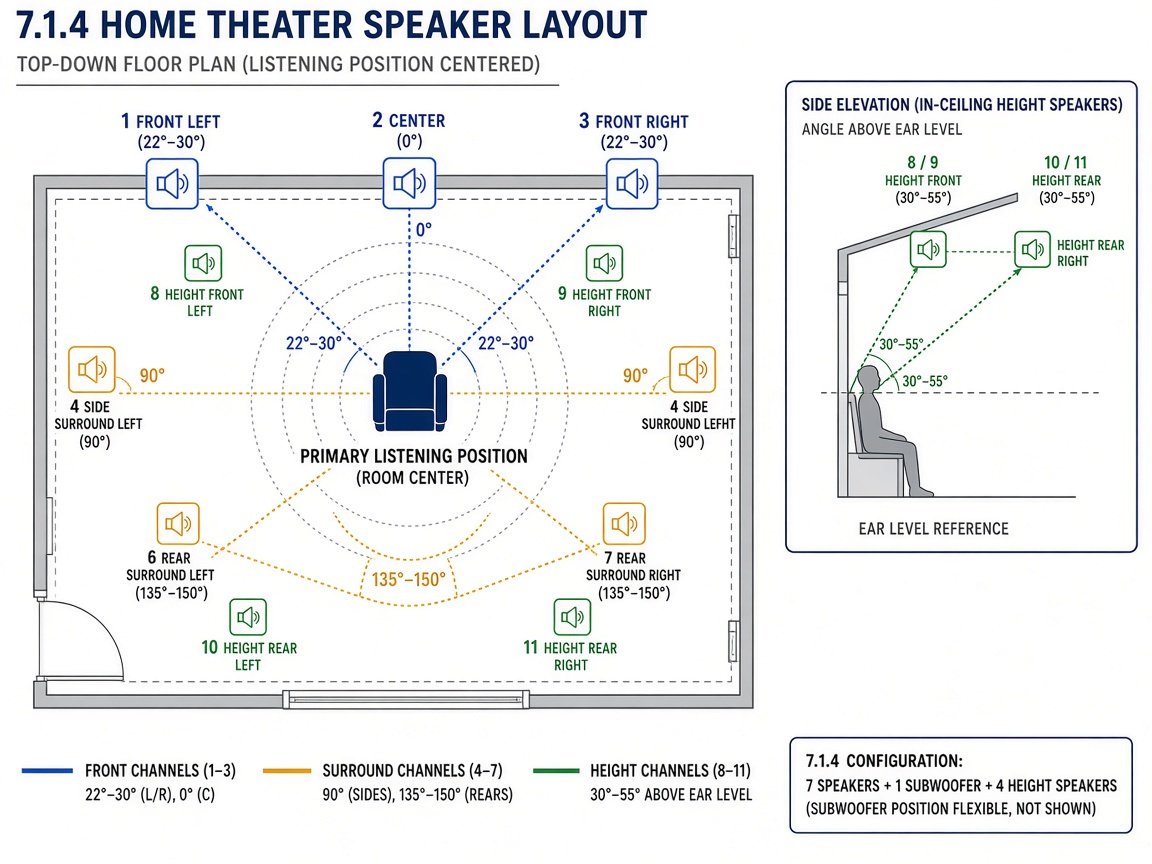
A 7.1 system adds two rear surround channels — left back and right back — positioned behind the listening position at approximately 135 to 150 degrees, supplementing the two side surrounds already present in a 5.1 layout. In a 5.1 system, the side surrounds at 90 to 110 degrees cover the full lateral and rear arc. In a 7.1 system, the side surrounds are refined to approximately 90 degrees, while the rear speakers take responsibility for the arc from 135 to 150 degrees behind the listener — positioning values specified in Dolby’s speaker placement documentation for home theaters.
This narrower arc of responsibility for each surround speaker improves the precision of sound effects that pan across the rear field — a vehicle passing directly behind the listening position, an ambience layer that shifts gradually from side to rear. The upgrade from 5.1 to 7.1 is most audible in rooms with enough depth to place rear surround speakers at a meaningful distance from the main seating. When the rear wall sits less than approximately two metres from the primary listening position, the rear and side surround speakers end up too close together to contribute as meaningfully separate channels, and a well-calibrated 5.1 layout will often outperform a forced 7.1 installation in that geometry.
What Does the Third Number Add in a Speaker Configuration and Why Does It Matter?
The Z figure in an X.Y.Z configuration represents the overhead or height-channel layer introduced by object-based audio formats. Rather than assigning audio to fixed speaker channels, Dolby Atmos, DTS:X, and Auro-3D encode audio objects with three-dimensional positional metadata. The decoder renders those objects to whatever speaker channels are available in the playback system, with the height layer providing the vertical axis of the sound field. A helicopter passing overhead, rainfall from above, or a score that expands from screen height to ceiling level — these effects require a Z greater than zero to be reproduced spatially rather than collapsed into the horizontal plane.
Dolby Atmos height speakers are positioned either physically in the ceiling above the listening area or as upward-firing modules placed on top of existing speakers — the latter type uses ceiling reflections to simulate an overhead source. Dolby’s published home theater placement guidelines recommend positioning height speakers at an elevation between approximately 30 and 55 degrees above ear level. The minimum Atmos configuration is 5.1.2, with two height speakers positioned in front of the listening area. The reference recommendation is 7.1.4, with four height speakers — two front height and two rear height — creating a full overhead audio envelope. Understanding the full range of Dolby Atmos speaker types and their placement tradeoffs is essential before committing to a configuration that depends on the height layer for its three-dimensional effect.
How Do 5.1.2, 5.1.4, 7.1.2, and 7.1.4 Compare in Practice?
The four main Atmos-capable home layouts represent different levels of overhead spatial resolution and differ in their room, receiver, and wiring requirements. Each has a distinct set of strengths and practical constraints that make it better suited to certain room sizes and build priorities.
5.1.2 provides a minimal overhead layer using two height speakers positioned above the front listening area. It is the entry-level Atmos configuration, requiring a seven-channel receiver, and is viable in rooms where ceiling height reaches at least 2.4 metres. The overhead layer conveys vertical information but lacks rear-height coverage, so sounds panning from front overhead to rear overhead lose resolution as they cross behind the listening position.
5.1.4 adds two rear height speakers, completing the overhead audio envelope across both front and rear arcs. It delivers noticeably more convincing three-dimensional immersion than 5.1.2 and suits mid-size rooms well. It requires nine amplifier channels and adequate ceiling-mount positions at both the front and rear of the listening area.
7.1.2 retains the full 7.1 horizontal surround layer but provides only two height channels. It is appropriate for rooms where horizontal surround precision is the primary priority and only a moderate overhead presence is needed — for example, an elongated room where rear-surround separation is strong but ceiling-mount positions are limited to the front half.
7.1.4 is Dolby’s published reference recommendation for home theaters: seven main channels, one subwoofer, and four height drivers requiring at least eleven amplifier channels. In a correctly sized and proportioned room, it is the configuration most capable of reproducing the full spatial resolution of a Dolby Atmos master. The room must support both adequate rear-surround depth and effective overhead placement — if either condition is unmet, 5.1.4 is the stronger practical choice.
How Do Room Dimensions Constrain Your Speaker Configuration Options?
Room dimensions are the single most important physical constraint on speaker configuration selection. A layout designed for a large space can produce congested, phasey audio in a compact room because speaker-to-listener distances are unequal and reflected sound arrives too quickly after the direct signal to integrate correctly. No amount of receiver processing or EQ correction fully compensates for physically impossible speaker geometry.
As a practical framework based on published manufacturer and acoustic placement guidance: rooms up to approximately 150 to 200 square feet typically perform best with 2.1 or 5.1, where shorter listening distances allow precise placement without crowding. Rooms in the 200 to 400 square foot range suit 5.1 or 5.1.2 well, with height channels becoming practical when ceiling height reaches at least 2.4 metres. Larger dedicated spaces above 400 square feet can support 7.1 and 7.1.4 without the rear-surround placement constraints that affect smaller rooms. Home theater strategies for small rooms involve different priorities than simply scaling a large-room configuration down — correct geometry for the actual space almost always outperforms maximising channel count in a room that cannot accommodate the required angles.
Ceiling height is a hard constraint for overhead configurations. Dolby’s published guidelines cite a minimum ceiling height of approximately 2.4 metres for effective Atmos height-channel performance, with 2.7 metres or above recommended for optimal speaker elevation angles. Rooms with lower ceilings will not produce sufficient separation between ear-level and overhead audio to justify the additional channel count and cost of a Z configuration.
Consider a dedicated room measuring 4.5 metres wide by 7 metres long with a 2.7-metre flat ceiling. The geometry provides enough lateral wall distance for side surrounds at a correct 90-degree angle, adequate depth for rear surrounds at 135 to 150 degrees with meaningful separation from the main seating row, and ceiling height within the range Dolby specifies as effective for overhead speaker placement. A 7.1.4 layout is feasible here. The same configuration applied to a 3.5 by 4.5-metre room would crowd the rear surround speakers within roughly one metre of the listening position and potentially position all four height drivers too close together to form a convincing overhead envelope. For that room, a 5.1.4 layout with correctly spaced in-ceiling height speakers would be the stronger choice — fewer channels, better geometry, more convincing result.
What Are the Receiver Channel Requirements for Each Configuration?
Every speaker in a home theater system requires its own amplifier channel from the AV receiver — with the exception of the subwoofer, which uses a line-level pre-out to feed a powered subwoofer’s built-in amplifier. A 5.1 system requires a six-channel receiver; a 7.1 layout requires eight; and a 7.1.4 layout requires at least eleven independent amplifier channels. The .2 subwoofer designation is handled through two line-level pre-out outputs rather than amplifier binding-post channels.
Many receivers allow height-channel amplification to be sourced from repurposed surround-back amplifier outputs — a technique explicitly documented in Dolby’s home Atmos receiver implementation guidelines — which means a nine-channel receiver can often drive a 7.1.2 layout without requiring an external amplifier. This matters for staged upgrades: a buyer starting with a 5.1 or 7.1 receiver can frequently activate height channels later by reassigning existing amplifier outputs to height positions. Selecting an AV receiver with the right channel architecture and pre-out configuration is therefore a critical early decision that determines the upgrade path for years.
How Do You Install and Position Speakers in a Multi-Channel Layout?
Installing a home theater speaker system follows a defined sequence of placement, wiring, and calibration steps. The order matters: locking in speaker positions before running cable prevents the most common and expensive mistakes in both DIY and contractor-led builds.
- Establish the primary listening position first. All speaker placement angles are measured from this point. Mark it on the floor before placing any speaker or running any cable.
- Place the front three speakers. The center speaker goes directly below or above the display, on-axis with the listening position. Left and right fronts are positioned at approximately 22 to 30 degrees from center, equidistant from the display. Tweeters should be at ear level when seated.
- Position the surround speakers. In a 5.1 layout, place side surrounds at 90 to 110 degrees from the front per ITU-R BS.775. In a 7.1 layout, place side surrounds at 90 degrees and rear surrounds at 135 to 150 degrees behind the listening position.
- Mark height-channel positions if applicable. Front height speakers should be positioned at 30 to 55 degrees elevation above ear level, in front of the listening position at roughly the same horizontal angle as the front main speakers. Rear height speakers mirror this geometry behind the listening position.
- Calculate cable runs before installation. Measure the distance from each speaker position to the receiver location and add 20% for routing around walls, floors, and furniture. Label each cable by channel before it is run.
- Run and terminate all speaker cables. Connect each cable to the correct receiver binding post, matching polarity (positive to positive, negative to negative) on every channel. Reversed polarity on even a single speaker degrades stereo imaging and surround localization across the entire system.
- Connect the subwoofer via the LFE pre-out. Use a single-ended RCA cable from the receiver’s subwoofer pre-out to the subwoofer’s LFE or line-level input. For a .2 configuration, run individual cables from the receiver’s two subwoofer pre-outs to each powered subwoofer independently.
- Run room correction calibration. Use the receiver’s built-in calibration system — Audyssey, MCACC, YPAO, or Dirac, depending on the brand — with the supplied microphone placed at the primary listening position. The calibration process sets speaker distances, channel levels, and crossover frequencies automatically.
- Verify crossover and bass management settings manually. Confirm the LFE crossover is set appropriately for your main speakers’ low-frequency extension: 80 Hz for bookshelf speakers, 60 to 80 Hz for floorstanding speakers with bass extension below 50 Hz. Automatic calibration systems do not always set crossovers optimally for every speaker combination.
- Test each channel individually using the receiver’s channel-check tone. Confirm every speaker produces sound and is correctly identified in the receiver’s speaker configuration menu. Address any wiring errors before sealing cable runs in walls or conduit.
- Room correction microphone: Included with most receivers supporting Audyssey, YPAO, or MCACC; essential for automatic level and distance calibration at the listening position
- SPL meter or calibration app: Useful for verifying channel levels manually using a reference test tone; smartphone-based SPL apps provide a free starting point for initial level checks
- Speaker wire stripper and banana plugs: Clean terminations reduce contact resistance; banana plugs allow quick and reliable connections at both receiver binding posts and speaker terminals
- Laser distance measure: Provides precise speaker-to-listening-position measurements for accurate distance entry in the receiver’s speaker setup menu
- Cable labels: Permanent adhesive labels on each cable end prevent channel assignment errors during termination and simplify future troubleshooting
The complete home theater setup process covers receiver configuration, display calibration, and source device integration in full detail beyond the speaker-placement sequence above.
How Do In-Ceiling Speakers and Upward-Firing Modules Compare for Height Channels?
Height-channel speakers in an Atmos or DTS:X system come in two principal forms: physically in-ceiling drivers mounted in the room’s ceiling structure, and upward-firing modules placed on top of existing floorstanding or bookshelf speakers. The choice between them involves acoustic performance tradeoffs, installation complexity, and room structural constraints that are worth understanding before committing to either approach.
In-ceiling speakers produce a true overhead point source: the driver is physically located above the listening position and sound arrives from above without requiring ceiling-reflection timing. This produces the most direct and reliably positioned height-channel imaging. Installation requires ceiling access for mounting, cutting, and wiring — typically behind a finished ceiling surface — and feasibility depends on ceiling material and what lies above: joists, concrete, insulation, or existing services all affect installation complexity and method.
Upward-firing modules place a driver on top of an existing speaker, angled toward the ceiling. The driver fires upward, reflects off the ceiling, and arrives at the listening position from above. Dolby certifies this approach as a valid Atmos implementation under its published Atmos-Enabled Speaker specification. Performance depends heavily on ceiling material and flatness: a flat, hard, non-absorbent ceiling at the correct height produces the strongest reflection. Heavily textured, angled, or acoustically treated ceilings attenuate and diffuse the reflection, reducing height-channel precision. Upward-firing modules require no ceiling work and are significantly easier to install, but are less reliable in rooms with vaulted, coffered, or absorptive ceiling geometry.
What Configuration Mistakes Most Commonly Degrade Audio Performance?
Errors in speaker configuration planning are among the most expensive to correct after installation, because they typically require re-running cable, repositioning speakers, or replacing a receiver. The following mistakes appear consistently in owner reports and published installer documentation across the home theater community.
- Purchasing a receiver with insufficient channel count for the intended layout. A 7.1 receiver cannot activate height channels without a separate external amplifier, and many receiver models do not cleanly support pre-out-driven external amplification for height channels. Buying to the final layout’s channel requirement from the outset avoids this constraint entirely.
- Placing rear surround speakers too close to the listening position. When the rear wall is less than approximately two metres from the listening row, rear surrounds provide minimal spatial separation from side surrounds and can create localization artifacts. 5.1 often performs better in this geometry than a forced 7.1 layout.
- Ignoring crossover settings after auto-calibration. Automatic room correction systems set crossovers conservatively. In systems with capable subwoofers and smaller satellite speakers, manually adjusting the crossover upward — to 80 Hz or 120 Hz — often produces cleaner integration between the main speakers and the subwoofer than the auto-calibrated value.
- Using upward-firing modules in rooms with angled or treated ceilings. Vaulted ceilings, coffered ceilings, and ceilings covered with acoustic panels all degrade the reflection path that upward-firing modules depend on. In-ceiling speakers are the technically correct choice for these room types.
- Combining speakers with significantly mismatched sensitivity ratings. Pairing speakers with large sensitivity differences — typically expressed in dB/W/m in manufacturer specifications — creates uneven channel balance that automatic level calibration can only partially correct through level trimming.
- Routing all LFE to a single subwoofer in a large room. A single subwoofer in a room above approximately 400 square feet will typically exhibit audible bass unevenness across different seating positions. Dual subwoofers at different placement points distribute bass more evenly across the full listening area.
What Does the Next Stage of Home Theater Configuration Technology Look Like?
The trajectory of home theater speaker configuration over the next 12 to 24 months reflects two parallel developments: continued adoption of object-based audio formats and incremental increases in mainstream receiver channel counts at accessible price points.
Object-based audio formats — Dolby Atmos, DTS:X, and Auro-3D — are now the standard encoding for theatrical releases, streaming platforms, and physical media. The shift away from fixed-channel-bed audio toward metadata-driven object rendering means that a 5.1.4 or 7.1.4 layout will continue to receive full three-dimensional mixes regardless of how many channels a source was originally produced in. The practical ceiling for mainstream home configurations is likely to remain at 7.1.4 or 9.1.6 for large dedicated spaces — Dolby’s published research into psychoacoustic spatial resolution limits documents the diminishing perceptual returns of channel counts beyond this range for typical home listening environments.
At the receiver level, 11.4-channel and 13.4-channel units are becoming accessible at mid-tier price points, making 9.1.2 and 9.1.4 configurations practical without external amplification. Wireless speaker technology for surround and height channels is also maturing: the latency constraints that have historically made wireless surround impractical are decreasing with each hardware generation, and several receiver manufacturers have introduced proprietary wireless surround ecosystems that eliminate the need for cable runs to rear and height positions. This may reduce the installation complexity barrier for multi-channel configurations in existing construction where running new cable through finished walls is difficult or cost-prohibitive.
Frequently Asked Questions About Home Theater Speaker Configurations
What is the minimum speaker configuration for Dolby Atmos?
Dolby lists 5.1.2 as the minimum configuration for Atmos processing in a home theater — five main speakers, one subwoofer, and two height-channel drivers, requiring a seven-channel receiver. While technically the format will decode to a 5.1 layout if no height speakers are present, the three-dimensional overhead layer is entirely absent in that case; the system plays back only the channel-bed portion of the Atmos mix without any spatial height information.
Can I upgrade from 5.1 to 7.1.4 incrementally?
Yes, provided the initial receiver purchase includes enough amplifier channels or pre-out connections to support the final layout. The most practical upgrade path is 5.1 → 5.1.2 → 5.1.4 → 7.1.4, adding height channels first if the room supports them, then rear surrounds. Each stage requires verifying that the receiver’s amplifier count or pre-out configuration can support the added channels without an external amplifier, or budgeting for one at that stage.
Does a 7.1 system always sound better than 5.1?
Not always. In rooms where the rear wall is less than approximately two metres from the listening position, rear surround speakers in a 7.1 layout are too close to the listening area to produce meaningful spatial separation from the side surrounds. A well-calibrated 5.1 system in a room with correct speaker geometry will typically outperform a 7.1 system forced into a room that cannot accommodate the rear-surround placement angles specified by Dolby and ITU-R BS.775. Configuration complexity does not substitute for correct geometry.
What receiver do I need for a 7.1.4 configuration?
A 7.1.4 layout requires at least eleven independent amplifier channels. Some receivers achieve this with an eleven-channel internal amplifier; others provide nine internal channels and require an external stereo power amplifier for the final two height channels, connected via pre-out outputs. Verifying that a receiver offers pre-out connections for all eleven channels — not just internal amplification — is important if you anticipate adding an external amplifier later in the build.
How many subwoofers should a home theater have?
One subwoofer is standard and sufficient for rooms up to approximately 300 to 400 square feet. Two subwoofers, placed at different room positions — such as opposite corners or midpoints of opposing walls — distribute bass more evenly by breaking up the standing-wave nodes that a single subwoofer produces at certain frequencies. In large rooms or rooms with more than one seating row, dual subwoofers produce a meaningfully more consistent listening experience across all seats.
Can I use a 7.1 receiver to run a 5.1 speaker configuration?
Yes. A 7.1 receiver running a 5.1 layout simply leaves the rear surround amplifier channels unused. There is no audio quality penalty for having more receiver channels than speaker channels. The practical benefit is upgrade flexibility: when the room or budget supports adding rear surround speakers later, no receiver replacement is required. Configure the receiver’s speaker setup menu to reflect the actual speaker count and the unused channels remain inactive until they are connected.
What is the difference between a .1 and a .2 subwoofer designation?
A .1 configuration uses one subwoofer pre-out from the receiver, feeding a single powered subwoofer. A .2 configuration uses two independent subwoofer pre-out outputs, each feeding a separate powered subwoofer placed at a different room position. Both carry the same LFE content — the difference is spatial bass distribution, not additional bass information. A .2 label on a receiver means it has two independent subwoofer pre-outs; it does not indicate that additional LFE content is present in the signal.
How Do You Choose the Right Home Theater Speaker Configuration for Your Room and Budget?
Choosing the right home theater speaker configuration is a sequenced decision process, not a single purchase. Working through the following steps in order prevents the most common and expensive build errors — and ensures the final system performs to the full potential of the room geometry and equipment budget.
- Measure the room first. Record the floor area, ceiling height, and the distance from the primary listening position to the front wall, rear wall, and both side walls. These measurements determine which configurations are physically feasible before any other decision is made.
- Apply the ceiling-height test. If ceiling height is below 2.4 metres, overhead Atmos configurations are unlikely to produce sufficient elevation separation. Plan for a 5.1 or 7.1 layout. At 2.4 metres or above with a flat, hard ceiling surface, Atmos-capable configurations become viable.
- Apply the rear-wall distance test. If the primary listening position is less than approximately two metres from the rear wall, omit rear surround speakers and choose a 5.x or 5.x.x configuration. The geometry cannot support 7.1 or 7.1.x effectively in that space.
- Choose a target configuration based on the room, not the marketing. Select the largest configuration the room geometry can support correctly, not the largest channel count available. For most living rooms, 5.1.2 or 5.1.4 is the realistic ceiling. For a dedicated home theater with adequate dimensions, 7.1.4 is the reference target.
- Select a receiver that supports the target configuration natively. Confirm amplifier channel count, pre-out availability, and Atmos or DTS:X decoding capability before purchase. Underpowering the receiver for the target layout is one of the most common upgrade-path constraints in home theater builds.
- Calibrate after installation, then verify crossover settings manually. Run room correction calibration with the supplied microphone at the primary listening position. After calibration completes, verify crossover frequencies manually — automatic systems do not always optimize crossover settings for every speaker combination.
A correctly sized and calibrated layout — even a 5.1 system in a well-matched room — consistently outperforms a larger system forced into a space that cannot accommodate its geometry. The hometheaterinfoline.com editorial team recommends prioritizing room fit and correct speaker geometry over maximising channel count, then upgrading incrementally as room design and budget allow.